1. 1. 1. Basic Printing Workflow > Printing procedure >
Printing Options Using Rolls and Sheets
Printing Options Using Rolls and Sheets
The printer supports both rolls and sheets.
This section introduces the main features of each, as well as the main printing methods available. Select rolls or sheets to suit your particular printing application.
| Note | ||
|
• For information on the types of paper the printer supports, refer to the Paper Reference Guide. (See "Types of Paper (6.1.1).")
• A variety of other ways to print are available besides those introduced here. Choose the printing method that suits your particular printing application, referring to "Working With Various Print Jobs" and "Enhanced Printing Options" from the table of contents.
|
||
| Roll printing |
|
Media in spooled rolls is generally called Roll Media. Rolls are loaded on the Roll Holder, which are in turn loaded in the printer.
Rolls can be used to print large photos or create posters or banners that cannot be printed on regular sheets.
•Large-format printing
Easily print vertical or horizontal banners from familiar applications such as Microsoft Office applications.
(See "Printing Vertical or Horizontal Banners (Large-Format Printing) (2.7.1).")
•Borderless printing
Print without a margin (border) around posters or photos.
(See "Borderless Printing on Paper of Equivalent Size (2.6.1).")
(See "Borderless Printing by Resizing Originals to Fit the Roll Width (2.6.4).")
(See "Borderless Printing at Actual Size (2.5.4).")
•Banner printing
You can print multiple pages as a single continuous image, without margins between pages.
(See "Printing Multiple Pages Continuously (2.8.4).")
•90-degree rotation before printing
Originals in portrait orientation are rotated 90 degrees when possible to use paper more efficiently.
(See "Conserving Roll Paper by Rotating Originals 90 Degrees (2.10.1).")
•Enlarged/reduced printing
You can freely adjust the size of originals by enlarging or reducing originals before printing.
(See "Resizing Originals to Match the Paper Size (2.4.1).")
(See "Resizing Originals to Fit the Roll Width (2.4.4).")
(See "Resizing Originals by Entering a Scaling Value (2.4.7).")
•Free Layout function
Print multiple documents from multiple applications (such as word-processing programs, spreadsheet programs, and so on) next to each other.
(See "Printing Multiple Originals Next to Each Other (2.8.1).")
|
| Sheet printing |
|
Sheets refer to individual sheets of paper.
Load sheets in the Top Paper Feed Slot. However, for heavyweight paper such as POP Board, load the sheet in the Front Paper Feed Slot.
•Enlarged/reduced printing
You can freely adjust the size of originals by enlarging or reducing originals before printing.
(See "Resizing Originals to Match the Paper Size (2.4.1).")
(See "Resizing Originals by Entering a Scaling Value (2.4.7).")
•Free Layout function
Print multiple documents from multiple applications (such as word-processing programs, spreadsheet programs, and so on) next to each other.
(See "Printing Multiple Originals Next to Each Other (2.8.1).")
|
1. 1. 2. Basic Printing Workflow > Printing procedure >
Turning the Printer On and Off
Turning the Printer On and Off
| Turning the printer on | |||
|
| Important | ||
|
• Starting the printer when it is connected via the USB cable to a Macintosh computer that is off may cause the computer to start up at the same time. To prevent this, disconnect the USB cable before starting the printer. Connecting the printer to the computer via a USB hub may solve this issue.
|
||
| Turning the printer off | ||||||||
|

1. 1. 3. Basic Printing Workflow > Printing procedure >
Loading and Printing on Rolls
Loading and Printing on Rolls
These are the basic steps for loading and printing on rolls.
Follow these steps to load and print on rolls.
•If you use the optional Stand, you can store printed documents in the Output Stacker. see "Using the Output Stacker (6.4.2)."
•You also can install and use the printer on a table, etc., instead of using the Stand.
| Important | ||
|
• Keeping a roll in the printer for a long time without printing on it may leave a depression on the leading edge.
When printing quality is most important, we recommend setting TrimEdge Reload to On or Automatic so that the paper edge is automatically cut before printing.
• Before printing banners or other long documents, spread a clean cloth or paper on the floor or use the Output Stacker to prevent the printed surface from becoming dirty from the floor after printing.
|
||
| Note | ||
|
• For details on supported sizes and types of rolls, see Paper Sizes or the Paper Reference Guide. (See "Paper Sizes (6.1.2).") (See "Types of Paper (6.1.1).")
• To wait until the ink dries after printing before cutting the roll, set Drying Time in the printer driver. (See "Specifying the Ink Drying Time for Rolls (6.2.11).")
• Once you have used all the paper on a roll, clean the platen. If the Platen inside the Top Cover becomes dirty, it may soil the underside of paper. (See "Cleaning Inside the Top Cover (11.4.2).")
|
||
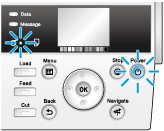
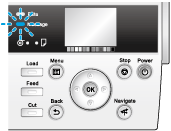
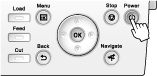
- Turn the printer on. (See "Turning the Printer On and Off (1.1.2).")

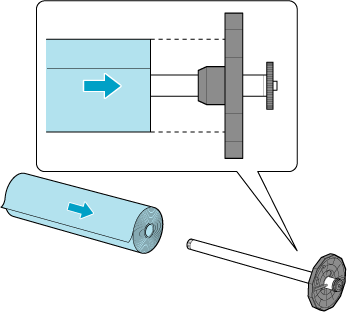
- Load the roll on the Roll Holder. (See "Loading Rolls on the Roll Holder (6.2.1).")
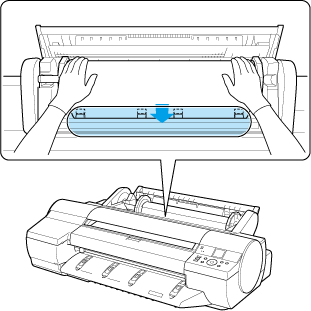
- Load the roll in the printer. (See "Loading Rolls in the Printer (6.2.2).")
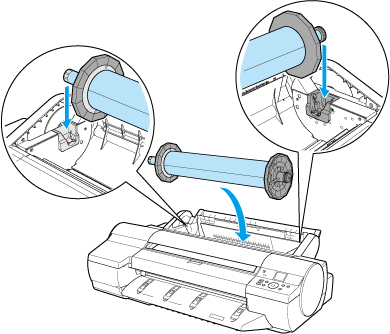

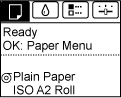
Important • When printing without borders, definitely set the blue Switch on the platen to the ● side. If the switch is set incorrectly, print quality may deteriorate. (See "Setting the Blue Switch on the Platen (12.5.12).") - Select the type of paper. (See "Changing the Type of Paper (6.2.3).")

Note • If no barcode has been printed on the roll and you have set ManageRemainRoll to On, specify the roll length after the type of paper. (See "Specifying the Paper Length (6.2.4).") - Complete settings in the printer driver for the type of paper and other details.
•Specifying Paper in the Printer Driver (Windows) (1.1.7)•Specifying Paper in the Printer Driver (Mac OS X) (1.1.8)
- Send the print job.
The printer now starts printing the print job.
| Important | ||
|
• Do not forcibly pull out paper once a roll has been advanced. This will prevent further feeding. If you accidentally pull out the paper, see "Removing the Roll from the Printer (6.2.5)."
|
||
1. 1. 4. Basic Printing Workflow > Printing procedure >
Loading and Printing on Sheets
Loading and Printing on Sheets
Follow the steps below to load and print on sheets.
| Note | ||
|
• For details on supported types and sizes of paper, see Paper Sizes or the Paper Reference Guide. (See "Paper Sizes (6.1.2).") (See "Types of Paper (6.1.1).")
• Borderless printing is not supported on sheets. For the features and the main printing methods available for sheet printing, see "Printing Options Using Rolls and Sheets (1.1.1)."
|
||
- Turn the printer on. (See "Turning the Printer On and Off (1.1.2).")
- Complete settings in the printer driver for the type of paper and other details.
•Specifying Paper in the Printer Driver (Windows) (1.1.7)•Specifying Paper in the Printer Driver (Mac OS X) (1.1.8)
- Send the print job.
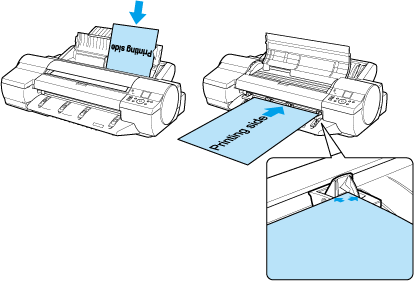
- Load a sheet manually. (See "Loading Sheets in the Feed Slot (6.3.1).")
(Top Paper Feed Slot)(Front Paper Feed Slot)
 The printer now starts printing the print job.
1. 1. 5. Basic Printing Workflow > Printing procedure >
Printing in Windows
Printing in Windows
| Important | ||
|
• We recommend exiting unnecessary applications before printing. Running several applications while printing may interrupt the transfer of print data and affect printing quality.
|
||
- In the source application, select Print from the File menu to display the dialog box for printing conditions.
- After confirming that the printer is selected in the dialog box, click Print or OK to start printing.
Note • The appearance of the dialog box varies depending on the software application. In most cases, the dialog box includes basic printing options and enables you to choose the printer, specify the range of pages, number of copies, and so on.Example: Print dialog box displayed by the application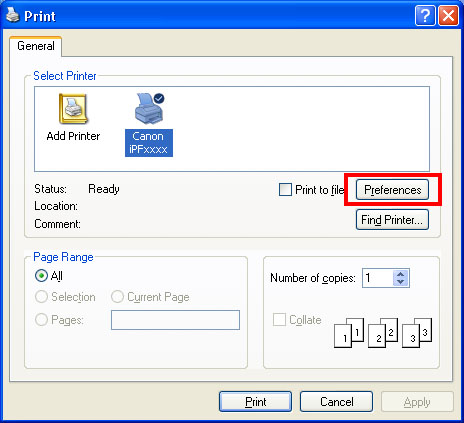 • If another printer is selected, select the printer you want to use under Select Printer or in the dialog box displayed after clicking Printer.
Settings for many printing methods (including enlarged or reduced printing, borderless printing, and so on) are displayed in the printer driver dialog box. There are two ways to access the printer driver dialog box, as follows.
1. 1. 6. Basic Printing Workflow > Printing procedure >
Printing from Mac OS X
Printing from Mac OS X
Print from the application menu after registering the printer.
| Important | ||
|
• We recommend exiting unnecessary applications before printing. Running several applications while printing may interrupt the transfer of print data and affect printing quality.
|
||
| Registering the printer | |||||
|
Before printing, you must register the printer in imagePROGRAF PrinterSetup.app.
For instructions on registering the printer, see "Configuring the Printer Driver Destination (Macintosh) (10.3.7)."
|
| Printing from the application software | |||||||
|

1. 1. 7. Basic Printing Workflow > Printing procedure >
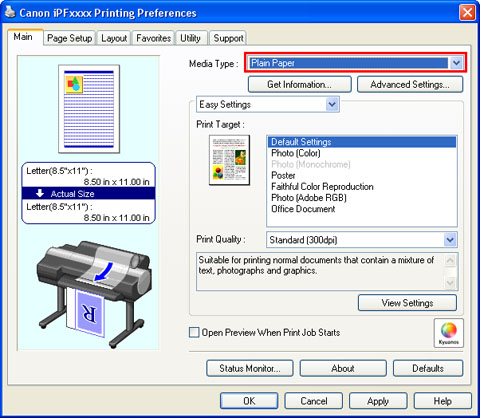
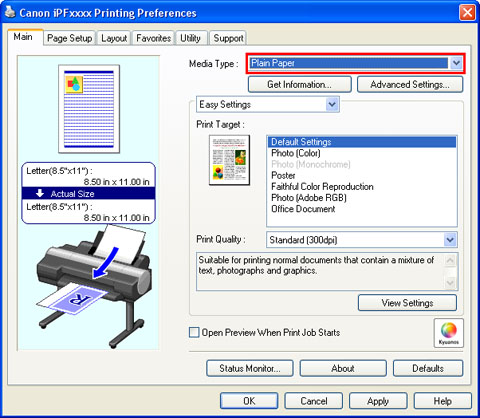
Specifying Paper in the Printer Driver (Windows)
Specifying Paper in the Printer Driver (Windows)
| Important | ||
|
• Always specify the same type and size of paper in the printer menu and printer driver.
|
||
- Choose Print in the application menu.
- Select the printer in the dialog box, and then display the printer driver dialog box.(See "Accessing the Printer Driver Dialog Box from Applications (3.1.6)")
- Make sure the Main sheet is displayed.
- In the AMedia Type list, select the type of paper that is loaded.
Note • Click the BGet Information button to display the Paper Information on Printer dialog box. On the Paper Information on Printer dialog box, you can obtain information on the paper in the printer and configure printer driver settings for the feed source and type of paper.This function requires that the Status Monitor be installed. - Click the Page Setup tab to display the Page Setup sheet.

- In the APage Size list, select the size of the original as specified in the application.
- In the LPaper Source list, select how paper is supplied.
- If you have selected roll paper in LPaper Source, select the width of the loaded roll in MRoll Paper Width.
| Note | ||
|
• A variety of settings are available in the printer driver to suit different printing applications.
For details on available printing conditions, see "Printer Driver Settings (3.1.1)"
|
||
1. 1. 8. Basic Printing Workflow > Printing procedure >
Specifying Paper in the Printer Driver (Mac OS X)
Specifying Paper in the Printer Driver (Mac OS X)
- This sets the BFormat for and CPaper Size.
Note • The configuration method varies depending on the OS and application software you are using.If Page Setup is displayed in the application menu, the settings are configured by opening the Page Attributes dialog box from Page Setup. If it is not displayed, the settings are configured in the upper part of the printer driver displayed when you select Print from the application software menu.
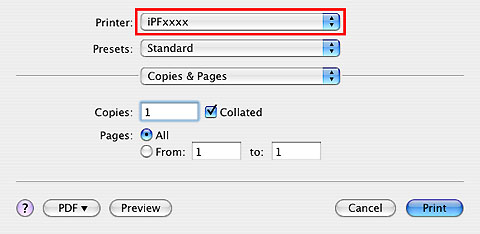
- Select the printer in the APrinter list.
- Choose the original size in the FPaper Size list.
- If you configured the settings using the Page Attributes dialog box, click FOK to close the dialog box, and then select Print from the application software menu.
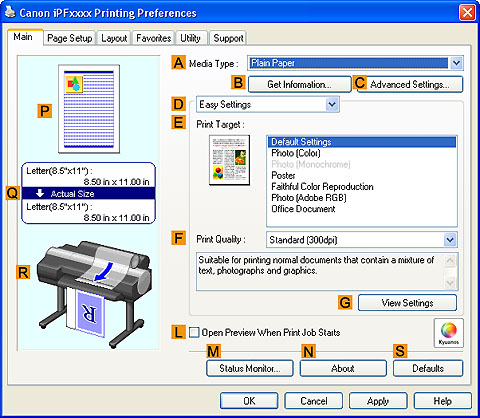
- Access the Main pane.
- In the AMedia Type list, select the type of paper that is loaded.
- Access the Page Setup pane.
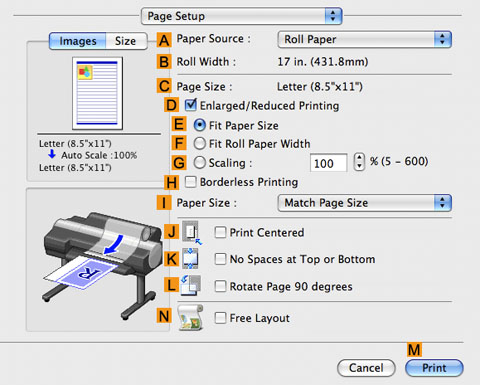
- In the APaper Source list, select how paper is supplied.
- If you have selected Manual in APaper Source, make sure the size as selected in Page Setup is displayed in CPage Size. If you have selected Roll Paper in APaper Source, make sure the width of the loaded roll is displayed in BRoll Width.
Note • If the width of the roll loaded in the printer is not shown in BRoll Width, click LPrinter Information on the Main pane to update the printer information.
| Note | ||
|
• A variety of settings are available in the printer driver to suit different printing applications.
For details on available printing conditions, see "Printer Driver Settings (4.1.1)"
|
||