2. 4. 1. Enhanced Printing Options > Printing enlargements or reductions >
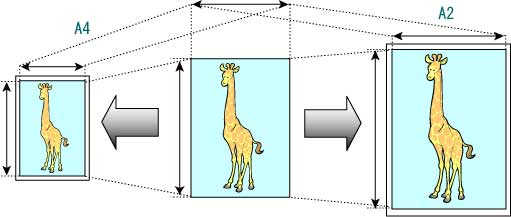
Resizing Originals to Match the Paper Size
Resizing Originals to Match the Paper Size
•Enlarged/Reduced Printing
Enlarge or reduce the original in the printer driver, as desired.
•Fit Paper Size
Enlarge or reduce the original to match the size of the paper you are using.
 |
For instructions on resizing originals to match the paper size, refer to the following topics, as appropriate for your computer and operating system.
•Resizing Originals to Match the Paper Size (Windows) (2.4.2)
•Resizing Originals to Match the Paper Size (Mac OS X) (2.4.3)
| Note | ||
|
• For better printing results when enlarging photos from a digital camera in TIFF or JPEG format, use an image-editing application software such as Adobe Photoshop to specify an image resolution of 150 dpi or more at actual size.
|
||
2. 4. 2. Enhanced Printing Options > Printing enlargements or reductions >
Resizing Originals to Match the Paper Size (Windows)
Resizing Originals to Match the Paper Size (Windows)
This topic describes how to enlarge originals before printing to match the paper size, based on the following example.
•Document: Any Type
•Page size: A4 (210.0×297.0mm)/Letter (8.3 × 11.7 in)
•Paper: Roll
•Paper type: Plain Paper
•Roll paper width: A2/A3 roll (420.0 mm [16.5 in])
- Choose Print in the application menu.
- Select the printer in the dialog box, and then open the printer driver dialog box.(See "Accessing the Printer Driver Dialog Box from Applications (3.1.6)")
- Make sure the Main sheet is displayed.
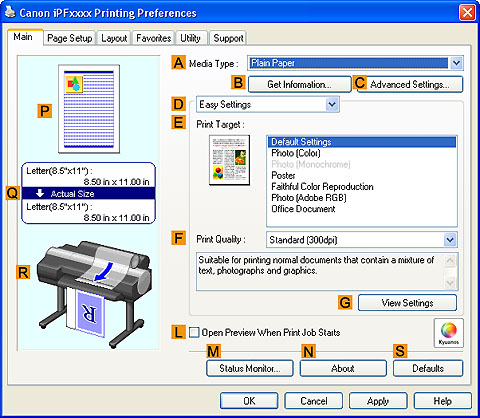
- In the AMedia Type list, select the type of paper that is loaded. In this case, click Plain Paper.
- Select the printing application in the EPrint Target list.
- Click the Page Setup tab to display the Page Setup sheet.

- Select and click a roll paper in the LPaper Source list.
- Select the width of the loaded roll in the MRoll Paper Width list—in this case, ISO A2/A3 Roll (420.0mm).
- In the APage Size list, click the size of the original as specified in the application. In this case, click ISO A4.
- Select the CEnlarged/Reduced Printing check box.
- Select the DFit Paper Size check box.
- Click ISO A3 in the GPaper Size list.
- Confirm the print settings and print as desired.

Note • For tips on confirming print settings, see "Confirming Print Settings (3.1.3)"
2. 4. 3. Enhanced Printing Options > Printing enlargements or reductions >
Resizing Originals to Match the Paper Size (Mac OS X)
Resizing Originals to Match the Paper Size (Mac OS X)
This topic describes how to enlarge originals before printing to match the paper size, based on the following example.
•Document: Any Type
•Page size: A4 (210.0 × 297.0 mm [8.3 × 11.7 in])
•Paper: Roll paper
•Paper type: Plain Paper
•Roll paper width: A2/A3 roll (420.0 mm [16.5 in])
- This sets the BFormat for and CPaper Size.
Note • The configuration method varies depending on the OS and application software you are using.If Page Setup is displayed in the application menu, the settings are configured by opening the Page Attributes dialog box from Page Setup. If it is not displayed, the settings are configured in the upper part of the printer driver displayed when you select Print from the application software menu.
- Select the printer in the APrinter list.
- In the FPaper Size list, click the size of the original. In this case, click ISO A4.
- If you configured the settings using the Page Attributes dialog box, click FOK to close the dialog box, and then select Print from the application software menu.
- Access the Main pane.
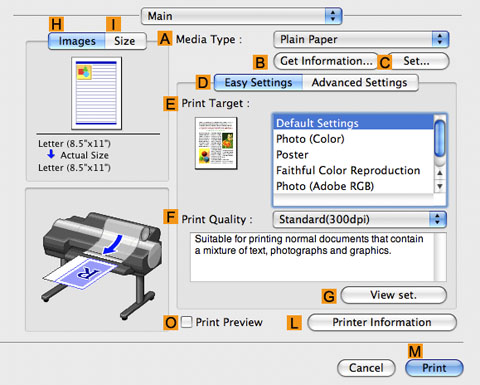
- In the AMedia Type list, select the type of paper that is loaded. In this case, click Plain Paper.
- Make your selection in the EPrint Target list.
- Make your selection in the FPrint Quality list.
- Access the Page Setup pane.
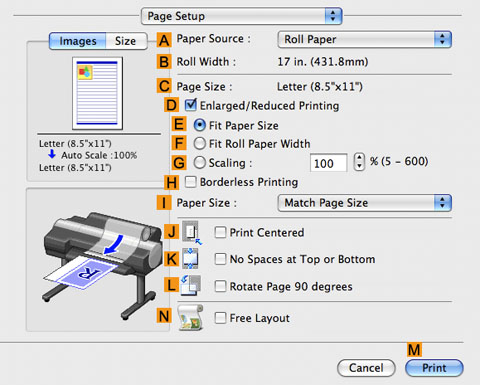
- Select and click a roll paper in the APaper Source list.
- Make sure the width of the loaded roll is displayed in the BRoll Width list—in this case, ISO A2/A3 (420.0mm).
Note • If the width of the roll loaded in the printer is not shown in BRoll Width, click LPrinter Information on the Main pane to update the printer information. - Make sure CPage Size on the Page Setup pane shows the original size as specified in CPaper Size in the Page Attributes dialog box—in this case, ISO A4.
- Select the DEnlarged/Reduced Printing check box.
- Make sure EFit Paper Size is selected.
- Click ISO A3 in the IPaper Size list.
- Confirm the print settings, and then click MPrint to start printing.
Note • For tips on confirming print settings, see "Confirming Print Settings (4.1.3)"
2. 4. 4. Enhanced Printing Options > Printing enlargements or reductions >
Resizing Originals to Fit the Roll Width
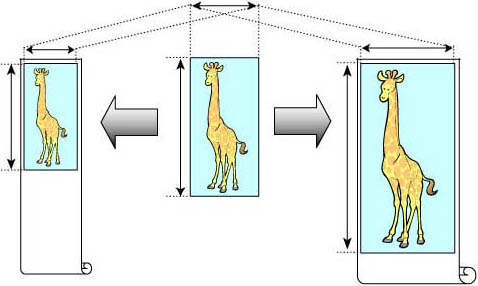
Resizing Originals to Fit the Roll Width
•Enlarged/Reduced Printing
Enlarge or reduce the original in the printer driver, as desired.
•Fit Roll Paper Width
Enlarge or reduce the original as a whole to match the roll paper width, as desired.
 |
For instructions on resizing originals to match the roll paper width, refer to the following topics, as appropriate for your computer and operating system.
•Resizing Originals to Fit the Roll Width (Windows) (2.4.5)
•Resizing Originals to Fit the Roll Width (Mac OS X) (2.4.6)
| Note | ||
|
• For better printing results when enlarging photos from a digital camera in TIFF or JPEG format, use an image-editing application software such as Adobe Photoshop to specify an image resolution of 150 dpi or more at actual size.
|
||
2. 4. 5. Enhanced Printing Options > Printing enlargements or reductions >
Resizing Originals to Fit the Roll Width (Windows)
Resizing Originals to Fit the Roll Width (Windows)
This topic describes how to enlarge originals before printing to match the roll width, based on the following example.
•Document: Any type
•Page size: A4 (210.0×297.0 mm)/Letter (8.3 × 11.7 in)
•Paper: Roll
•Paper type: Plain Paper
•Roll paper width: 16 inches (406.4 mm)
- Choose Print in the application menu.
- Select the printer in the dialog box, and then display the printer driver dialog box.(See "Accessing the Printer Driver Dialog Box from Applications (3.1.6)")
- Make sure the Main sheet is displayed.
- In the AMedia Type list, select the type of paper that is loaded. In this case, click Plain Paper.
- Select the printing application in the EPrint Target list.
- Click the Page Setup tab to display the Page Setup sheet.
- Select and click a roll paper in the LPaper Source list.
- In the APage Size list, click the size of the original as specified in the application. In this case, click ISO A4 or Letter (8.5"x11").
- Select the CEnlarged/Reduced Printing check box.
Note • If the CEnlarged/Reduced Printing check box is not displayed on the Page Setup sheet, clear the BBorderless Printing check box.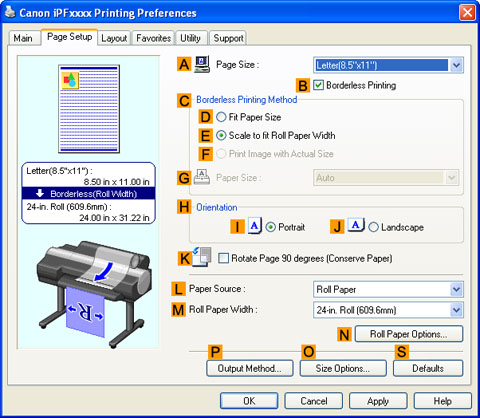
- Click EFit Roll Paper Width.
Note • After you click EFit Roll Paper Width, the Information dialog box is displayed. Select the width of the loaded roll in the Roll Paper Width list and click OK.• Make sure the roll paper width you specify matches the width of the loaded roll. - Confirm the print settings and print as desired.
Note • For tips on confirming print settings, see "Confirming Print Settings (3.1.3)"
2. 4. 6. Enhanced Printing Options > Printing enlargements or reductions >
Resizing Originals to Fit the Roll Width (Mac OS X)
Resizing Originals to Fit the Roll Width (Mac OS X)
This topic describes how to enlarge originals before printing to match the roll width, based on the following example.
•Document: Any Type
•Page size: A4 (210.0 × 297.0 mm [8.3 × 11.7 in])
•Paper: Roll paper
•Paper type: Plain Paper
•Roll paper width: 16 inches (406.4 mm)
- This sets the BFormat for and CPaper Size.
Note • The configuration method varies depending on the OS and application software you are using.If Page Setup is displayed in the application menu, the settings are configured by opening the Page Attributes dialog box from Page Setup.If it is not displayed, the settings are configured in the upper part of the printer driver displayed when you select Print from the application software menu. - Select the printer in the APrinter list.
- In the FPaper Size list, click the size of the original. In this case, click ISO A4.
- If you configured the settings using the Page Attributes dialog box, click FOK to close the dialog box, and then select Print from the application software menu.
- Access the Main pane.
- In the AMedia Type list, select the type of paper that is loaded. In this case, click Plain Paper.
- Make your selection in the EPrint Target list.
- Make your selection in the FPrint Quality list.
- Access the Page Setup pane.
- Select and click a roll paper in the APaper Source list.
- Make sure the width of the loaded roll is displayed in the BRoll Width list—in this case, 16 in. (406.4mm).
Note • If the width of the roll loaded in the printer is not shown in BRoll Width, click LPrinter Information on the Main pane to update the printer information. - Make sure the CPage Size setting matches the original size as selected in CPaper Size in the Page Attributes dialog box—in this case, ISO A4.
- Select the DEnlarged/Reduced Printing check box.
- Click FFit Roll Paper Width.
- Confirm the print settings, and then click MPrint to start printing.
Note • For tips on confirming print settings, see "Confirming Print Settings (4.1.3)"
2. 4. 7. Enhanced Printing Options > Printing enlargements or reductions >
Resizing Originals by Entering a Scaling Value
Resizing Originals by Entering a Scaling Value
•Enlarged/Reduced Printing
Enlarge or reduce the original in the printer driver, as desired.
•Scaling
Enlarge or reduce originals by a particular amount, as desired.
 |
For instructions on entering a scaling value to resize originals, refer to the following topics, as appropriate for your computer and operating system.
•Resizing Originals by Entering a Scaling Value (Windows) (2.4.8)
•Resizing Originals by Entering a Scaling Value (Mac OS X) (2.4.9)
| Note | ||
|
• For better printing results when enlarging photos from a digital camera in TIFF or JPEG format, use an image-editing application software such as Adobe Photoshop to specify an image resolution of 150 dpi or more at actual size.
|
||
2. 4. 8. Enhanced Printing Options > Printing enlargements or reductions >
Resizing Originals by Entering a Scaling Value (Windows)
Resizing Originals by Entering a Scaling Value (Windows)
This topic describes how to enlarge originals before printing by entering a scaling value, based on the following example.
•Document: Any Type
•Page size: A4 (210.0 × 297.0 mm [8.3 × 11.7 in])
•Paper: Roll paper
•Paper type: Plain Paper
•Roll paper width: A2/A3 roll (420.0 mm [16.5 in])
| Important | ||
|
• In borderless printing, you cannot resize originals by entering a scaling value.
|
||
- Choose Print in the application menu.
- Select the printer in the dialog box, and then display the printer driver dialog box.(See "Accessing the Printer Driver Dialog Box from Applications (3.1.6)")
- Make sure the Main sheet is displayed.
- In the AMedia Type list, select the type of paper that is loaded. In this case, click Plain Paper.
- Select the printing application in the EPrint Target list.
- Click the Page Setup tab to display the Page Setup sheet.
- Select and click a roll paper in the LPaper Source list.
- Select the width of the loaded roll in the MRoll Paper Width list—in this case, ISO A2/A3 Roll (420.0mm).
- In the APage Size list, click the size of the original as specified in the application. In this case, click ISO A4.
- Select the CEnlarged/Reduced Printing check box.
- Click ISO A4 in the GPaper Size list.
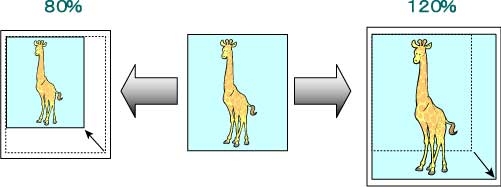
- Click FScaling and enter 120.
Note • You can specify enlargement that exceeds the paper size, but in this case, the portions off the bottom and right edges of the paper will not be printed.• If the original size after enlargement or reduction is smaller than the paper size, the original is printed in the upper-left corner. In this case, you can center originals by selecting EPrint Centered on the Layout sheet.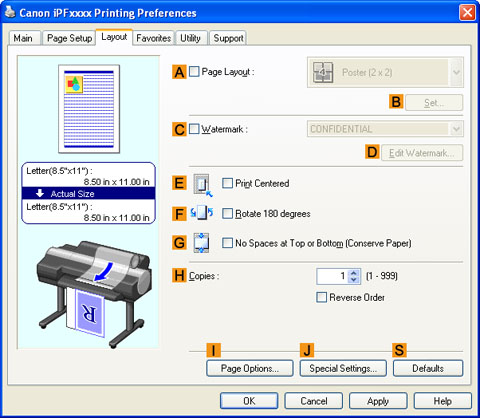
- Confirm the print settings and print as desired.
Note • For tips on confirming print settings, see "Confirming Print Settings (3.1.3)"
2. 4. 9. Enhanced Printing Options > Printing enlargements or reductions >
Resizing Originals by Entering a Scaling Value (Mac OS X)
Resizing Originals by Entering a Scaling Value (Mac OS X)
This topic describes how to enlarge originals before printing by entering a scaling value, based on the following example.
•Document: Any Type
•Page size: A4 (210.0 × 297.0 mm [8.3 × 11.7 in])
•Paper: Roll paper
•Paper type: Plain Paper
•Roll paper width: A2/A3 roll (420.0 mm [16.5 in])
- This sets the BFormat for and CPaper Size.
Note • The configuration method varies depending on the OS and application software you are using.If Page Setup is displayed in the application menu, the settings are configured by opening the Page Attributes dialog box from Page Setup.If it is not displayed, the settings are configured in the upper part of the printer driver displayed when you select Print from the application software menu. - Select the printer in the APrinter list.
- In the FPaper Size list, click the size of the original. In this case, click ISO A4.
- If you configured the settings using the Page Attributes dialog box, click FOK to close the dialog box, and then select Print from the application software menu.
- Access the Main pane.
- In the AMedia Type list, select the type of paper that is loaded. In this case, click Plain Paper.
- Make your selection in the EPrint Target list.
- Make your selection in the FPrint Quality list.
- Access the Page Setup pane.
- Select and click a roll paper in the APaper Source list.
- Make sure the width of the loaded roll is displayed in the BRoll Width list—in this case, ISO A2/A3 (420.0mm).
Note • If the width of the roll loaded in the printer is not shown in BRoll Width, click LPrinter Information on the Main pane to update the printer information. - Make sure the CPage Size setting matches the original size as selected in CPaper Size in the Page Attributes dialog box—in this case, ISO A4.
- Select the DEnlarged/Reduced Printing check box.
- Click GScaling and enter 120.
Note • You can specify enlargement that exceeds the paper size, but in this case, the portion off the edge of the paper will not be printed.• If the original size after enlargement or reduction is smaller than the paper size, the original is printed in the upper-left corner. In this case, you can center originals by selecting the JPrint Centered check box. - Confirm the print settings, and then click MPrint to start printing.
Note • For tips on confirming print settings, see "Confirming Print Settings (4.1.3)"