4. 1. 1. Mac OS X Software > Printer Driver >
Printer Driver Settings (Mac OS X)
Printer Driver Settings (Mac OS X)
•Accessing the Printer Driver Dialog Box from Applications (4.1.6)
 |
For information on the Mac OS X printer driver settings, refer to the following topics.
•Main Pane (4.1.7)
You can specify the media type, color processing, print quality, print preview, and other settings. Choose Easy Settings to specify basic print settings based on the printing application or Advanced Settings to complete more detailed settings as desired.
•Paper Detailed Settings Dialog Box (4.1.9)
•View settings Dialog Box for the Printing Application (4.1.10)
•Color Settings Pane: Color (4.1.14)
•Object Adjustment dialog box: Color (4.1.15)
•Matching pane (4.1.11)
•Ambient Light Adjust dialog box (4.1.12)
•Light Source Check Tool (4.1.13)
•Color Settings Pane: Monochrome (4.1.16)
•Object Adjustment dialog box: Monochrome (4.1.17)
•Gray Adjustment Pane (4.1.18)
•Page Setup Pane (4.1.19)
You can specify the page size of the original, borderless printing, enlargement or reduction, the orientation, the paper size and source, and automatic cutting.
•Utility Pane (4.1.20)
You can specify settings related to maintenance for the Printhead and feed amount, as well as settings for Color imageRUNNER Enlargement Copy.
•Additional Settings Pane (4.1.21)
You can specify settings for how print jobs are sent to the printer.
With the imagePROGRAF Free Layout feature, you can arrange originals from various source applications on a single page before printing. For details, see Free Layout.
With the imagePROGRAF Preview feature, you can check the layout before printing and adjust layout or size settings while viewing a preview screen. For details, see Preview.
With the Color imageRUNNER Enlargement Copy feature, you can automatically enlarge and print scanned originals from a Color imageRUNNER. For details, see Color imageRUNNER Enlargement Copy.
4. 1. 2. Mac OS X Software > Printer Driver >
Specifying Paper in the Printer Driver (Mac OS X)
Specifying Paper in the Printer Driver (Mac OS X)
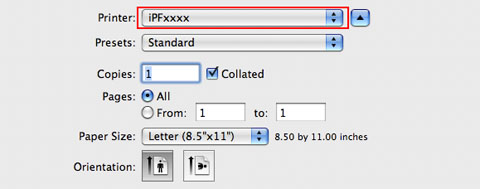
- This sets the BFormat for and CPaper Size.

Note • The configuration method varies depending on the OS and application software you are using.If Page Setup is displayed in the application menu, the settings are configured by opening the Page Attributes dialog box from Page Setup. If it is not displayed, the settings are configured in the upper part of the printer driver displayed when you select Print from the application software menu.
- Select the printer in the APrinter list.
- Choose the original size in the FPaper Size list.
- If you configured the settings using the Page Attributes dialog box, click FOK to close the dialog box, and then select Print from the application software menu.
- Access the Main pane.
- In the AMedia Type list, select the type of paper that is loaded.
- Access the Page Setup pane.
- In the APaper Source list, select how paper is supplied.
- If you have selected Manual in APaper Source, make sure the size as selected in Page Setup is displayed in CPage Size. If you have selected Roll Paper in APaper Source, make sure the width of the loaded roll is displayed in BRoll Width.
Note • If the width of the roll loaded in the printer is not shown in BRoll Width, click LPrinter Information on the Main pane to update the printer information.
| Note | ||
|
• A variety of settings are available in the printer driver to suit different printing applications.
For details on available printing conditions, see "Printer Driver Settings (4.1.1)"
|
||
4. 1. 3. Mac OS X Software > Printer Driver >
Confirming Print Settings (Mac OS X)
Confirming Print Settings (Mac OS X)
•Checking a preview of the settings
•Checking a print preview
•Checking a preview of the settings
A preview of the settings is displayed on the left side of the Main, Page Setup, Utility, and Additional Settings panes.By checking images and numerical values in the preview, you can confirm current settings for the page size, orientation, paper source, and so on.
|
| Note | ||
|
• To confirm the Print Target specified in Easy Settings, click GView set. on the Main pane to display the View settings dialog box.
|
||
•Checking a print preview
You can check an image of the original just as it will be printed.
Confirming the image of print jobs beforehand helps prevent printing errors.
For details on print previews, see "Checking the Layout in a Preview Before Printing (2.11.1)"
4. 1. 4. Mac OS X Software > Printer Driver >
Checking the Layout in a Preview Before Printing (Mac OS X)
Checking the Layout in a Preview Before Printing (Mac OS X)
This topic describes how to check the layout before printing using the Canon imagePROGRAF Preview function.
- Choose Print in the application menu.
- Access the Main pane.
- Select the OPrint Preview check box.
- Click MPrint.
- The Canon imagePROGRAF Preview window is displayed.
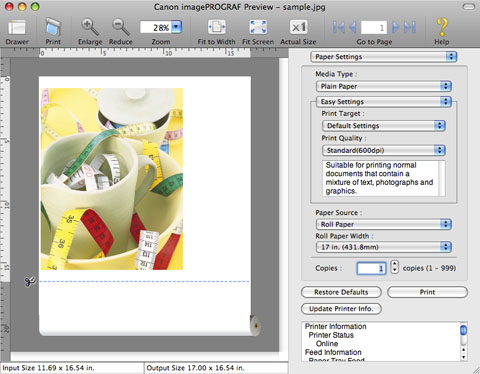
- Check the layout and adjust settings in the Canon imagePROGRAF Preview window as desired.
- Print from the Canon imagePROGRAF Preview menu.
| Note | ||
|
• For details on imagePROGRAF Preview functions, refer to Preview.
|
||
4. 1. 5. Mac OS X Software > Printer Driver >
Using Favorites (Mac OS X)
Using Favorites (Mac OS X)
| Note | ||
|
• In the printing dialog box, click Save As in the Presets list to save the current print settings. This is a standard feature of the operating system. For details, refer to the Mac OS documentation.
|
||
4. 1. 6. Mac OS X Software > Printer Driver >
Accessing the Printer Driver Dialog Box from Applications (Mac OS X)
Accessing the Printer Driver Dialog Box from Applications (Mac OS X)
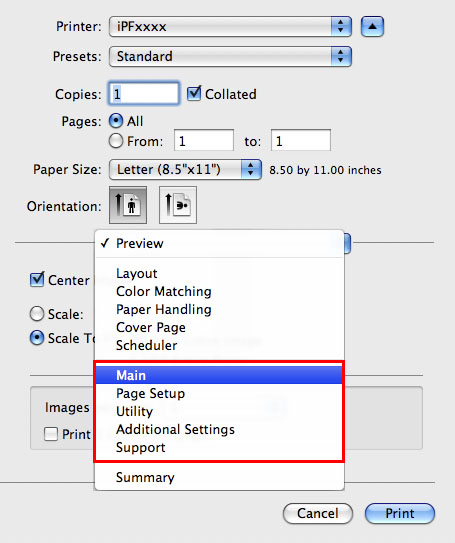
- In the application software, select Print from the File menu to display the dialog box for printing conditions.
Note • This dialog box includes basic printing options and enables you to choose the printer, specify the range of pages, number of copies, and so on. - Select the printer in the Printer list.
- Click Print to start printing.
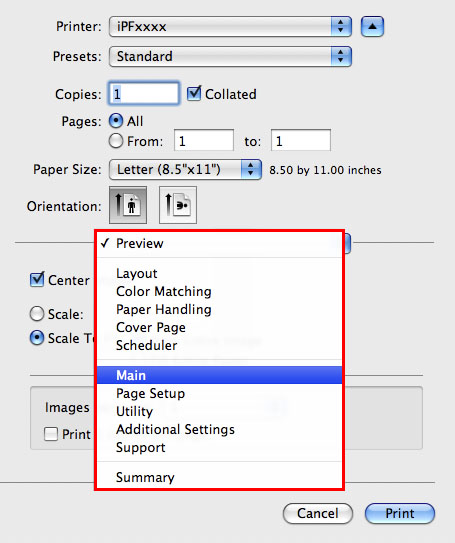
As shown in the following illustration, you can switch to other panes in this dialog box to complete settings for various methods of printing, including enlarged and reduced printing, borderless printing, and so on.
4. 1. 7. Mac OS X Software > Printer Driver >
Main Pane (Mac OS X)
Main Pane (Mac OS X)
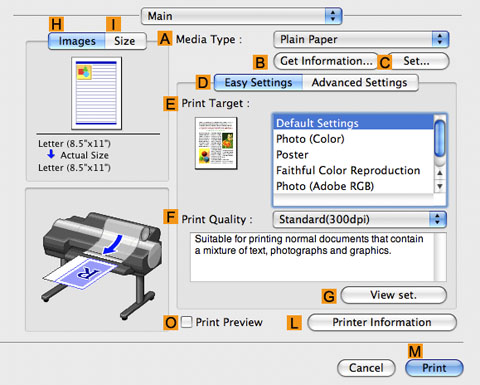
The following settings are available on the Main pane. For details on settings items, refer to the printer driver help.
| Note | ||
|
• On the Main pane, choose Easy Settings to specify basic print settings based on the print target, or switch to Advanced Settings to complete more detailed settings as desired.
|
||
| Common Items | |
|
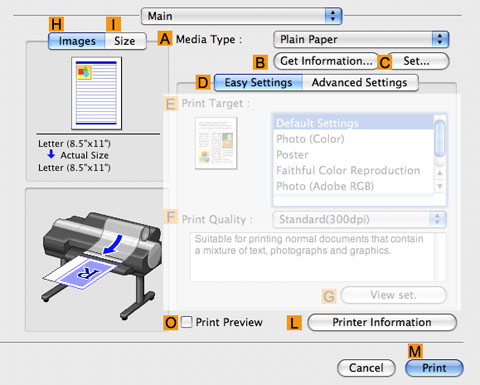
•AMedia Type
Select the paper type.
For information on the types of paper the printer supports, refer to the Paper Reference Guide.(See "Types of Paper (6.1.1)")
•BGet Information
Displays Paper Information on Printer. You can update the printer driver settings for the feed source, media type, and roll width by selecting the feed source.
•Paper Information on Printer Dialog Box (4.1.8)
•CSet
Displays Paper Detailed Settings. You can configure the printing settings to match the type of media, such as the ink drying time.
•Paper Detailed Settings Dialog Box (4.1.9)
•OPrint Preview
If you turn this on, imagePROGRAF Preview starts before printing.
This allows you to check on-screen previews of documents before printing.
| Important | ||
|
• When Free Layout is selected on the Page Setup panel, Free Layout is disabled.
|
||
•Checking the Layout in a Preview Before Printing (2.11.1)
•LPrinter Information
Displays Printer Information. You can display printer information such as the remaining ink levels.
| Configuration using Easy Settings | |
|

•EPrint Target
Choose presets that match the type of document to be printed.
•FPrint Quality
Choose the level of print quality.
•GView set.
Click to display the View settings dialog box, which enables you to confirm the settings for the selected item from the EPrint Target list or change the order of items listed in EPrint Target.
•View settings Dialog Box for the Printing Application (4.1.10)
| Configuration using Advanced Settings | |
|
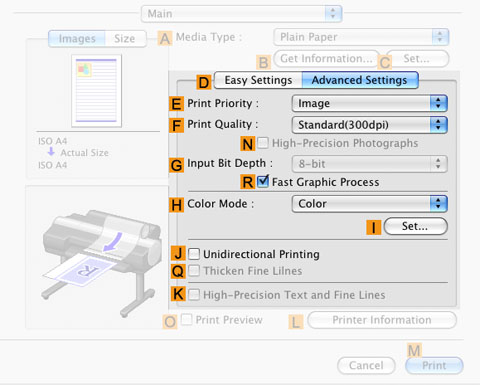
•EPrint Priority
Choose the graphic elements that you want to emphasize for printing.
•Giving Priority to Particular Graphic Elements and Colors for Printing (2.3.4)
•FPrint Quality
Choose the level of print quality.
•Giving Priority to Particular Graphic Elements and Colors for Printing (2.3.4)
•NHigh-Precision Photographs
Print with improved gradation and uniformity, particularly for high-precision photographs. However, this takes more time than regular printing.
| Note | ||
|
• NHigh-Precision Photographs may not be selected depending on the AMedia Type you select.
• NHigh-Precision Photographs and KHigh-Precision Text and Fine Lines cannot be checked at the same time.
• To improve print quality, you may need to adjust the position of the printhead. (See "Enhancing Printing Quality (7.1.1)")
|
||
•GInput Bit Depth
Choose the levels of gradation in print data, either 8-bit or 16-bit. Optimal results when printing data with rich gradation are possible by choosing 16-bit. For example, this option is particularly suited to printing images created after specifying 16 bits per channel in Photoshop.
(Mac OS X 10.4 or later)
•RFast Graphic Process
Select this option to print faster than usual, when possible.
•HColor Mode
Choose the color mode.
•Giving Priority to Particular Graphic Elements and Colors for Printing (2.3.4)
•ISet
Click to display the Color Settings dialog box for more advanced color settings.
•Adjusting the Color in the Printer Driver (2.3.1)
•JUnidirectional Printing
Select this checkbox to prevent problems such as misaligned lines and improve the print quality. However, the printing speed becomes slower.
•QThicken Fine Lines
Activate this option to print fine lines more distinctly.
•KHigh-Precision Text and Fine Lines
Print increasing ink impact accuracy, particularly for sharper text and fine lines. However, this takes more time than regular printing.
| Note | ||
|
• KHigh-Precision Text and Fine Lines may not be selected depending on the AMedia Type you select.
• To improve print quality, you may need to adjust the position of the printhead. (See "Enhancing Printing Quality (7.1.1)")
|
||
4. 1. 8. Mac OS X Software > Printer Driver >
Paper Information on Printer Dialog Box (Mac OS X)
Paper Information on Printer Dialog Box (Mac OS X)
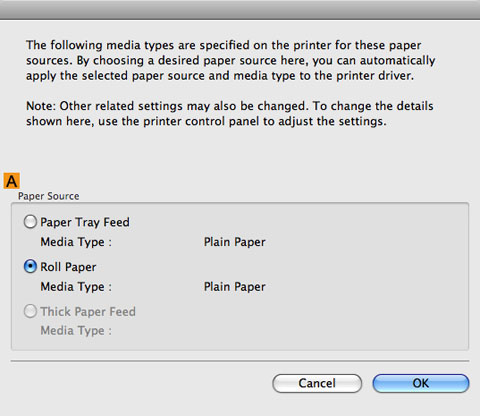
On the Paper Information on Printer dialog box, you can obtain information on the paper in the printer and configure printer driver media type setting.
 |
| Note | ||
|
• To display the Paper Information on Printer dialog box, on the Main pane, click Get Information by Media Type.(See "Main Pane (4.1.7)")
|
||
•APaper Source
Shows the Paper Source supported by the printer, as well as the type of paper loaded. To update the media type setting in the printer driver, select the desired Paper Source option and click OK.
4. 1. 9. Mac OS X Software > Printer Driver >
Paper Detailed Settings Dialog Box (Mac OS X)
Paper Detailed Settings Dialog Box (Mac OS X)
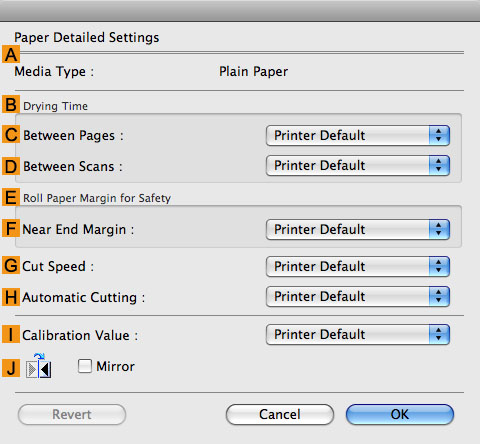
The Paper Detailed Settings dialog box offers the following settings. For details on settings items, refer to the printer driver help.
 |
| Note | ||
|
• To display the Paper Detailed Settings dialog box, on the Main pane, click Set by Media Type.(See "Main Pane (4.1.7)")
|
||
•AMedia Type
Select the paper type.
For information on the types of paper the printer supports, refer to the Paper Reference Guide.(See "Types of Paper (6.1.1)")
•BDrying Time
Specify the time that the printer waits for ink to dry, as needed. The Drying Time setting is only valid for rolls.
•(See "Specifying the Ink Drying Time for Rolls (6.2.11)")
•CBetween Pages
Specify the time the printer waits after printing a page until ejecting the paper, as needed.
•DBetween Scans
Specify the time the printer waits after printing a line on the page until printing the next line, as needed.
•ERoll Paper Margin for Safety
You can specify the length of a margin on the leading edge of paper to ensure that paper susceptible to curling is held firmly against the Platen.
•FNear End Margin
Specify the length of the Near End Margin (the leading edge margin) of the roll, as needed.
•GCut Speed
Select the speed of automatic cutting, as needed. You can adjust this setting if paper is not cut well when automatic cutting is used.
•HAutomatic Cutting
You can activate or deactivate automatic cutting and printing of cut lines, as desired. In this list, specify Printer Default, None, or Print Cut Guideline.
•ICalibration Value
You can specify whether to apply the results of calibration performed on the printer to image processing.
•JMirror
Specify whether to print a mirror image, as needed. Select this option to print a version of the document or image with the left and right sides inverted.
4. 1. 10. Mac OS X Software > Printer Driver >
View settings Dialog Box for the Printing Application (Mac OS X)
View settings Dialog Box for the Printing Application (Mac OS X)
 |
| Note | ||
|
• To display the View settings dialog box, on the Main pane, click View settings by Print Target.(See "Main Pane (4.1.7)")
|
||
•APrint Target
Shows all Print Target options (settings items for the printing application).
•BName
Identifies the item selected in Print Target by its name and an icon.
•CDetails
Here, you can confirm detailed settings values for each item selected in the Print Target list.
4. 1. 11. Mac OS X Software > Printer Driver >
Matching pane
Matching pane
On the Matching pane, you can specify color matching to compensate for differences in the appearance of colors on various devices.
| Important | ||
|
• If No color correction is selected under Color Mode, the Matching pane is not displayed.
|
||
| Note | ||
|
• To display the Matching pane, on the Main pane click Color Settings in Color Mode in Advanced Settings, and then click the Matching tab. (Refer to "Main Pane (4.1.7)")
|
||
•Driver Matching Mode (Using Mac OS X 10.3.9)
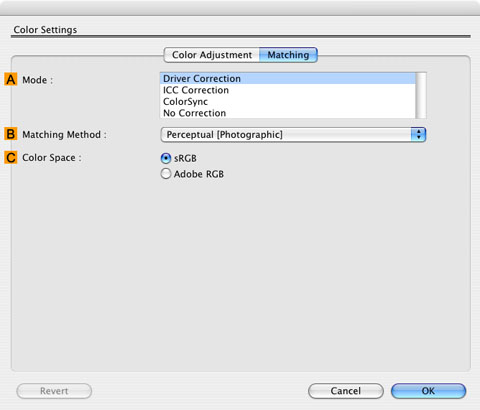 |
•AMatching Mode
Select the color matching mode to use, as desired.
•BMatching Method
Select the color matching method that suits the document to be printed. Various BMatching Method options are available depending on your selection in AMatching Mode.
•CColor Space
Select the applicable color space as desired.
•Driver Matching Mode (Using Mac OS X 10.4 or later)
The following options are available when you select Driver Matching Mode in the AMatching Mode list.
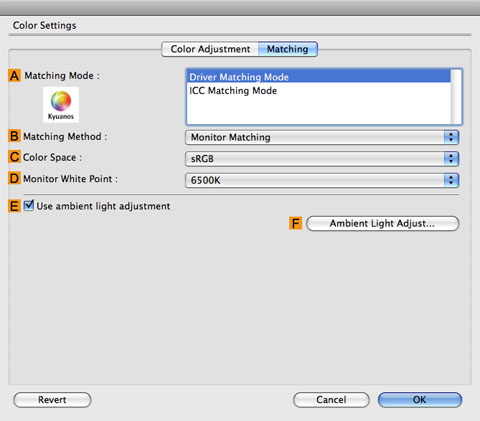 |
•AMatching Mode
Select the color matching mode to use, as desired.
Normally, select Driver Matching Mode. For color matching based on ICC profiles, select ICC Matching Mode depending on your color matching system.
•BMatching Method
Select the color matching method that suits the document to be printed. Various BMatching Method options are available depending on your selection in AMatching Mode.
•CColor Space
Select the applicable color space as desired.
•DMonitor White Point
Enter the color temperature set on the monitor.
Displayed when the BMatching Method is set to Monitor Matching.
•EUse ambient light adjustment
Select this option for adjustment of colors to suit the ambient light in the viewing environment.
•FAmbient Light Adjust
Click to display the Ambient Light Adjust dialog box, which enables you to complete settings for printing to match the ambient light.
•Ambient Light Adjust dialog box (4.1.12)
| ICC Matching Mode | ||||||
|
The following options are available when you select ICC Matching Mode, in the AMatching Mode list.
|

•AMatching Mode
Select the color matching mode to use, as desired.
•BInput Profile Settings
You can choose Input Profile.
Various options are available depending on your selected AMatching Mode.
•CMatching Method
You can choose CMatching Method.
Various options are available depending on your selected AMatching Mode.
•DPrinter Profile Settings
Specify the printer profile as desired.
| Note | ||
|
• For details on settings items, see "Adjusting the Color in the Printer Driver (2.3.1)"
|
||
4. 1. 12. Mac OS X Software > Printer Driver >
Ambient Light Adjust dialog box
Ambient Light Adjust dialog box
The Ambient Light Adjust dialog box is used to select the setting method and to enter and select the information required for the settings.
| When you select By selecting a chart number in Setting Method | |
|
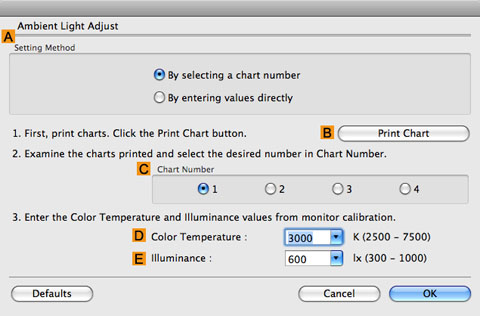
•ASetting Method
You can choose configuration based on the printed Chart or based on using the i1 colorimeter.
•BPrint Chart
Click to start the Light Source Check Tool, for printing Chart.
•Light Source Check Tool (4.1.13)
•CChart Number
In Chart, select the number of the pattern with your desired colors.
•DColor Temperature
Enter the DColor Temperature measured during monitor calibration. Displayed when the BMatching Method is set to Monitor Matching on the Matching pane.
•EIlluminance
Enter the EIlluminance measured during monitor calibration. Displayed when the BMatching Method is set to Monitor Matching on the Matching pane.
| When you select By entering values directly in Setting Method | |
|
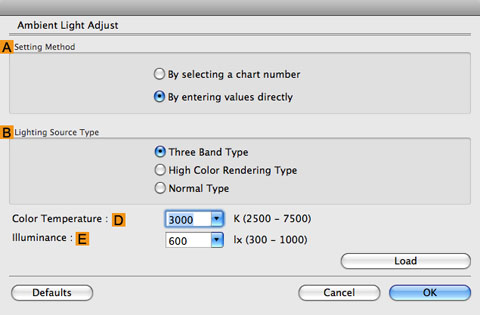
•ASetting Method
You can choose configuration based on the printed Chart or based on using the i1 colorimeter.
•BLighting Source Type
Select the light source measured using the i1 colorimeter.
•DColor Temperature
Enter the DColor Temperature measured using the i1 colorimeter.
•EIlluminance
Enter the EIlluminance measured using the i1 colorimeter.
Displayed when the BMatching Method is set to Monitor Matching on the Matching pane.
| Note | ||
|
• For details on settings items, see "Adjusting the Color in the Printer Driver (2.3.1)"
|
||
4. 1. 13. Mac OS X Software > Printer Driver >
Light Source Check Tool
Light Source Check Tool
The Light Source Check Tool enables you to print Chart.
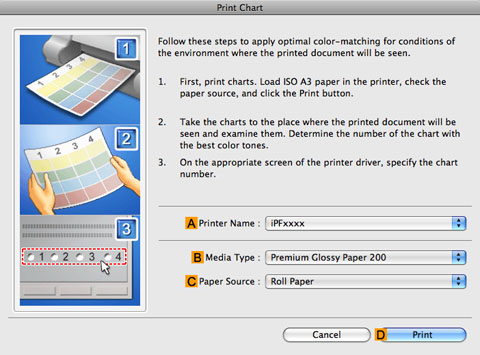 |
•APrinter Name
The printer name is displayed here.
•BMedia Type
Select the paper type. For information on the types of paper compatible with Driver Matching Mode, refer to the Paper Reference Guide.(See "Types of Paper (6.1.1)")
•CPaper Source
Choose the paper source, as desired.
Options displayed in the list vary depending on the selection in Media Type in the Main pane.
•DPrint
Click to print the Chart.
4. 1. 14. Mac OS X Software > Printer Driver >
Color Settings Pane: Color (Mac OS X)
Color Settings Pane: Color (Mac OS X)
In general, make any needed adjustments to the color of documents in the application used to create them. However, if the color tone as printed is not as you expected, you can also adjust the color in the printer driver.
| Color Adjustment pane: color | ||||||
|
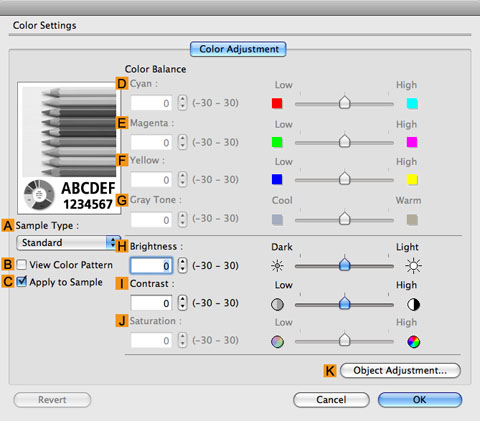
If the color tone as printed is not as you expected, you can adjust it on the Color Adjustment pane.
|
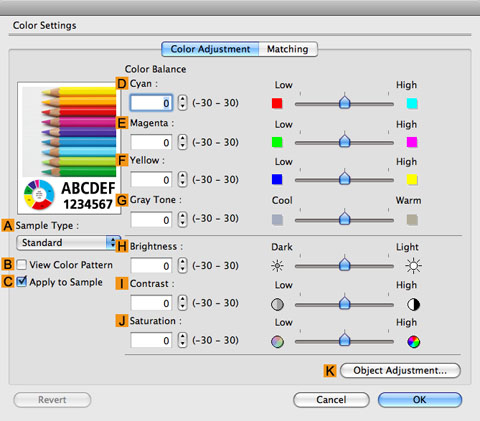
•ASample Type
Choose a sample image from Standard, Portrait, Landscape, or Graphics.
•BView Color Pattern
Select this checkbox to display the color pattern.
•CApply to Sample
Select this checkbox to apply the changed settings to the sample image.
•DCyan / EMagenta / FYellow
Correct color tones by adjusting the levels of each color.
•GGray Tone
Adjust the color tone of grays as desired. Choose Cool (tinged with blue) or Warm (tinged with red).
•HBrightness
Adjust the overall image brightness as desired. You can adjust the brightness if the printed document is lighter or darker than the original image (that is, the original photo that was scanned or the original graphic as it appears on the computer screen).
•IContrast
Adjust the contrast of the darkest and lightest portions relative to each other, as desired. Increasing the Contrast makes images sharper, and reducing the Contrast softens images.
•JSaturation
Adjust the color intensity as desired. Increasing the Saturation setting makes colors more vivid, and reducing the Saturation makes colors more subdued.
| Note | ||
|
• For details on settings items, see "Adjusting the Color in the Printer Driver (2.3.1)"
|
||
•KObject Adjustment
Select this option to display the Object Adjustment dialog box, in which you can specify objects subject to color adjustment.
•Object Adjustment dialog box: Color (4.1.15)
4. 1. 15. Mac OS X Software > Printer Driver >
Object Adjustment dialog box: Color
Object Adjustment dialog box: Color
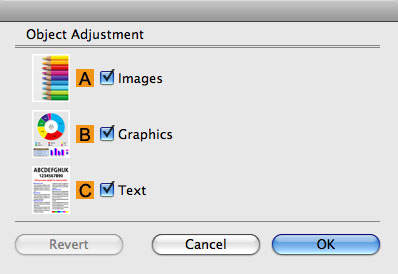
In the Object Adjustment dialog box, you can specify what type of print jobs to apply color adjustment to. If an original comprises images, graphics, and text, you can specify which portion to apply color adjustment to.
 |
| Note | ||
|
• To display the Object Adjustment dialog box, click Object Adjustment on the Color Adjustment panel.
|
||
•AImages
Select this option to apply color adjustment to image areas, such as photos.
•BGraphics
Select this option to apply color adjustment to graphics, such as lines and circles.
•CText
Select this option to apply color adjustment to text.
4. 1. 16. Mac OS X Software > Printer Driver >
Color Settings Pane: Monochrome (Mac OS X)
Color Settings Pane: Monochrome (Mac OS X)
| Color Adjustment pane: Monochrome | ||||||
|
On the Color Adjustment pane for monochrome printing, you can adjust the brightness and contrast.
|
•ASample Type
Choose a sample image from Standard, Portrait, Landscape, or Graphics.
•BView Color Pattern
Select this checkbox to display the color pattern.
•CApply to Sample
Select this checkbox to apply the changed settings to the sample image.
•DCyan / EMagenta / FYellow
Not available.
•GGray Tone
Not available.
•HBrightness
Adjust the overall image brightness as desired. You can adjust the brightness if the printed document is lighter or darker than the original image (that is, the original photo that was scanned or the original graphic as it appears on the computer screen).
•IContrast
Adjust the contrast of the darkest and lightest portions relative to each other, as desired. Increasing the IContrast makes images sharper, and reducing the IContrast softens images.
•JSaturation
Not available.
| Note | ||
|
• For details on settings items, see "Adjusting the Color in the Printer Driver (2.3.1)"
|
||
•KObject Adjustment
Select this option to display the Object Adjustment dialog box, in which you can specify objects subject to color adjustment.
•Object Adjustment dialog box: Monochrome (4.1.17)
4. 1. 17. Mac OS X Software > Printer Driver >
Object Adjustment dialog box: Monochrome
Object Adjustment dialog box: Monochrome
In the Object Adjustment dialog box, you can specify what type of print jobs to apply color adjustment to. If an original comprises images, graphics, and text, you can specify which portion to apply color adjustment to.
 |
| Note | ||
|
• To display the Object Adjustment dialog box, click Object Adjustment on the Color Adjustment panel.
|
||
•AImages
Select this option to apply color adjustment to image areas, such as photos.
•BGraphics
Select this option to apply color adjustment to graphics, such as lines and circles.
•CText
Select this option to apply color adjustment to text.
4. 1. 18. Mac OS X Software > Printer Driver >
Gray Adjustment Pane (Mac OS X)
Gray Adjustment Pane (Mac OS X)
| Gray Adjustment | ||||||
|
On the Gray Adjustment pane, you can adjust the color balance, brightness, contrast, and other image qualities.
|
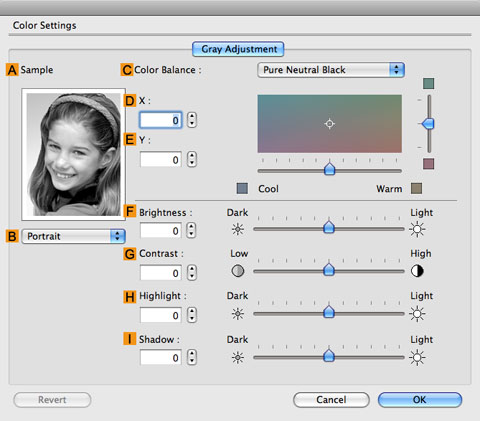
•ASample
The image at left is updated to reflect any changes you make to setting items on the sheet, enabling you to check the results of adjustment.
•BSample List
Select a sample image, as desired.
•CColor Balance
Click the list to select a color balance that suits the printing application.
•DX / EY
Adjust the color balance as you check the color tone in the adjustment area.
You can adjust the square area in the center by clicking or dragging it.
Drag the vertical or horizontal scroll bars for adjustment, as desired.
You can click the arrows by the DX (horizontal) and EY (vertical) boxes or enter the values directly.
•FBrightness
Adjust the overall image brightness as desired. You can adjust the brightness if the printed document is lighter or darker than the original image (that is, the original photo that was scanned or the original graphic as it appears on the computer screen).
•GContrast
Adjust the contrast of the darkest and lightest portions relative to each other, as desired. Increasing the GContrast makes images sharper, and reducing the GContrast softens images.
•HHighlight
Adjust the brightness of the lightest portion.
•IShadow
Adjust the brightness of the darkest portion.
4. 1. 19. Mac OS X Software > Printer Driver >
Page Setup Pane (Mac OS X)
Page Setup Pane (Mac OS X)
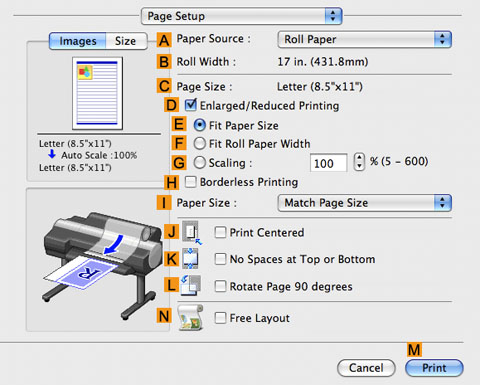
The following settings are available on the Page Setup pane. For details on settings items, refer to the printer driver help.
|
•APaper Source
Choose how paper is supplied.
Options displayed in the list vary depending on the selection in AMedia Type in the Main pane.
•BRoll Width
Displays the paper width of the roll loaded in the printer. Unknown is displayed if the printer cannot detect the roll paper width.
•CPage Size
Displays the size of the original, as specified in the page settings of the application.
For details on page sizes available in the application. see "Paper Sizes (6.1.2)"
•DEnlarged/Reduced Printing
Select this checkbox to choose the following options.
•EFit Paper Size
Resizes the document image to match the paper size.
•FFit Roll Paper Width
Resizes the document image to match the roll width.
•GScaling
Resizes the document image based on a specified scaling value. Enter a value in a range of 5–600.
•HBorderless Printing
Borderless printing is available if roll paper is selected in the APaper Source list.
Activate this setting for borderless printing to match the size and width of the paper.
•IPaper Size
Choose the size of the paper you will print on.
Click Display all selections for Paper Size to list available sizes.
For details on available paper sizes, see "Paper Sizes (6.1.2)"
•JPrint Centered
Select this checkbox to print document images in the center of the paper.
•KNo Spaces at Top or Bottom
Select this checkbox to print the next image skipping blank areas above and below printable data in documents, which enables you to conserve the paper.
•Conserving Roll Paper by Printing Originals Without Top and Bottom Margins (2.10.4)
•LRotate Page 90 degrees
Select this checkbox to rotate the document image by 90 degrees before printing.
•Conserving Roll Paper by Rotating Originals 90 Degrees (2.10.1)
•NFree Layout
Select this checkbox to start imagePROGRAF Free Layout before printing.
This allows you to print multiple documents next to each other.
| Important | ||
|
• When Print Preview is selected on the Main panel, Print Preview is disabled.
|
||
•Printing Multiple Originals Next to Each Other (2.8.1)
4. 1. 20. Mac OS X Software > Printer Driver >
Utility Pane (Mac OS X)
Utility Pane (Mac OS X)
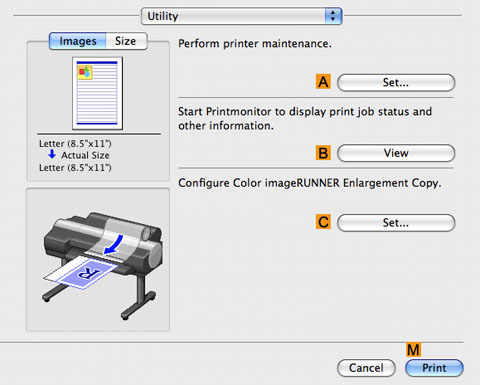 |
•ASet
Click to display the Printer Information dialog box, which offers the following maintenance for the printer.
•Nozzle (ink ejecting outlet) cleaning
•Head alignment adjustment
•Feed amount adjustment
•BView
Click to start imagePROGRAF Printmonitor, which enables you to view the status of print jobs.
•CSet
Click to complete the settings for Color imageRUNNER Enlargement Copy (iR enlargement copy).
For details, see Color imageRUNNER Enlargement Copy.
4. 1. 21. Mac OS X Software > Printer Driver >
Additional Settings Pane (Mac OS X)
Additional Settings Pane (Mac OS X)
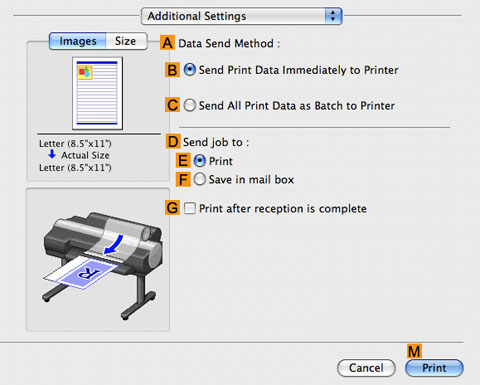 |
•AData Send Method
Choose how print data is sent to the printer.
•BSend Print Data Immediately to Printer
•CSend All Print Data as Batch to Printer
•DSend job to
You can configure the method for saving print jobs to the printer hard disk.
•EPrint
•FSave in mail box
•GPrint after reception is complete
Jobs are printed after they are saved on the hard disk.
4. 1. 22. Mac OS X Software > Printer Driver >
Support Pane (Mac OS X)
Support Pane (Mac OS X)
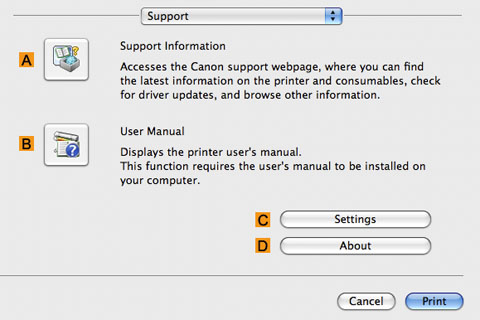 |
•ASupport Information
Click to access the Canon support webpage, where you can find the latest information on the printer and consumables, check for printer driver updates, and browse other information.
•BUser Manual
Click to view the printer user's manual. This function requires the user's manual to be installed on your computer.
•CSettings
The settings can be saved as a file. Click to display the Export dialog box, which enables you to specify where to save the file.
•DAbout
You can display version information for the printer driver.