6. 2. 1. Handling Paper > Handling rolls >
Loading Rolls on the Roll Holder
Loading Rolls on the Roll Holder
Rolls have a two- or three-inch paper core. Use the correct attachment for the paper core. The printer comes equipped with the 2-Inch Paper Core Attachment installed.

For borderless printing on A1 (594 mm) or A2 (420 mm) rolls, attach the included Spacer for Borderless Printing to the Roll Holder.

| Caution | ||
|
• Set the roll on a table or other flat surface so that it does not roll or fall. Rolls are heavy, and dropping a roll may cause injury.
|
||
| Important | ||
|
• When handling the roll, be careful not to soil the printing surface. This may affect the printing quality. We recommend wearing clean cloth gloves when handling rolls to protect the printing surface.
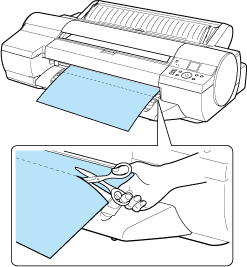
• Use scissors or a cutting tool to cut the edge of the roll paper if it is uneven, dirty, or has tape residue. Otherwise, it may cause feeding problems and affect the printing quality. Be careful not to cut through any barcodes printed on the roll.
• Align the edges of the paper on both ends of the roll. Otherwise, it may cause feeding problems.
|
||
| Note | ||
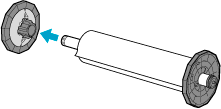
- Remove the Holder Stopper from the Roll Holder.
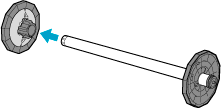
- Insert the attachments for the roll paper on the Roll Holder.
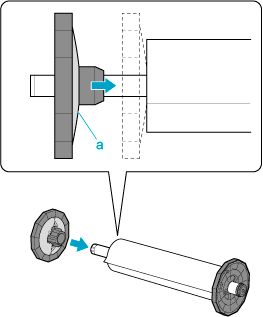
•Using rolls with a 3-inch paper core
Attach the included 3-Inch Paper Core Attachment on the Roll Holder.Align the triangular part (b) of the 3-Inch Paper Core Attachment (a) with the triangular part (c) of the Roll Holder as shown, and insert the 3-Inch Paper Core Attachment into the Roll Holder.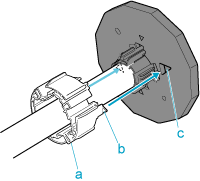 Use the Holder Stopper for 3-inch paper cores.•Borderless printing on A1 or A2 rolls
Attach the included Spacer for Borderless Printing to the Roll Holder.Insert the protrusions (b) of the Spacer for Borderless Printing (a) into the holes (c) of the Roll Holder, as shown.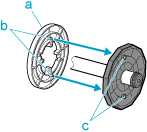
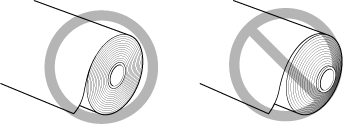
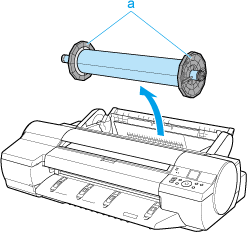
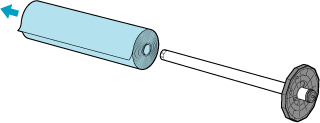
- With the Roll Holder resting horizontally and the edge of the roll paper facing forward as shown, insert the roll in the Roll Holder from the left. Insert the roll firmly until it touches the flange (a) of the Roll Holder, leaving no gap.
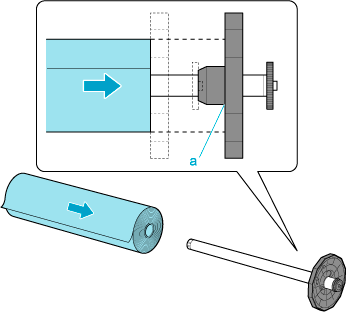

Important • Always have the Roll Holder resting horizontally when loading rolls. Attempting to load rolls with the Roll Holder upright may damage the Roll Holder. - Insert the Holder Stopper from the left in the Roll Holder as shown. Push it firmly in until the flange (a) of the Holder Stopper touches the roll.
Attach the appropriate Holder Stopper for the size of the paper core.
6. 2. 2. Handling Paper > Handling rolls >
Loading Rolls in the Printer
Loading Rolls in the Printer
| Important | ||
|
• Always load rolls when the printer is on. If the printer is off when you load a roll, the paper may not be advanced correctly when you turn the printer on.
• Before loading a roll, confirm whether the inside of the Top Cover or the Ejection Guide is soiled. If soiled, we recommend cleaning in advance. (See "Cleaning Inside the Top Cover (11.4.2).")
|
||
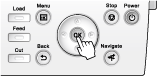
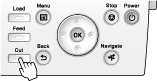
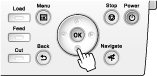
- Press the Load button.
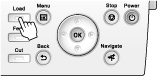
- Press
 or
or  to select Roll Paper, and then press the OK button.

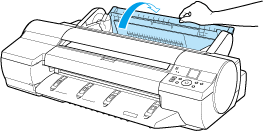
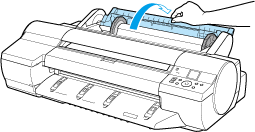
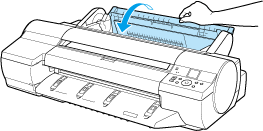
Note • If any paper has been advanced that will not be used, a message is shown requesting you to remove it.Press or to select "Yes", and then press the OK button. Remove the paper and go to the next step. - Open the Roll Feed Unit Cover.
- Holding the Roll Holder flange (a), load the Roll Holder shaft into the guide grooves (b) on both sides of the Roll Holder Slot. At this time, load the shaft so that the color of the Roll Holder shaft (c) matches the color of the guide groove.
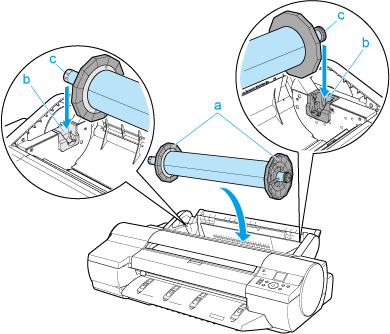

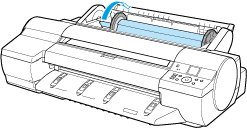
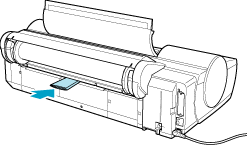
Caution • Do not release the flanges until you load the holder fully in the Roll Holder Slot. Rolls are heavy, and dropping a roll may cause injury.• Be careful not to pinch your fingers between the guide grooves (b) and the Roll Holder shaft (c) when loading rolls.Important • Do not force the Roll Holder into the printer with the right and left ends reversed. Otherwise, it may damage the printer or Roll Holder.Note • If it is difficult to load rolls from the front of the printer, load rolls from the back of the printer. - Insert the edge of the roll in the Paper Feed Slot (a) and advance the roll until you hear the feed tone.
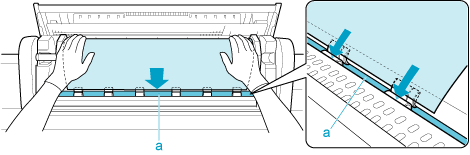
Important • Be careful not to soil the printing surface of roll paper as you insert it in the slot. This may affect the printing quality. We recommend wearing clean cloth gloves when handling rolls to protect the printing surface.• If the paper is wrinkled or warped, straighten it out before loading it.• Load paper straight so it is not fed askew.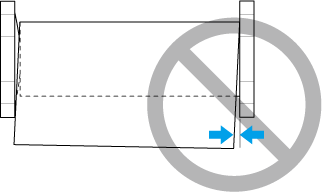
- Once paper feeding starts, you will need to do the following, based on the ManageRemainRoll setting and the barcode printed on rolls. (See "Keeping Track of the Amount of Roll Paper Left (6.2.10).")
Note • For details on types of paper to select, see the Paper Reference Guide. (See "Types of Paper (6.1.1).") - Close the Roll Feed Unit Cover.
Important • Cut the edge of the roll using the Paper Cutting function if the edge is creased or soiled. (See "Specifying the Cutting Method for Rolls (6.2.12).")Note • Adjusting the printhead alignment with the type of paper to be used in printing may enhance printing quality. (See "Automatic Adjustment to Straighten Lines and Colors (Head Posi. Adj.) (7.2.2).")
6. 2. 3. Handling Paper > Handling rolls >
Changing the Type of Paper
Changing the Type of Paper
Follow these steps to change the type of paper specified on the printer after you have loaded paper.
If you will continue using this type of paper later, selecting Keep Paper Type > On will save the time and effort of configuring the media type setting when you load the paper again. The current media type settings before you select On will be automatically selected at that time. (See "Using the Same Type of Paper Regularly.")
| Important | ||
|
• For best printing results, the printer fine-tunes the print head height and the feed amount for each type of paper. Be sure to select the type of paper to use correctly before printing.
• Because the printer fine-tunes the feed amount for each type of paper, the margins and the size of printed images may vary depending on the type of paper used. If margins and the size of images are not as you expected, adjust the paper feed amount.
(See "Adjusting the Feed Amount (7.3.1).")
|
||
| Changing the Type of Paper | |||||||||||||||||||||
|
| Using the Same Type of Paper Regularly | |||||||||||
|
Configure this setting so that current media type settings will be automatically selected when you load the same type of paper later.
|
6. 2. 4. Handling Paper > Handling rolls >
Specifying the Paper Length
Specifying the Paper Length
| Note | ||
|
• Specify the paper length when you have set ManageRemainRoll to On. (See "Keeping Track of the Amount of Roll Paper Left (6.2.10).")
|
||
- On the Tab Selection screen of the Control Panel, press
 or
or  to select the Paper tab (
 ).
).
Note • If the Tab Selection screen is not displayed, press the Menu button. - Press the OK button.
The Paper Menu is displayed.
- Press or to select Chg. Paper Size, and then press the OK button.
- Press or to select Roll Length, and then press the OK button.
- Press or to select the length of paper loaded in the printer, and then press the OK button.
Specify the roll length as follows.1.Press the or button to move to the next field for input.2.Press the or button to enter the value.3.Repeat steps 1 and 2 to finish entering the value, and then press the OK button.
6. 2. 5. Handling Paper > Handling rolls >
Removing the Roll from the Printer
Removing the Roll from the Printer
| Important | ||
|
• Once a roll has been advanced, do not pull the paper out by force. This will prevent further feeding, and the printer will be unable to keep track of the amount of roll paper left.
If you accidentally pull out paper, follow these steps to remove the roll, and open the paper feed slot.
|
||
| Note | ||
|
• If you need to cut the roll, see "Specifying the Cutting Method for Rolls (6.2.12)."
|
||
- On the Tab Selection screen of the Control Panel, press or to select the( Paper tab ) .
Note • If the Tab Selection screen is not displayed, press the Menu button. - Press the OK button.
The Paper Menu is displayed.
- Press or to select Eject Paper, and then press the OK button.
- Press or to select "Yes", and then press the OK button.
The roll is now rewound and ejected.
Important • If you have selected ManageRemainRoll > On in the Control Panel menu, a barcode is printed on the leading edge of the roll.Do not remove the roll before the barcode is printed. You will be unable to keep track of the amount of roll paper left. (See "Keeping Track of the Amount of Roll Paper Left (6.2.10).")
- Open the Roll Feed Unit Cover.
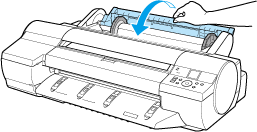
- Using both hands, rotate the Roll Holder toward the back to rewind the roll.
- Holding the Roll Holder flange (a), remove the holder from the Roll Holder Slot.
Note • For instructions on removing rolls from the Roll Holder, see "Removing Rolls From the Roll Holder (6.2.6)." - Close the Roll Feed Unit Cover.
| Note | ||
|
• To load new paper in the printer at this point, see "Loading Rolls in the Printer (6.2.2)."
|
||
6. 2. 6. Handling Paper > Handling rolls >
Removing Rolls From the Roll Holder
Removing Rolls From the Roll Holder
- Remove the Holder Stopper from the Roll Holder.
- Remove the roll from the Roll Holder.
- Remove any attachments as follows.
•3-Inch Paper Core AttachmentSpread the tips (b) of the 3-Inch Paper Core Attachment that protrude by the triangular label (a) of the Roll Holder as shown and remove the 3-Inch Paper Core Attachment.
 •Spacer for Borderless PrintingRemove the Spacer for Borderless Printing from the Roll Holder as shown.
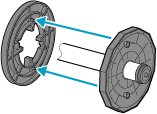
| Important | ||
|
• Store the roll in the original bag or box, away from high temperature, humidity, and direct sunlight. If paper is not stored properly, the printing surface may become scratched, which may affect the printing quality when you use it again.
|
||
6. 2. 7. Handling Paper > Handling rolls >
Clearing Jammed Roll Paper
Clearing Jammed Roll Paper
If paper from a roll becomes jammed, "Paper jam" is shown on the Display Screen of the Control Panel. Remove the jammed paper as follows.
| Important | ||
|
• For instructions on removing scraps from the paper feed slot after clearing jammed roll paper, see "Clearing Jammed Paper (Paper Feed Slot) (6.2.8)."
|
||
- Open the Roll Feed Unit Cover. Use a commercially available cutter or the like to cut the paper of the loaded roll.
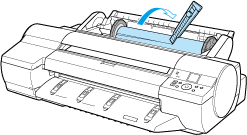
Caution • When cutting paper, be careful to avoid injury or damage to the printer. - Press the OK button.
- Remove the jammed paper.
•If paper is jammed inside the Top Cover
1.Open the Top Cover and move the Carriage to the side.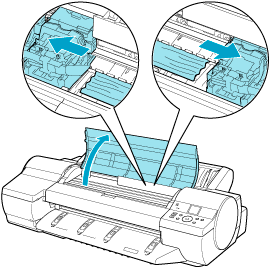 2.Clear any jammed paper from inside the Top Cover.After removing the paper, make sure there are no other scraps of paper in the printer.3.Close the Top Cover.
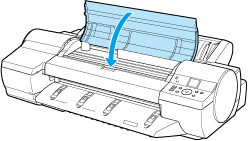
Important • Do not move the Carriage over jammed paper. This may damage the Printhead.• Do not touch the Linear Scale (a) or Carriage Shaft (b). This may stain your hands and damage the printer.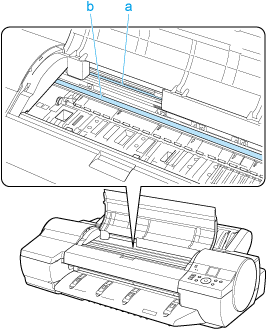 •If paper from a roll is jammed by the Paper Feed Slot
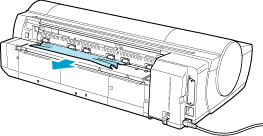
1.Open the Roll Feed Unit Cover.2.Remove the jammed paper from the Paper Feed Slot.After removing the paper, make sure there are no other scraps of paper in the printer.If paper is jammed deep in the Paper Feed Slot, remove the roll feed unit, and then clear the paper jam. (See "Clearing Jammed Paper (Paper Feed Slot) (6.2.8).")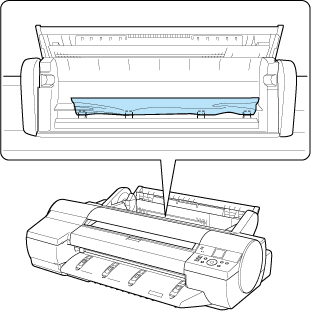 •If the paper is jammed by the Ejection Guide
Remove the jammed paper from the Output Tray.After removing the paper, make sure there are no other scraps of paper in the printer.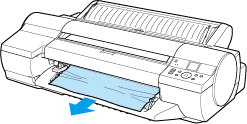
- Press the OK button.
6. 2. 8. Handling Paper > Handling rolls >
Clearing Jammed Paper (Paper Feed Slot)
Clearing Jammed Paper (Paper Feed Slot)
Follow these steps to clear jams deep in the Paper Feed Slot or to remove any scraps left in the slot when you are clearing jams.
| Clear any jammed paper deep in the Paper Feed Slot |
|
If paper is jammed deep in the Paper Feed Slot, remove the Roll Feed Unit and clear the paper jam as follows.
|
| Remove scraps left in the Paper Feed Slot | |
|
Follow these steps to remove any scraps left in the Paper Feed Slot after you clear jammed sheets or roll paper.
|
6. 2. 9. Handling Paper > Handling rolls >
Feeding Roll Paper Manually
Feeding Roll Paper Manually
After a roll has been advanced, you can press the Feed button to feed or retract the roll with the and buttons.
and buttons. |
- Press the Feed button.
- Press the or button to advance or retract the roll.
Press to retract the roll manually.Press to advance the roll manually.
| Note | ||
|
• If you hold down
or for less than a second, the roll will move about 1 mm (0.04 in).
If you hold down
or for more than a second, the roll will move until you release the button. Release the button when the Display Screen indicates "End of paper feed. Cannot feed paper more.". |
||
6. 2. 10. Handling Paper > Handling rolls >
Keeping Track of the Amount of Roll Paper Left
Keeping Track of the Amount of Roll Paper Left
Setting ManageRemainRoll to On in the Paper Menu of the Control Panel will print a barcode with text on the roll when the roll is removed that identifies the type of paper and amount left. When ManageRemainRoll is On and you load rolls with printed barcodes, the type of paper and amount left are automatically detected after rolls are loaded. The barcode will be cut off after it has been read.
|
| Important | ||
|
• If the barcode on the roll is not detected, enter the type and length of paper on the Control Panel.
|
||
Follow these steps to set ManageRemainRoll to On as follows.
- On the Tab Selection screen of the Control Panel, press or to select the Paper tab ().
Note • If the Tab Selection screen is not displayed, press the Menu button. - Press the OK button.
The Paper Menu is displayed.
- Press or to select ManageRemainRoll, and then press the OK button.
- Press or to select On, and then press the OK button.
6. 2. 11. Handling Paper > Handling rolls >
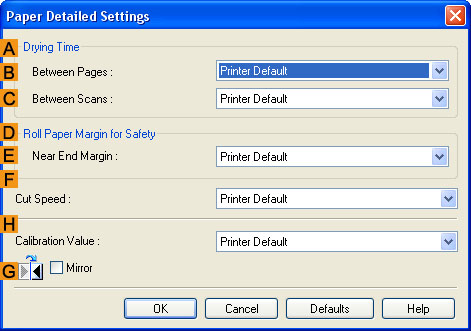
Specifying the Ink Drying Time for Rolls
Specifying the Ink Drying Time for Rolls
When you are using paper that takes longer for ink to adhere, ink may be transferred onto the paper surface during ejection, soiling it. In that case, you may be able to improve the condition by setting the time to wait for the ink to dry after printing.
| Note | ||
|
• If the Cutter touches the print surface on which the ink is not dry, the paper surface may become scratched or soiled, or the paper surface may rub against the output stacker when the paper falls and the surface may become soiled.
To wait for the ink to dry without allowing printed documents to fall after printing, set Cutting Mode on the menu of the printer to Eject. (See "Specifying the Cutting Method for Rolls (6.2.12).")
|
||
| Windows | ||
|
| Mac OS X | ||
|
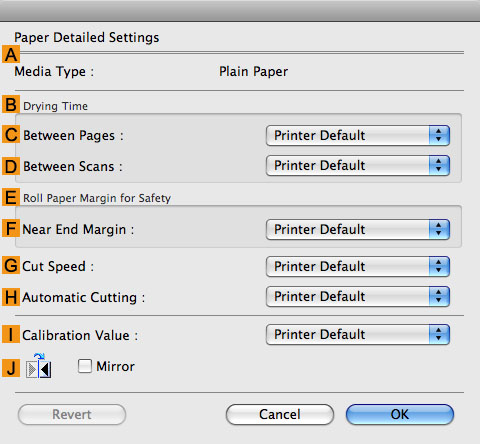
6. 2. 12. Handling Paper > Handling rolls >
Specifying the Cutting Method for Rolls
Specifying the Cutting Method for Rolls
| Cutting Method | Printer Setting | Driver Setting | |||
| Automatic | The roll is automatically cut by the Cutter Unit following printer driver settings. | Media Menu > Paper Details > (Various Types of Paper) > Cutting Mode | Automatic | Auto Cut
(See "Cutting Roll Paper After Printing (2.12.9).")
|
Yes |
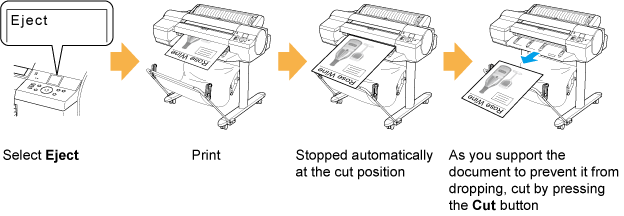
| Eject | Select this to move the cutter by key operation and cut paper. Although there are cases with Automatic in which the paper falls and the paper surface is scratched when the paper rubs the Output Stacker, you can avoid damaging the paper with this method since you can cut by holding the paper with your hand so that the paper does not fall when cutting, Also, since you can cut while visually confirming the drying of the ink, you can avoid ejecting paper before the ink has dried.
To cut the roll with the Cutter Unit, press the Cut button.
|
Eject | Yes | ||
| Manual | Choose this setting when using media that cannot be cut using the Cutter Unit.
Use scissors to cut each document from the roll after printing. For continuous printing (if you will cut each page later), select Auto Cut > Yes or select Print Cut Guideline.
|
Manual | NoYesPrint Cut Guideline | ||
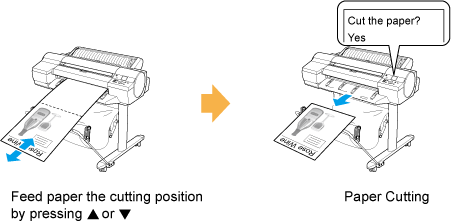
| Paper Cutting | Choose this option if you want to cut pages by pressing Cutter Unit buttons for manual cutting after printing when Auto Cut > No is selected or Print Cut Guideline is selected in the printer driver.
Otherwise choose this option if you want to cut the roll edge after loading a roll.
|
Cut button pressed | Yes | NoPrint Cut Guideline | |
| Note | ||
|
• Automatic and Eject are valid only when you have selected Auto Cut > Yes in the printer driver.
• With Eject, printing does not resume after a series of jobs have been printed continuously until the roll is cut.
• Eject is the preset selection in Cutting Mode for some types of paper. For this paper, we recommend keeping the preset cutting mode.
• If documents printed using Automatic, Eject, or manual cutting are short, rolls are advanced a specific amount before cutting to prevent problems with cutting and paper ejection. This may create a wider bottom margin, in some cases.
|
||
Cut rolls manually in the following cases:
| Eject (when the paper surface is being scratched / to wait for ink to dry) | |||||||||||||
|
| Manual (when using media that cannot be cut with the Cutter Unit ) | ||||||||||
|

| Paper cutting (to have the roll cut at your specified position) | |||
|
6. 2. 13. Handling Paper > Handling rolls >
Cutting the Leading Edge of Roll Paper Automatically
Cutting the Leading Edge of Roll Paper Automatically
If the leading edge of a roll is crooked or warped, it may cause an error message or printing problems. In this case, set Trim Edge First to Automatic or On in the Paper Menu on the Control Panel to have the printer cut the leading edge to make the edge straight after you load a roll.
Trim Edge First offers the following options.
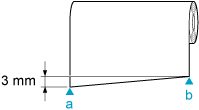
•Automatic
If the left and right side of the leading edge of the roll ((a) and (b)) are uneven by 3 mm (0.12 in) or more when you load the roll, the edge is cut an amount relative to the slant to ensure a straight edge, and scraps are removed. The edge is not cut if the unevenness is less than 3 mm. However, paper may sometimes be cut, depending on the state of the leading edge.
 |
•Off
The edge is not cut and scraps are not removed. This setting is Off for most types of paper, by default. For more information, see the Paper Reference Guide. (See "Types of Paper (6.1.1).")
•On
The leading edge is cut off when you load a roll, and scraps are removed. The amount of paper cut from the leading edge varies depending on the type of paper. For more information, see the Paper Reference Guide. (See "Types of Paper (6.1.1).")
 |
| Important | ||
|
• If the width of the paper differs, setting Skew Check Lv. to Loose relaxes the accuracy of the paper skew detection feature, and setting it to Off ignores the skew detection feature. However, when Off is selected and the paper is loaded skewed, a paper jam may result or the Platen may become soiled.
|
||
| Note | ||
|
• In the condition at the time of factory shipment, the setting differs depending on the paper. For details, refer to the Paper Reference Guide. (See "Types of Paper (6.1.1).")
|
||
Follow these steps to change the Trim Edge First setting.
- On the Tab Selection screen of the Control Panel, press or to select the Paper tab ().
Note • If the Tab Selection screen is not displayed, press the Menu button. - Press the OK button.
The Paper Menu is displayed.
- Press or to select Paper Details, and then press the OK button.
- Press or to select the type of paper, and then press the OK button.
- Press or to select Trim Edge First, and then press the OK button.
- Press or to select the desired setting option, and then press the OK button.
This setting takes effect the next time you load a roll.
6. 2. 14. Handling Paper > Handling rolls >
Reducing Dust from Cutting Rolls
Reducing Dust from Cutting Rolls
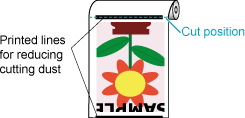
For media such as Backlit Film that are more likely to generate debris when cut, select CutDustReduct. >On in the Paper Menu of the Control Panel. This option reduces debris from cutting by printing black lines at the leading and trailing edges of documents. It may help prevent Printhead damage. You can specify for CutDustReduct. to be activated for particular types of paper.
 |
| Important | ||
|
• Do not set CutDustReduct. to On for paper that wrinkles easily, such as Plain Paper or lightweight paper. This may impair cutting and cause paper jams.
• Borderless printing is not available when CutDustReduct. is set to On. To use borderless printing, select CutDustReduct. >Off.
|
||
Set CutDustReduct. to On as follows.
- On the Tab Selection screen of the Control Panel, press or to select the Paper tab ().
Note • If the Tab Selection screen is not displayed, press the Menu button. - Press the OK button.
The Paper Menu is displayed.
- Press or to select Paper Details, and then press the OK button.
- Press or to select the type of paper loaded in the printer, and then press the OK button.
- Press or to select CutDustReduct., and then press the OK button.
- Press or to select On, and then press the OK button.
6. 2. 15. Handling Paper > Handling rolls >
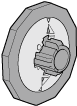
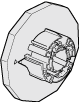
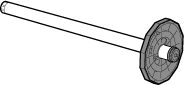
Roll Holder Set
Roll Holder Set
Load a roll on the roll holder and then load the holder in the printer. The Roll Holder in the Roll Holder Set RH2-25 is for use with both 2-inch and 3-inch paper cores. Use the correct attachment for the particular paper core. For borderless printing on A1 (594 mm) or A2 (420 mm) rolls, attach the included Spacer for Borderless Printing to the Roll Holder. (See "Loading Rolls on the Roll Holder (6.2.1).")
•Roll Holder Set RH2-25
•Roll Holder (for 2- and 3-inch paper cores)
 |
6. 2. 16. Handling Paper > Handling rolls >
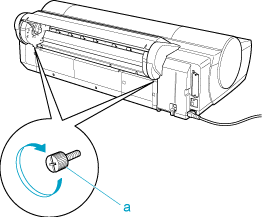
Removing the Roll Feed Unit
Removing the Roll Feed Unit
| Important | ||
|
• Always turn off the printer before removing the Roll Feed Unit. The printer may be damaged if you do not turn it off first.
|
||
- Remove the roll from the Roll Feed Unit. (See "Removing the Roll from the Printer (6.2.5).")
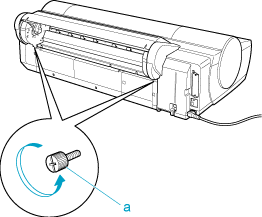
- Use a coin or screwdriver to loosen the screws (a) on both sides of the back of the Roll Feed Unit, and remove the screws.
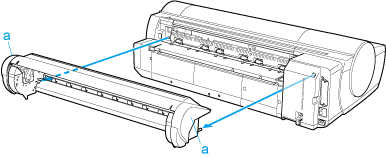
- Holding the Carrying Handles (a) of the Roll Feed Unit, remove the Roll Feed Unit from the printer.
6. 2. 17. Handling Paper > Handling rolls >
Installing the Roll Feed Unit
Installing the Roll Feed Unit
| Important | ||
|
• Always turn off the printer before attaching the Roll Feed Unit. The printer may be damaged if you do not turn it off first.
|
||
- Holding the Roll Feed Unit by the Carrying Handles (a), insert the two pins of the Roll Feed Unit (b) into the each hole on the back of the printer (c).
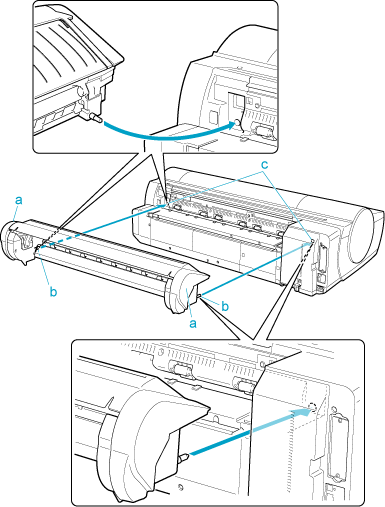
- Use a coin or screwdriver to tighten the two screws on the back of the Roll Feed Unit (a) to secure it to the printer.