9. 1. 1. Control Panel > Operations and Display Screen >
Control Panel
Control Panel
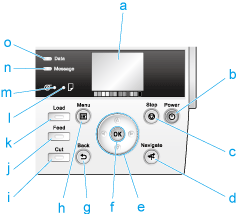 |
a.Display Screen
Shows printer menus, as well as the printer status and messages.
b.Power button (green)
Turns the printer on and off. (See "Turning the Printer On and Off (1.1.2).")
The Power button is lit when the printer is on or in Sleep mode.
c.Stop button
Cancels print jobs in progress and ends the ink drying period.
d.Navigate button
Enables you to check instructions for loading and removing paper or replacing ink tanks or printheads, as well as other operations. (See "How to View Instructions with Navigate (9.1.3).")
e.Arrow buttons
• button
buttonPress this button on the Tab Selection screen to move to another tab.
In menu items requiring numerical input, press this button to move to another digit.
• button
buttonPress this button when viewing menus to display the next menu item or setting value.
• button
buttonPress this button on the Tab Selection screen to move to another tab.
In menu items requiring numerical input, press this button to move to another digit.
• button
buttonPress this button when viewing menus to display the next menu item or setting value.
f.OK button
Press this button on the Tab Selection screen to display the menu of the tab shown.
Pressing this button in menu items of each tab for which  is displayed at left will move to the lower level of the menu item, enabling you to execute menu commands or set menu values.
is displayed at left will move to the lower level of the menu item, enabling you to execute menu commands or set menu values.Also press this button if the Display Screen indicates to press the OK button.
g.Back button
Displays the screen before the current screen.
i.Cut button
Pressing this button when rolls are loaded cuts the paper, if you have specified Automatic or Eject in Cutting Mode in the Control Panel menu. (See "Specifying the Cutting Method for Rolls (6.2.12).")
j.Feed button
Pressing this button when rolls are loaded enables you to reposition the paper. (See "Feeding Roll Paper Manually (6.2.9).")
k.Load button
Press this button when loading or replacing paper.
(See "Loading Rolls in the Printer (6.2.2).")
(See "Loading Sheets in the Feed Slot (6.3.1).")
l.Cut Sheet lamp (green)
Lit when Tray or Front Paper Feed Slot is selected as the paper source.
m.Roll Media lamp (green)
Lit when rolls are selected as the paper source.
n.Message Lamp (orange)
•On
A warning message is displayed.
•Flashing
An error message is displayed.
•Off
The printer is off or is operating normally.
o.Data Lamp (green)
•Flashing
During printing, the Data lamp flashes when the printer is receiving or processing print jobs. Otherwise, this lamp flashes when the print job is paused or the printer is updating the firmware.
•Off
There are no active print jobs when the Data lamp is off.
| Note | ||
|
• To recover from Sleep mode, any button can be pressed on the Control Panel.
|
||
9. 1. 2. Control Panel > Operations and Display Screen >
Control Panel Display
Control Panel Display
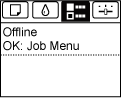
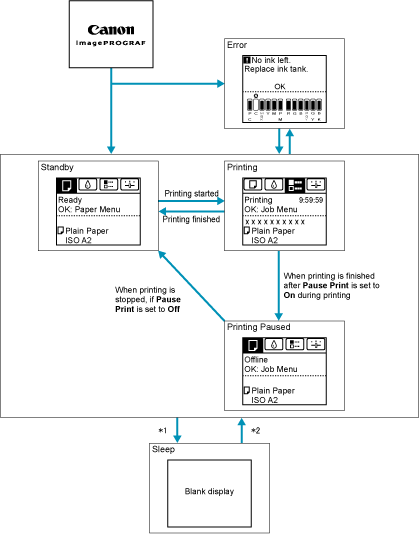
After the printer starts up, the Tab Selection screen is displayed.
Each of the four tabs presents status, menus, and error information related to the particular tab.
| Types of tabs | ||||||
|
The Tab Selection screen presents four tabs. Each tab is represented by an icon in the top row. Press the
or button to access other tabs.
|
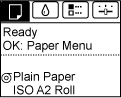
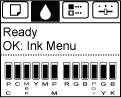
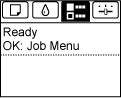
| Printer status and modes | ||||||
|
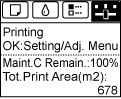
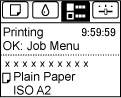
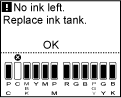
Printer status is classified according to the following five modes.
|
9. 1. 3. Control Panel > Operations and Display Screen >
How to View Instructions with Navigate
How to View Instructions with Navigate
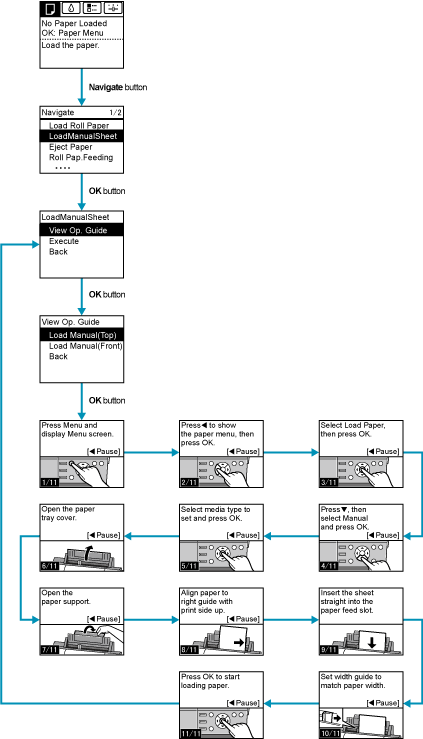
You can refer to instructions for loading paper, replacing ink tanks, and performing other operations on the printer control panel.
- Press the Navigate button.
- Press or to select the desired navigation menu.
- Press or to select View Op. Guide, and then press the OK button.
Instructions are now displayed.
・ Example: Loading sheets
 |
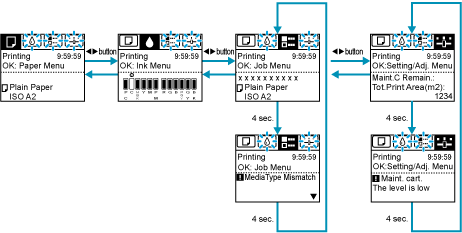
9. 1. 4. Control Panel > Operations and Display Screen >
Checking Instructions During Printer Operations
Checking Instructions During Printer Operations
You can refer to instructions on the printer control panel when loading paper, replacing ink tanks, or performing other operations.
| How to view instructions | ||||||
|
Once you complete an action described in the instructions, the printer detects the action and switches to the next instruction screen.
In the case of actions the printer cannot detect, instruction screens are switched every four seconds, and the sequence of operations is shown repeatedly.
When all actions in the sequence are finished, the instruction screen for the next step is displayed.
・ Example: Ink tank replacement
|
