6. Handling Paper
   6. 3. Handling sheets

  1. Loading Sheets in the Feed Slot
  2. Changing the Type of Paper
  3. Removing Sheets
  4. Clearing a Jammed Sheet, Fed Manually
  5. Clearing Jammed Paper (Paper Feed Slot)

6. 3. 1. Handling Paper > Handling sheets >
Loading Sheets in the Feed Slot
When printing on individual sheets, load the sheet in the Top Paper Feed Slot. However, for heavyweight paper such as POP board, load the sheet in the Front Paper Feed Slot.
  Selecting the Paper Source and Type of Paper
If a print job was received
Sheets are automatically selected, and the media type and size specified by the print job are shown on the Display Screen.
  1. Press or to select Load Paper, and then press the OK button.
  2. Load the sheet in the Top Paper Feed Slot or Front Paper Feed Slot, depending on the type of paper specified by the print job.
    If a type of paper other than POP Board is selected
If no print job was received
  1. Press the Load button.
  2. Press or to select Manual Paper, and then press the OK button.
    Note
    •  If any paper has been advanced that will not be used, a message is shown requesting you to remove it.
    Press or to select "Yes", and then press the OK button. Remove the paper and go to the next step.
  3. Press or to select the type of paper, and then press the OK button.
    When printing on heavyweight paper, select POP Board and load the sheet in the Front Paper Feed Slot.  (See "Loading Heavyweight Sheets in the Front Paper Feed Slot.")
    When printing on other types of paper, select the type of paper and load the sheet in the Top Paper Feed Slot.  (See "Loading Sheets in the Top Paper Feed Slot.")
    Note
    •  For details on types of paper to select, see the Paper Reference Guide.  (See "Types of Paper (6.1.1).")

  Loading Sheets in the Top Paper Feed Slot
Important
•  One sheet of paper can be loaded at a time. Do not load multiple sheets. This may cause paper jams.
•  Before feeding paper or printing, make sure the sheet is flat against the Paper Tray Cover. The sheet may jam if it curls before feeding or printing and the trailing edge drops toward the front.
•  Paper that is wrinkled or warped may jam. If necessary, straighten the paper and reload it.
•  Load the paper straight. Loading paper askew will cause an error.
Note
•  Store unused paper in the original package, away from high temperature, humidity, and direct sunlight.
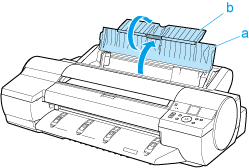
  1. Open the Paper Tray Cover (a), and then open the Tray Extension (b).
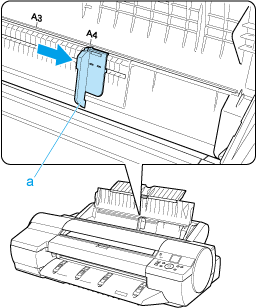
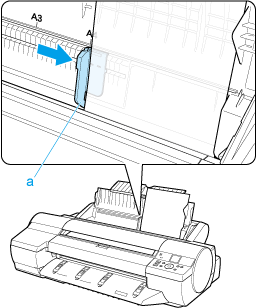
  2. Slide the Width Guide (a) to align it with the mark for the size of paper you will load.
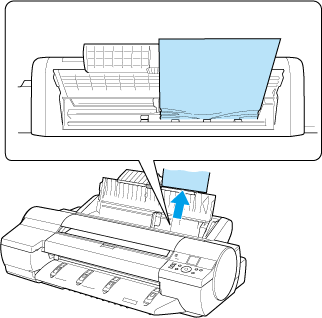
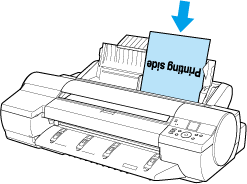
  3. Load one sheet, printing-side up, in the Top Paper Feed Slot.
    Insert the paper until it touches the far end of the tray lightly.
    Important
    •  If you load a sheet larger than A2, the sheet may fall behind the printer under its own weight. Put your hand under the sheet to support it and prevent it from falling.
  4. Move the Width Guide (a) to match the size of paper loaded.
    Set the Width Guide against the edge of the paper to prevent the paper from becoming crooked or wrinkled.
  5. Press the OK button.
    If a print job was received
    After the paper is advanced, the printer starts printing the print job.
    If no print job was received
    The printer now starts feeding the paper.

  Loading Heavyweight Sheets in the Front Paper Feed Slot
Important
•  Always load POP Board in the Front Paper Feed Slot for printing. Loading it in other ways may impair operation and damage the printer.
•  One sheet of paper can be loaded at a time. Do not load multiple sheets. This may cause paper jams.
•  Straighten paper if it is warped before loading it.
•  Load the paper straight. Loading paper askew will cause an error.
•  Once you load the paper, you cannot shift it sideways. Load the paper straight.
Note
•  Store unused paper in the original package, away from high temperature, humidity, and direct sunlight.
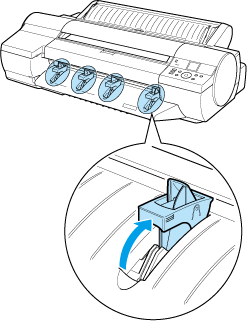
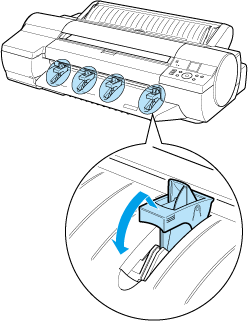
  1. If the message "Leave 70cm (28") space behind printer." is displayed, check the space behind the printer, pull up the four Front Tray Guides above the Ejection Guide, and press the OK button.
    Note
    •  Sufficient space behind the printer is required when loading paper in the Front Paper Feed Slot. For details on the installation space required, see "Specifications (14.1.1)."
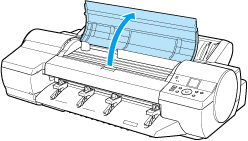
  2. After "Open Upper Cover" is displayed, open the Top Cover.
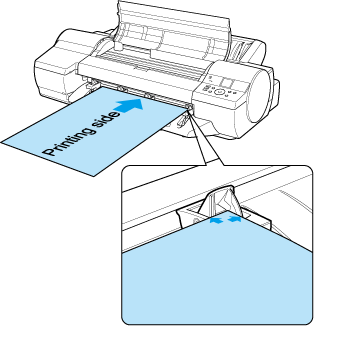
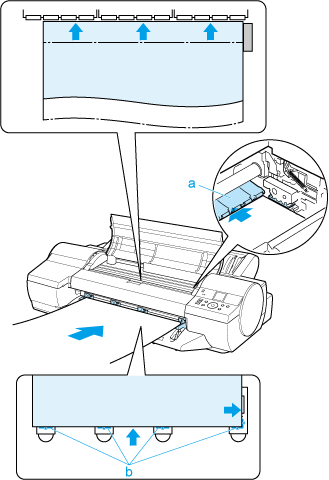
  3. Set the leading edge of one sheet, printing-side up, on the Front Tray Guides, and insert the sheet in the Front Paper Feed Slot, keeping it level.
    Important
    •  When you insert the sheet in the Front Paper Feed Slot, keep the sheet level, relative to the paper feed slot. Failure to do this may scratch the printing surface.
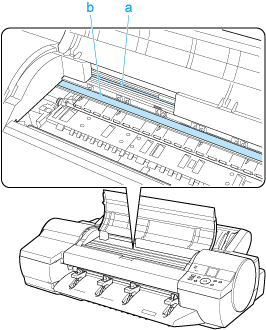
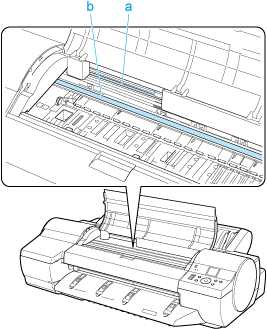
  4. As you look inside the Top Cover, insert the leading edge of the sheet between the Platen and Paper Retainer (a), keeping it parallel to the Paper Retainer (a), and align the paper with the Paper Alignment Line (b) of the Front Tray Guides.
    Important
    •  Do not touch the Linear Scale (a) or Carriage Shaft (b). This may stain your hands and damage the printer.
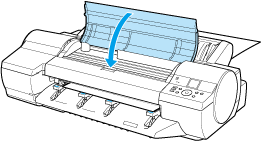
  5. When "Close top cover." is displayed, close the Top Cover and press the OK button.
    The sheet is held between the Platen and Back Cover, and feeding begins.
    If a print job was received
    After the paper is advanced, the printer starts printing the print job.
    If no print job was received
    The printer now starts feeding the paper.
  6. After printing, the printer will temporarily stop advancing the paper while the trailing edge is still in the rollers to prevent the sheet from dropping.
    Once you press the OK button, the paper can be removed.
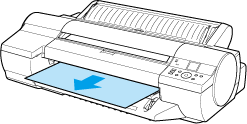
  7. Remove the sheet, keeping the front edge level as you pull it out.
    Important
    •  If POP Board is accidentally removed at an angle, it may scratch the printed surface.
  8. Press the OK button.
  9. Lift the four Front Tray Guides above the Ejection Guide, store them toward the front, and then press the OK button.

6. 3. 2. Handling Paper > Handling sheets >
Changing the Type of Paper
Follow these steps to change the type of paper specified on the printer after you have loaded paper.
If you will continue using this type of paper later, selecting Keep Paper Type > On will save the time and effort of configuring the media type setting when you load the paper again. The current media type settings before you select On will be automatically selected at that time.  (See "Using the Same Type of Paper Regularly.")
Important
•  For best printing results, the printer fine-tunes the print head height and the feed amount for each type of paper. Be sure to select the type of paper to use correctly before printing.
•  Because the printer fine-tunes the feed amount for each type of paper, the margins and the size of printed images may vary depending on the type of paper used. If margins and the size of images are not as you expected, adjust the paper feed amount.
 (See "Adjusting the Feed Amount (7.3.1).")

  Changing the Type of Paper
Note
•  When you load a roll, a menu for selection of the type of paper is shown on the Display Screen. Select the type of paper, and then press the OK button.
If no barcode has been printed on the roll and you have set ManageRemainRoll to On, specify the roll length after the type of paper.  (See "Specifying the Paper Length (6.2.4).")
  1. On the Tab Selection screen of the Control Panel, press or to select the Paper tab ().
    Note
    •  If the Tab Selection screen is not displayed, press the Menu button.
  2. Press the OK button.
    The Paper Menu is displayed.
  3. Press or to select Chg. Paper Type, and then press the OK button.
  4. Press or to select the type of paper loaded ( Roll Paper or Manual ), and then press the OK button.
  5. Press or to select the type of paper loaded in the printer, and then press the OK button.
    Important
    •  Be sure to select the correct paper type. If this setting does not match the loaded paper, it may cause feed errors and affect printing quality.
    Note
    •  For details on types of paper, see the Paper Reference Guide.  (See "Types of Paper (6.1.1).") By default, Plain Paper is selected.

  Using the Same Type of Paper Regularly
Configure this setting so that current media type settings will be automatically selected when you load the same type of paper later.
  1. On the Tab Selection screen of the Control Panel, press or to select the Paper tab ().
    Note
    •  If the Tab Selection screen is not displayed, press the Menu button.
  2. Press the OK button.
    The Paper Menu is displayed.
  3. Press or to select Keep Paper Type, and then press the OK button.
  4. Press or to select On, and then press the OK button.
Note
•  The specified media type setting is updated in the following situations.
•  When using sheets, if you send a print job before loading a sheet, the media type setting is updated to match the type of paper specified by the print job.
•  When you have selected ManageRemainRoll > On on the Control Panel and a barcode is printed on the roll, the media type setting is updated to match the type of paper specified by the barcode.
•  To change the media type setting, see "Changing the Type of Paper."

6. 3. 3. Handling Paper > Handling sheets >
Removing Sheets
Remove sheets from the printer as follows.

  Removing sheets from the top paper feed slot
  1. On the Tab Selection screen of the Control Panel, press or to select the Paper tab ().
    Note
    •  If the Tab Selection screen is not displayed, press the Menu button.
  2. Press the OK button.
    The Paper Menu is displayed.
  3. Press or to select Eject Paper, and then press the OK button.
  4. Press or to select "Yes", and then press the OK button.
    The paper is ejected from the front of the printer.
    Important
    •  If the trailing edge of a sheet is not ejected, pull the sheet out, keeping the front edge level. Accidentally removing the sheet at an angle may scratch the printed surface.

  Removing heavyweight sheets from the front paper feed slot
  1. On the Tab Selection screen of the Control Panel, press or to select the Paper tab ().
    Note
    •  If the Tab Selection screen is not displayed, press the Menu button.
  2. Press the OK button.
    The Paper Menu is displayed.
  3. Press or to select Eject Paper, and then press the OK button.
  4. Press or to select "Yes", and then press the OK button.
    As the printer ejects the paper, the paper is stopped momentarily with the trailing edge still held in the rollers.
  5. Press the OK button.
    The sheet can now be removed.
  6. Remove the sheet, keeping the front edge level as you pull it out.
    Important
    •  If POP Board is accidentally removed at an angle, it may scratch the printed surface.
  7. Press the OK button.
    Important
    •  Always remove the sheet before pressing the OK button. If you do not remove the sheet before step 7, it may go back inside the printer, leaving roller marks across the trailing edge of paper.
  8. Lift the four Front Tray Guides above the Ejection Guide, store them toward the front, and then press the OK button.

6. 3. 4. Handling Paper > Handling sheets >
Clearing a Jammed Sheet, Fed Manually
If a sheet you have fed manually becomes jammed, "Paper jam" is shown on the Display Screen of the Control Panel. Remove the jammed paper as follows.
  1. Press the OK button.
  2. Remove the jammed paper.
    If paper is jammed inside the Top Cover
    1.Open the Top Cover and manually move the Carriage to the side.
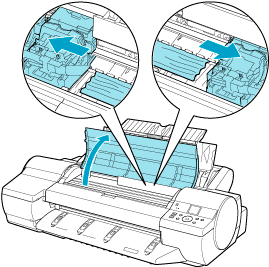
    2.Clear any jammed paper from inside the Top Cover.
    After removing the paper, make sure there are no other scraps of paper in the printer.
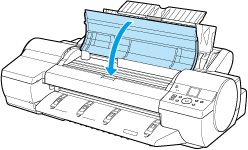
    3.Close the Top Cover.
    Important
    •  Do not move the Carriage over jammed paper. This may damage the Printhead.
    •  Do not touch the Linear Scale (a) or Carriage Shaft (b). This may stain your hands and damage the printer.
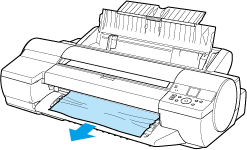
    If the paper is jammed by the Ejection Guide
    Remove the jammed paper from the Output Tray.
    After removing the paper, make sure there are no other scraps of paper in the printer.
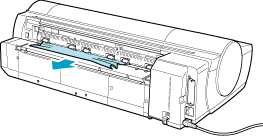
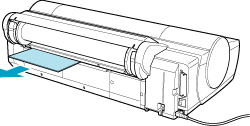
    If paper is jammed in the back of the printer
    Remove the jammed paper from the back of the printer.
    After removing the paper, make sure there are no other scraps of paper in the printer.
  3. Press the OK button.

6. 3. 5. Handling Paper > Handling sheets >
Clearing Jammed Paper (Paper Feed Slot)
Follow these steps to clear jams deep in the Paper Feed Slot or to remove any scraps left in the slot when you are clearing jams.
  Clear any jammed paper deep in the Paper Feed Slot
If paper is jammed deep in the Paper Feed Slot, remove the Roll Feed Unit and clear the paper jam as follows.
  1. Turn the printer off before removing the Roll Feed Unit from the printer.  (See "Removing the Roll Feed Unit (6.2.16).")
  2. Remove the jammed paper from the Paper Feed Slot.
  3. Attach the Roll Feed Unit to the printer.  (See "Installing the Roll Feed Unit (6.2.17).")

  Remove scraps left in the Paper Feed Slot
Follow these steps to remove any scraps left in the Paper Feed Slot after you clear jammed sheets or roll paper.
  1. Press the Load button.
  2. Press or to select Manual Paper, and then press the OK button.
    A menu for selection of the type of paper is displayed.
  3. Select POP Board and press the OK button.
    Instructions for feeding POP Board are now displayed on the Control Panel, but follow this procedure to remove the jammed paper.
  4. Open the Top Cover.
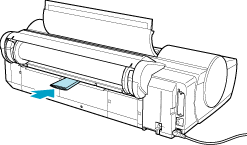
  5. Fold an A4 sheet lengthwise four times and insert it through the gap of the Back Cover. Push the scrap out toward the Platen.
  6. Remove the scrap when it is pushed out onto the Platen.
  7. If any scraps remain inside the paper feed slot, repeat steps 5 and 6.
  8. Close the Top Cover.
  9. Turn the printer off.  (See "Turning the Printer On and Off (1.1.2).")