9. 2. 1. Control Panel > Printer Menu >
Printer Menu Operations
Printer Menu Operations
The printer menu is classified into menu items available when no print job is in progress and menu items only available during printing.
| Menu operations when no print job is in progress | ||||||||||
|
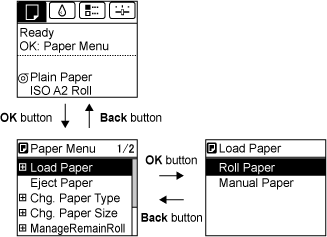
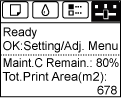
To view available menus organized on tabs, select a tab on the Tab Selection screen and press the OK button.
The following operations are available from the menu.
•Paper Menu
Paper menu settings
•Ink Menu
Ink menu operations
•Job Menu
Menu operations to manage print jobs
•Set./Adj. Menu
Menu operations for printer adjustment and maintenance
For a description of specific menu items available, see "Menu Settings (9.2.4)."
For instructions on selecting menu items, see "Menu Operations (9.2.2)."
|
| Menu operations during printing | |||||
|
To display menus during printing, select a tab on the Tab Selection screen on the Control Panel, and then press the OK button. Other menus are available after printing is finished.
The following operations are available from the menu during printing.
•Ink Menu
Ink menu operations
•Job Menu
Menu operations to manage print jobs
•Set./Adj. Menu
Fine-tuning paper feeding
Display of printer-related information
For a description of specific menu items available during printing, see "Menu Settings (During Printing) (9.2.5)."
For instructions on selecting menu items during printing, see "Menu Operations (9.2.2)."
|
9. 2. 2. Control Panel > Printer Menu >
Menu Operations
Menu Operations
To view available menus organized on tabs, select a tab on the Tab Selection screen and press the OK button. For details, see "Menu Settings (9.2.4)."
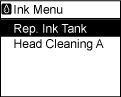
•Menus (when the Ink tab is selected and the OK button is pressed)
 |
| Note | ||
|
• If the Tab Selection screen is not displayed, press the Menu button.
|
||
Simply press buttons on the Control Panel to access menus on various tabs from the Tab Selection screen and set or execute Menu items.
The following section describes menu operations.
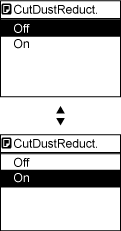
 or
or  to scroll through higher and lower menu items. Items you select are highlighted.
 is displayed at left next to the second and subsequent rows. To access the lower menus, select the menu and press the OK button.
| Specifying menu items | ||||||
|
Menu items can be set as follows.
|
| Specifying numerical values | |||||||||||
|
Follow these steps to enter numbers. In this example, network settings items are entered.
|
 or
or  button to move to the next field for input.
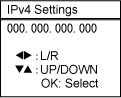
| Executing menu commands |
|
Menu commands can be executed as follows.
|
9. 2. 3. Control Panel > Printer Menu >
Menu Structure
Menu Structure
The menu structure is organized by tabs, as follows. Values at right indicated by an asterisk are the defaults.
For instructions on menu operations, see "Menu Operations (9.2.2)."
For details on menu items, see "Menu Settings (9.2.4)."
| Paper Menu | |||||||||||||||||||||||||||||||||||||||||||||||||||||||||||||||||||||||||||||||||||||||||||||||||||||||||||||||||||||
|
|||||||||||||||||||||||||||||||||||||||||||||||||||||||||||||||||||||||||||||||||||||||||||||||||||||||||||||||||||||
| Ink Menu |
| Job Menu | ||||||||||||||||||||||||||||||||||||||||||||||||||||||||||||||||||||||||||||||||||||||||||||||||
|
||||||||||||||||||||||||||||||||||||||||||||||||||||||||||||||||||||||||||||||||||||||||||||||||
| Set./Adj. Menu | |||||||||||||||||||||||||||||||||||||||||||||||||||||||||||||||||||||||||||||||||||||||||||||||||||||||||||||||||||||||||||||||||||||||||||||||||||||||||||||||||||||||||||||||||||||||||||||||||||||||||||||||||||||||||||||||||||||||||||||||||||||||||||||||||||||||||||||||||||||||||||||||||||||||||||||||||||||||||||||||||||||||||||||||||||||||||||||||||||||||||||||||||||||||||||||||||||||||||||||||||||||||||||||||||||||||||||||||||||||||||||||||||||||||||||||||||||||||||||||||||||||||||||||||||||||||||||||||||||||||||||||||||||||||||||||||||||||||||||||||||||||||||||||||||||||||||||||||||||||||||||||||||||||||||||||||||||||||||||||||||||||||||||||||||||||||||||||||||||||||||||||||||||||||||||||||||||||||||||||||||||||||||||||||||||||||||||||||||||||||||||||||||||||||||||||||||||||||||||||||||||||||||||||||||||||||||||||||||||||||||||||||||||||||||||||||||||||||||||||||||||||||||||||||||||||||||||||||||||||||||||||||||||||||||||||||||||||||||||||||||||||||||||||||||||||||||||||||||||||||
|
|||||||||||||||||||||||||||||||||||||||||||||||||||||||||||||||||||||||||||||||||||||||||||||||||||||||||||||||||||||||||||||||||||||||||||||||||||||||||||||||||||||||||||||||||||||||||||||||||||||||||||||||||||||||||||||||||||||||||||||||||||||||||||||||||||||||||||||||||||||||||||||||||||||||||||||||||||||||||||||||||||||||||||||||||||||||||||||||||||||||||||||||||||||||||||||||||||||||||||||||||||||||||||||||||||||||||||||||||||||||||||||||||||||||||||||||||||||||||||||||||||||||||||||||||||||||||||||||||||||||||||||||||||||||||||||||||||||||||||||||||||||||||||||||||||||||||||||||||||||||||||||||||||||||||||||||||||||||||||||||||||||||||||||||||||||||||||||||||||||||||||||||||||||||||||||||||||||||||||||||||||||||||||||||||||||||||||||||||||||||||||||||||||||||||||||||||||||||||||||||||||||||||||||||||||||||||||||||||||||||||||||||||||||||||||||||||||||||||||||||||||||||||||||||||||||||||||||||||||||||||||||||||||||||||||||||||||||||||||||||||||||||||||||||||||||||||||||||||||||||


9. 2. 4. Control Panel > Printer Menu >
Menu Settings
Menu Settings
For instructions on selecting menu items, see "Menu Operations (9.2.2)."
For details on menu levels and values, see "Menu Structure (9.2.3)."
| Paper Menu | |||||||||||||||||||||||||||||||||||||||||||||||||||||||||||||||
|
|||||||||||||||||||||||||||||||||||||||||||||||||||||||||||||||
| Ink Menu | ||||||
|
| Job Menu | |||||||||||||||||||||||||||||||||||||||||||||||||||||||||||||||||||||||||||||||||||||||||||||||||||||||||||
|
|||||||||||||||||||||||||||||||||||||||||||||||||||||||||||||||||||||||||||||||||||||||||||||||||||||||||||
| Set./Adj. Menu | ||||||||||||||||||||||||||||||||||||||||||||||||||||||||||||||||||||||||||||||||||||||||||||||||||||||||||||||||||||||||||||||||||||||||||||||||||||||||||||||||||||||||||||||||||||||||||||||||||||||||||||||||||||||||||||||||||||||||||||||||||||||||||||||||||||||||||||||||||||||||||||||||||||||||||||||||||||||||||||||||||||||||||||||||||||||||||||||||||||||||||||||||||||||||||||||||||||||||||||||||||||||||||||||||||||||||||||||||||||||||||||||||||||||||||||||||||||||||||||||||||||||||||||||||||||||||||||||||||||||||||||
|
||||||||||||||||||||||||||||||||||||||||||||||||||||||||||||||||||||||||||||||||||||||||||||||||||||||||||||||||||||||||||||||||||||||||||||||||||||||||||||||||||||||||||||||||||||||||||||||||||||||||||||||||||||||||||||||||||||||||||||||||||||||||||||||||||||||||||||||||||||||||||||||||||||||||||||||||||||||||||||||||||||||||||||||||||||||||||||||||||||||||||||||||||||||||||||||||||||||||||||||||||||||||||||||||||||||||||||||||||||||||||||||||||||||||||||||||||||||||||||||||||||||||||||||||||||||||||||||||||||||||||||
9. 2. 5. Control Panel > Printer Menu >
Menu Settings (During Printing)
Menu Settings (During Printing)
Menu items are described in the following tables.
For instructions on selecting menu items, see "Menu Operations (9.2.2)."
For details on menu levels and values, see "Menu Structure (9.2.3)."
| Ink Menu | ||||||
|
| Job Menu | ||||||||||||||||||||||||||||||||||||||||||||||||||||||||||||||||||||||||||||||||||||||||||||||
|
||||||||||||||||||||||||||||||||||||||||||||||||||||||||||||||||||||||||||||||||||||||||||||||
| Set./Adj. Menu | |||||||||||||||||||
|
|||||||||||||||||||
9. 2. 6. Control Panel > Printer Menu >
Status Print
Status Print
You can print a Status Print report indicating the current status of the printer.
With Status Print, information is printed regarding the printer firmware version, various settings, and the status of consumables.
| Printing Status Print reports | ||||||
|
 ).
).
| Checking the information in Status Print reports | |||||||||||||||||||||||||||||||||||||||||||||||||||||||||||||||||||||||||||||||||||||||||||||||||||||||||||||||||||||||||||||||||||||||||||||||||||||||||||||||||||||||||||||
|
The following information is included in Status Print reports.
|
|||||||||||||||||||||||||||||||||||||||||||||||||||||||||||||||||||||||||||||||||||||||||||||||||||||||||||||||||||||||||||||||||||||||||||||||||||||||||||||||||||||||||||||
9. 2. 7. Control Panel > Printer Menu >
Printing Interface Setting Reports
Printing Interface Setting Reports
You can print an Interface Print report indicating the current interface settings values of the printer.
Interface Print reports indicate settings values for TCP/IP, NetWare, and other settings.
| Printing Interface Print reports | ||||||
|
| Confirming Interface Print information | |||||||||||||||||||||||||||||||||||||||||||||||||||||||||||||||||||||||||||||||||||||||||||||||||||||||||||||||||||||||||||||
|
The following information is included in the Interface Print report.
|
|||||||||||||||||||||||||||||||||||||||||||||||||||||||||||||||||||||||||||||||||||||||||||||||||||||||||||||||||||||||||||||