5. 1. 1. Print Job Operations > Basic Print Job Operations >
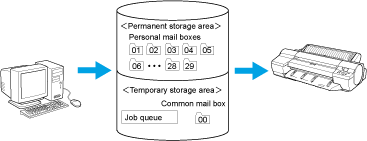
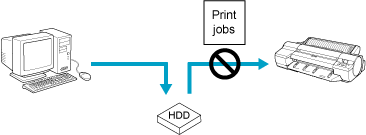
Using the Printer Hard Disk
Using the Printer Hard Disk
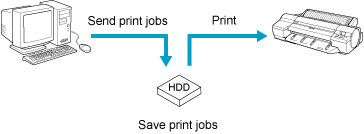
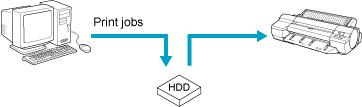
Using print jobs stored on the printer enables you to print the jobs again as needed without using a computer.
 |
Saving print jobs offers the following benefits.
•Save the time spent using a computer
When you send a print job to the printer, you can save it on the printer after printing or simply save it on the printer without printing it yet. Saved print jobs can be printed in the required quantity later without the need to use a computer again.
•Simplify reprinting, if any errors occur
If errors occur in the middle of printing (as when paper runs out), you can resume printing after clearing the error without resending the print job from a computer.
•Streamline printing work
Without using a computer, you can select print jobs and print in the desired quantity. You can also select multiple print jobs to print during the same period. This enables unattended operation at night, for example.
5. 1. 2. Print Job Operations > Basic Print Job Operations >
Saving Print Jobs on the Printer Hard Disk
Saving Print Jobs on the Printer Hard Disk
To save print jobs on the printer's hard disk, configure the printer driver.
 |
| Note | ||
|
• Printing from the following software also enables you to save print jobs on the printer's hard disk.
Windows
• Print Plug-In
• Free Layout
• Color imageRUNNER Enlargement Copy
• imagePROGRAF Preview
Mac OS
• Print Plug-In
• Free Layout
• Color imageRUNNER Enlargement Copy
• imagePROGRAF Preview
The document title will be "imagePROGRAF" when you print from imagePROGRAF Preview.
|
||
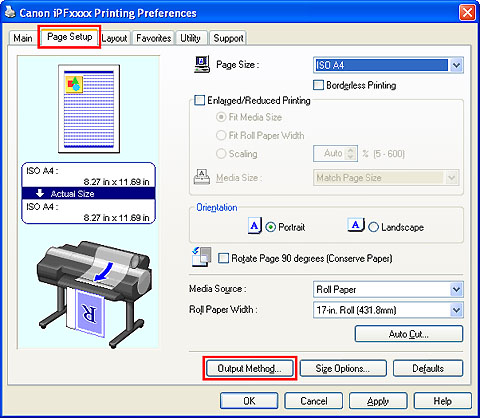
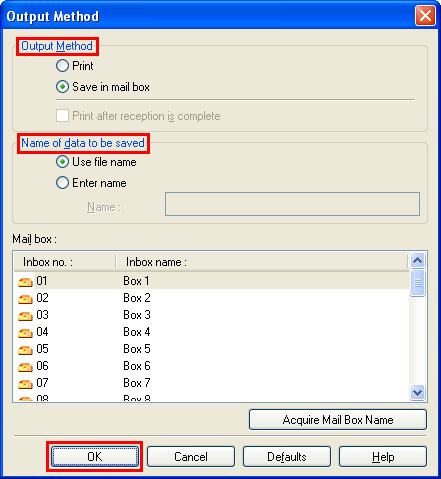
| Configuring the Printer Driver in Windows | |||||||
|
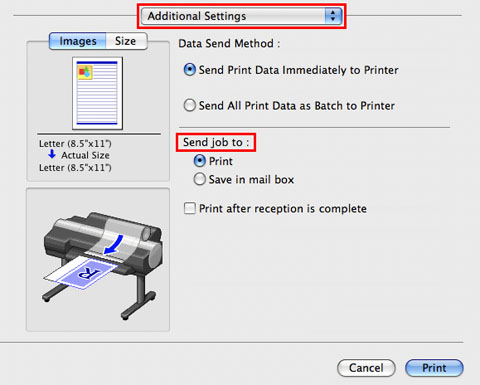
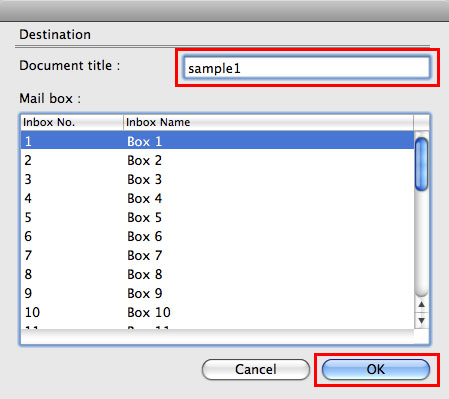
| Configuring the printer driver in Mac OS | ||
|
5. 1. 3. Print Job Operations > Basic Print Job Operations >
Managing the Job Queue (Deleting or Preempting Other Jobs)
Managing the Job Queue (Deleting or Preempting Other Jobs)
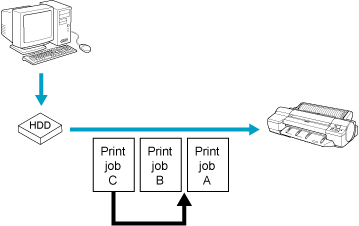
Print jobs being processed by the printer are collectively called the job queue. You can delete or preempt jobs in the job queue as needed.
These operations are available from the Control Panel or in RemoteUI, imagePROGRAF Status Monitor, and imagePROGRAF Printmonitor.
•Delete
Note that only jobs that are not currently being deleted can be deleted from the job queue.
 |
•Preempting other jobs
You can preempt other jobs by printing jobs that are currently being received or prepared for processing first.
 |
| Note | ||
|
• For information on managing jobs being held, see "Managing Pending Jobs (Printing or Deleting Jobs on Hold) (5.1.4)."
|
||
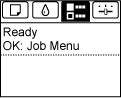
| Using the Control Panel | ||||||
|
 or
or  to select the Job tab (
 ).
).
 or
or  to select Print Job, and then press the OK button.
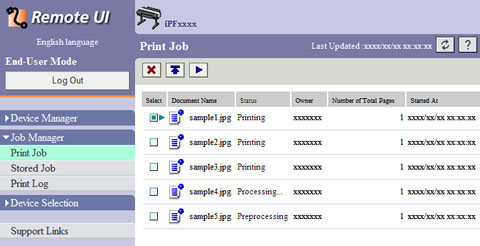
| Using RemoteUI | |
|
Manage jobs as needed on the Print Job page. For details, refer to the RemoteUI help.
|
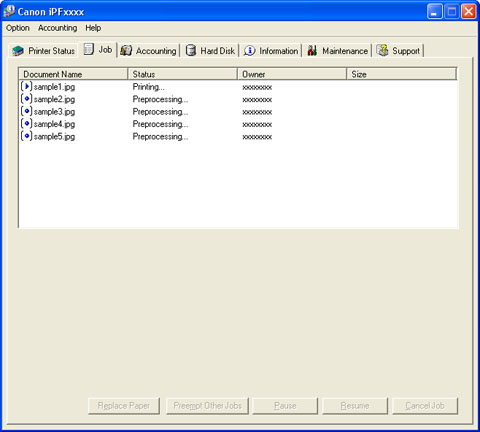
| Using imagePROGRAF Status Monitor (Windows) | |
|
Manage jobs as needed on the Job sheet. For details, refer to the imagePROGRAF Status Monitor help file.
|
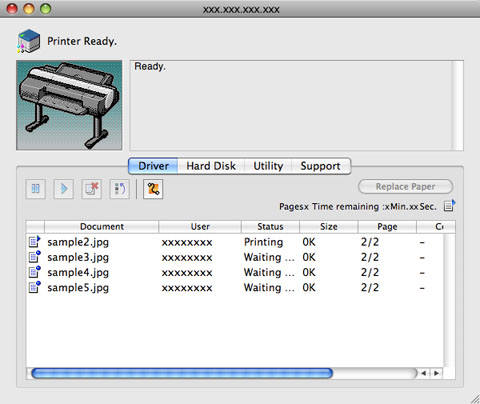
| Using imagePROGRAF Printmonitor (Mac OS) | |
|
Manage jobs as needed on the Driver sheet. For details, refer to the imagePROGRAF Printmonitor help file.
|
5. 1. 4. Print Job Operations > Basic Print Job Operations >
Managing Pending Jobs (Printing or Deleting Jobs on Hold)
Managing Pending Jobs (Printing or Deleting Jobs on Hold)
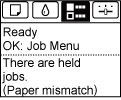
If the type or size of paper loaded does not match the settings in the print job received when you have set Detect Mismatch to Hold Job in the Control Panel menu, the print job is held on the printer as a pending job in the job queue.
Manage held jobs such as these as follows.
These operations are available from the Control Panel or in RemoteUI, imagePROGRAF Status Monitor, and imagePROGRAF Printmonitor.
| Note | ||
|
• As long as you do not manage held jobs from the Control Panel, imagePROGRAF Status Monitor, or imagePROGRAF Printmonitor, they will remain in the job queue. In this case, the printer processes the next job in the queue without pausing.
|
||
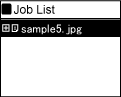
| Using the Control Panel | |||||||
|
| Using RemoteUI | |
|
Manage jobs as needed on the Print Job page. For details, refer to the RemoteUI help file.
|
| Using imagePROGRAF Status Monitor | |
|
Manage jobs as needed on the Job sheet. For details, see "Job Management Using imagePROGRAF Status Monitor (3.7.2)."
|
| Using imagePROGRAF Printmonitor | |
|
Manage jobs as needed on the Driver sheet. For details, see "Job Management Using imagePROGRAF Printmonitor (4.6.2)."
|
5. 1. 5. Print Job Operations > Basic Print Job Operations >
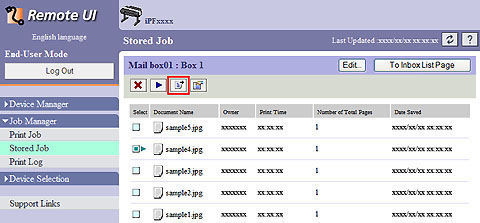
Printing Saved Jobs
Printing Saved Jobs
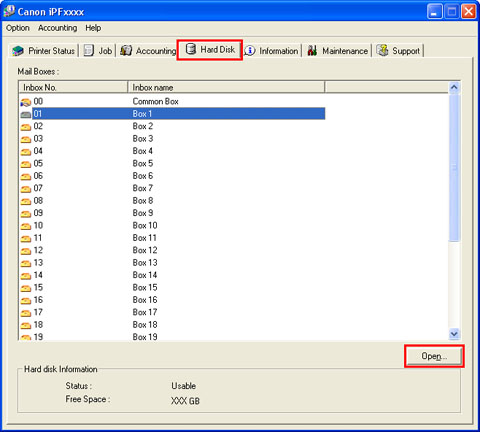
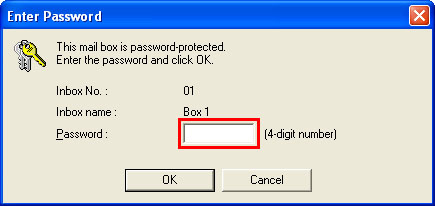
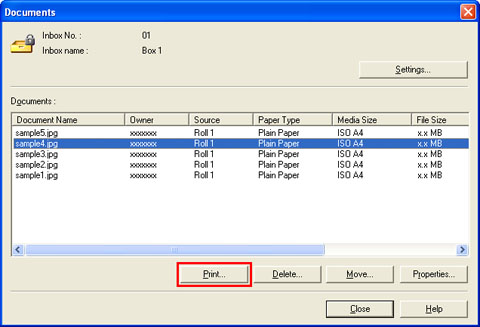
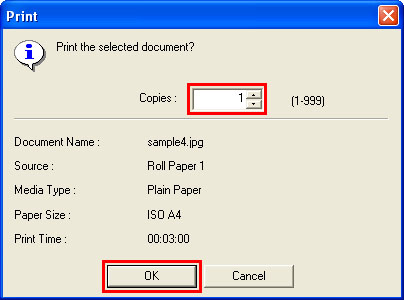
Print saved print jobs stored on the printer's hard disk as follows.
These operations are available from the Control Panel or in RemoteUI, imagePROGRAF Status Monitor, and imagePROGRAF Printmonitor.
 |
| Using the Control Panel | |||||||||||
|
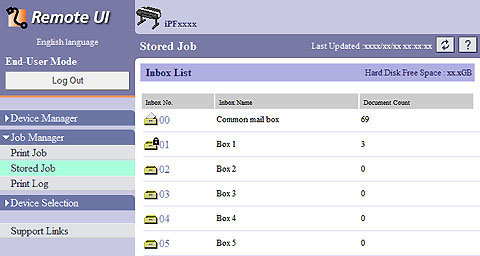
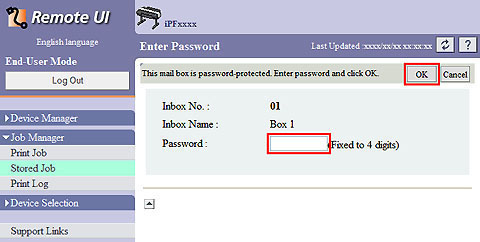
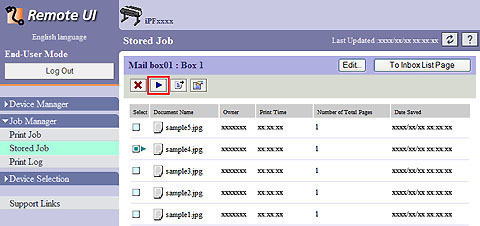
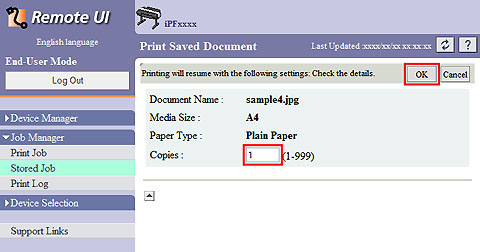
| Using RemoteUI | |||||||||
For details, refer to the RemoteUI help.
|
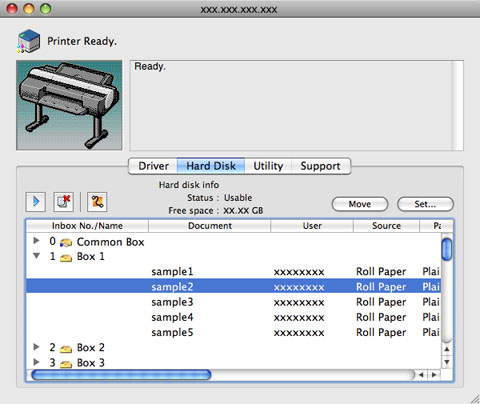
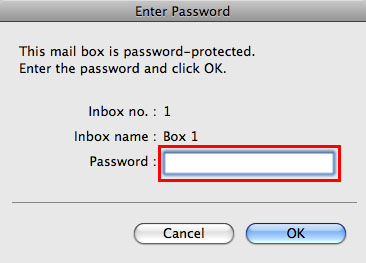
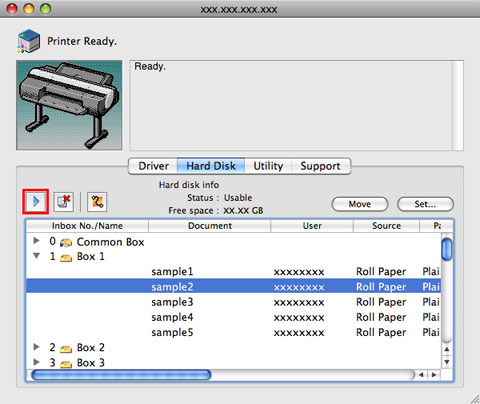
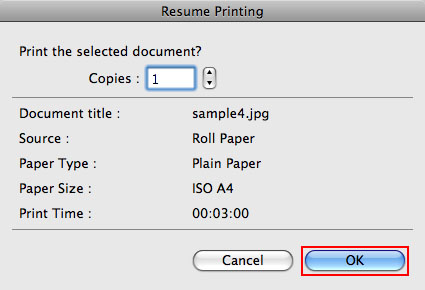
| Using imagePROGRAF Status Monitor | ||||||||||||||
For details, refer to the imagePROGRAF Status Monitor help file.
|
| Using imagePROGRAF Printmonitor | |||||||||
For details, refer to the imagePROGRAF Printmonitor help file.
|
5. 1. 6. Print Job Operations > Basic Print Job Operations >
Deleting Saved Jobs
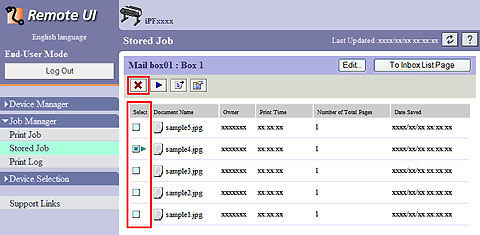
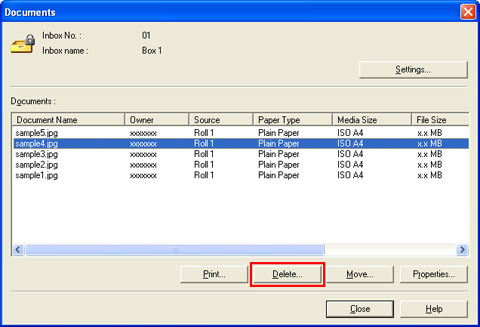
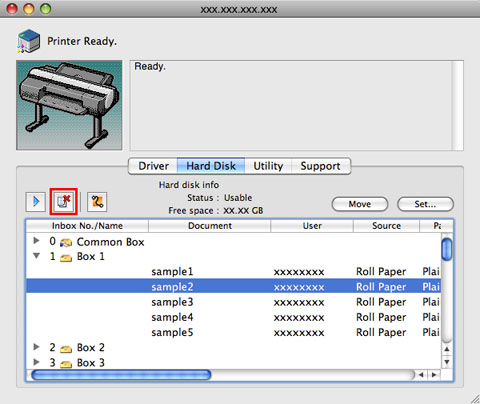
Deleting Saved Jobs
Delete saved print jobs stored on the printer's hard disk as follows.
This operation is available from the Control Panel, in RemoteUI, imagePROGRAF Status Monitor, and imagePROGRAF Printmonitor.
| Using the Control Panel | |||||||||||
|
| Using RemoteUI | ||||||||
For details, refer to the RemoteUI help file.
|
| Using imagePROGRAF Status Monitor | ||||||||
For details, refer to the imagePROGRAF Status Monitor help file.
|
| Using imagePROGRAF Printmonitor | ||||||||
For details, refer to the imagePROGRAF Printmonitor help file.
|
5. 1. 7. Print Job Operations > Basic Print Job Operations >
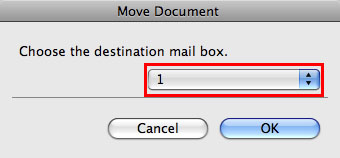
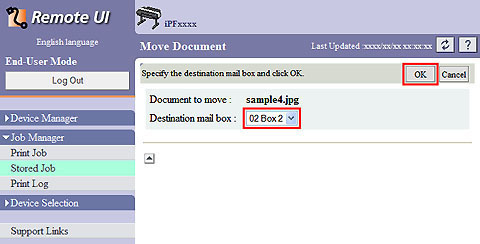
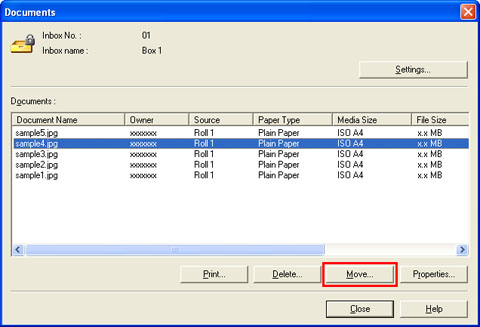
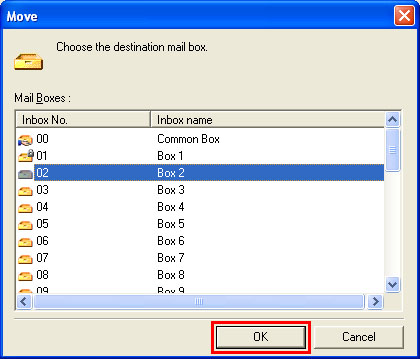
Moving Saved Jobs
Moving Saved Jobs
Print jobs stored on the printer's hard disk (saved jobs) can be moved from the current box to another box as follows.
However, jobs saved in personal boxes cannot be moved to the shared mailbox.
This operation is available in RemoteUI, imagePROGRAF Status Monitor, and imagePROGRAF Printmonitor.
 |
| Important | ||
|
• Jobs stored in the shared mailbox may be automatically deleted under some conditions. To prevent jobs from being deleted, move them from the shared mailbox to personal boxes. (See "Using the Printer Hard Disk (5.1.1).")
|
||
| Using RemoteUI | |||||||||
For details, refer to the RemoteUI help file.
|
| Using imagePROGRAF Status Monitor (Windows) | |||||||||
For details, refer to the imagePROGRAF Status Monitor help file.
|
| Using imagePROGRAF Printmonitor (Macintosh) | |||||||||
For details, refer to the imagePROGRAF Printmonitor help file.
|