11. 4. 1. Maintenance and Consumables > Cleaning the Printer >
Cleaning the Printer Exterior
Cleaning the Printer Exterior
About once a month, clean the printer exterior.
- Turn the printer off. (See "Turning the Printer On and Off (1.1.2).")
- Unplug the power cord from the outlet.

Caution • Always turn off the printer and unplug the power cord before cleaning or maintenance. Accidentally leaving the printer on poses a risk of injury if you touch moving parts inside the printer. - Using a damp cloth that you have wrung out completely, wipe the exterior surfaces of the printer. Dry the surfaces with a dry cloth.
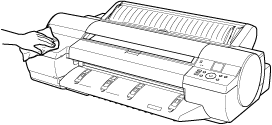

Warning • Never use flammable solvents such as alcohol, benzene, or thinner. If these substances come into contact with electrical components inside the printer, there is a risk of fire or electrical shock.
Important • If the Ejection Guide is dirty, it may soil the edge of the paper when the paper is cut. We recommend cleaning the Ejection Guide even if it does not appear dirty, because it may actually be covered with paper dust. - Plug the power cord into the outlet.
11. 4. 2. Maintenance and Consumables > Cleaning the Printer >
Cleaning Inside the Top Cover
Cleaning Inside the Top Cover
Clean inside the Top Cover about once a month to maintain better printing quality and help prevent problems.
Also clean inside the Top Cover in the following situations to ensure optimal operation.
•If the printed surface or the underside of paper is dirty after printing
•After you have used up a roll
•After borderless printing
•After printing on small paper
•After printing on paper that generates a lot of cutting debris
•If you have replaced the roll
•After printing on paper that generates a lot of paper dust
•If the message "Blue platen switch is dirty." is displayed
| Important | ||
|
• If the Platen inside the Top Cover becomes dirty, it may soil the underside of paper. We recommend cleaning the Platen after borderless printing or printing on small paper.
• If the Ejection Guide is dirty, it may soil the edge of the paper when the paper is cut. We recommend cleaning the Ejection Guide even if it does not appear dirty, because it may actually be covered with paper dust.
|
||
- On the Tab Selection screen of the Control Panel, press
 or
or  to select the Settings/Adj. tab (
 ).
).


Note • If the Tab Selection screen is not displayed, press the Menu button. - Press the OK button.
The Set./Adj. Menu is displayed.
- Press
 or
or  to select Maintenance, and then press the OK button.
 - Press
 or
or  to select Clean Platen, and then press the OK button.
A message on the Display Screen requests you to open the Top Cover.
 - Open the Top Cover.
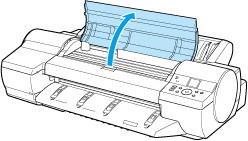
- If paper dust has accumulated in the Vacuum holes (a) on the Platen or in the Borderless Printing Ink Grooves (b), use the Cleaning Brush (c), provided with the printer, to wipe it away.
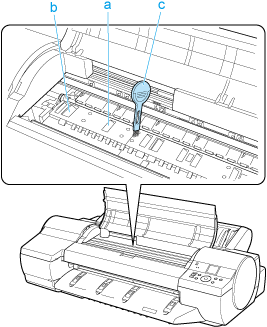

Note • If the Cleaning Brush is dirty, rinse it in water. - Using a damp cloth that you have wrung out completely, wipe inside the Top Cover to clean it. Wipe away any ink residue on the Platen as a whole, on the Paper Retainer, Borderless Printing Ink Grooves, and blue Switch.
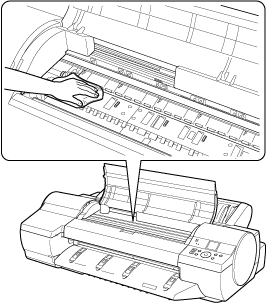

Warning • Never use flammable solvents such as alcohol, benzene, or thinner. If these substances come into contact with electrical components inside the printer, there is a risk of fire or electrical shock.
Important • Do not use a dry cloth to wipe inside the Top Cover. This may create a static charge, which may attract dust and affect the printing quality.• Do not touch the Linear Scale (a) or Carriage Shaft (b). This may stain your hands and damage the printer.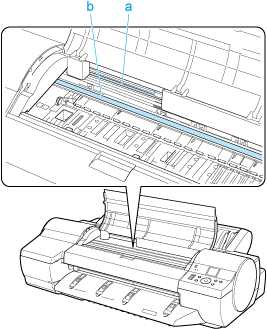
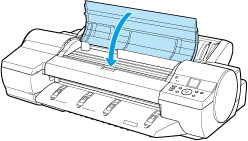
- Close the Top Cover.
11. 4. 3. Maintenance and Consumables > Cleaning the Printer >
Cleaning the Paper Retainer
Cleaning the Paper Retainer
Clean the Paper Retainer about once a month to maintain better printing quality and help prevent problems.
Also clean the Paper Retainer in the following situations to ensure optimal operation.
•If the printed surface or the underside of paper is dirty after printing
•After printing on small paper
| Important | ||
|
• During cleaning, use paper that does not generate much cutting dust, such as Plain Paper. It may affect printing quality if you use film or other media that are more likely to generate debris when cut, or that have a surface finish that may come off.
|
||
- Turn the printer off. (See "Turning the Printer On and Off (1.1.2).")
- Unplug the power cord from the outlet.

Caution • Always turn off the printer and unplug the power cord before cleaning or maintenance. Accidentally leaving the printer on poses a risk of injury if you touch moving parts inside the printer. - Remove the Roll Feed Unit. (See "Removing the Roll Feed Unit (6.2.16).")
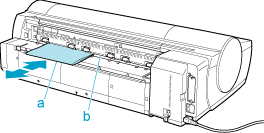
- Fold a sheet of Plain Paper two or three times (a) and insert it under the Paper Retainer (b) from behind the printer to wipe the entire surface of the Paper Retainer clean.
- Attach the Roll Feed Unit. (See "Installing the Roll Feed Unit (6.2.17).")
- Plug the power cord into the outlet.
11. 4. 4. Maintenance and Consumables > Cleaning the Printer >
Cleaning the Printhead
Cleaning the Printhead
Choose one of two Printhead cleaning modes ( Head Cleaning A or Head Cleaning B ), depending on the problem to resolve.
•Head Cleaning A
Use this mode if printing is faint or contains foreign substances. This method of cleaning consumes the least amount of ink.
It takes about six minutes to complete.
•Head Cleaning B
Use this mode if no ink is ejected at all, or if Head Cleaning A does not solve the problem.
It takes about seven minutes to complete.
| Caution | ||
|
• Do not remove the Maintenance Cartridge or ink tanks during either Head Cleaning A or Head Cleaning B.
|
||
| Note | ||
|
• If printing does not improve after Head Cleaning B, try repeating Head Cleaning B once or twice. If this still does not improve printing, the Printhead may have reached the end of its useful life. Contact your Canon dealer for assistance.
• Nozzles are periodically checked to ensure they are clear. Configure the settings on the Control Panel menu in Nozzle Check. (See "Menu Settings (9.2.4).")
|
||
Perform cleaning as follows.
- On the Tab Selection screen of the Control Panel, press
 or
or  to select the Settings/Adj. tab (
 ).
).


Note • If the Tab Selection screen is not displayed, press the Menu button. - Press the OK button.
The Set./Adj. Menu is displayed.
- Press
 or
or  to select Maintenance, and then press the OK button.
 - Press
 or
or  to select Head Cleaning, and then press the OK button.
 - Press
 or
or  to select Head Cleaning A or Head Cleaning B, and then press the OK button.
Head cleaning is now executed.
 - Print a test pattern to check the nozzles, and determine whether cleaning has cleared the nozzles. (See "Checking for Nozzle Clogging (11.2.2).")