2. 12. 1. Enhanced Printing Options > Other useful settings >
Printing With Watermarks
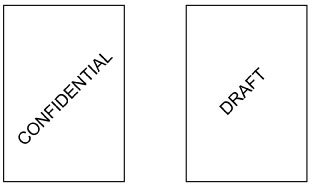
Printing With Watermarks
 |
•Watermark
Watermarks are applied to all pages of your document.
| Important | ||
|
• Watermarks are not printed if you select poster as the type of page layout.
|
||
The following watermarks are provided:
•CONFIDENTIAL
•COPY
•DRAFT
•FILE COPY
•FINAL
•PRELIMINARY
•PROOF
•TOP SECRET
You can also create your own watermarks. Specify the following options to customize your watermark.
•Watermark string: Specify the font, size, color, and so on. Surround the watermark with a frame, if desired.
•Watermark position: Specify the position on the page, the angle, and so on.
•Watermark printing method: Specify whether to print the watermark superimposed or under the document image. You can also print the watermark only on the first page, if desired.
| Note | ||
|
• Watermarks are supported in Windows.
• In addition to the provided watermarks, you can create up to 50 original watermarks.
|
||
For detailed instructions on printing with watermarks, refer to the following topics:
•Printing with Watermarks— COPY, FILE COPY, and so on (Windows) (2.12.2)
2. 12. 2. Enhanced Printing Options > Other useful settings >
Printing with Watermarks— COPY, FILE COPY, and so on (Windows)
Printing with Watermarks— COPY, FILE COPY, and so on (Windows)
This topic describes how to print with watermarks, based on the following example of printing with a FILE COPY watermark.
•Document: Any type
•Page size: A2 (420.0×594.0 mm [16.5 × 23.4 in])
•Paper: Roll paper
•Paper type: Plain Paper
•Roll paper width: A2/A3 roll (420.0 mm [16.5 in[)
- Choose Print in the application menu.
- Select the printer in the dialog box, and then display the printer driver dialog box.(See "Accessing the Printer Driver Dialog Box from Applications (3.1.6)")
- Make sure the Main sheet is displayed.
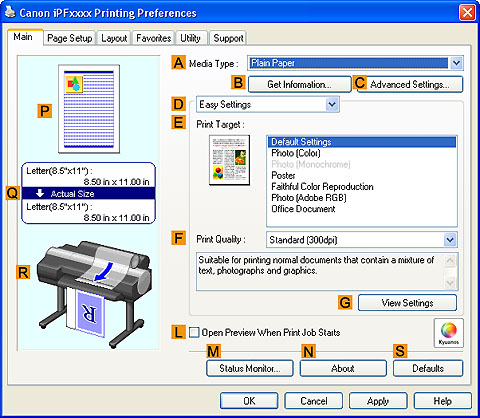
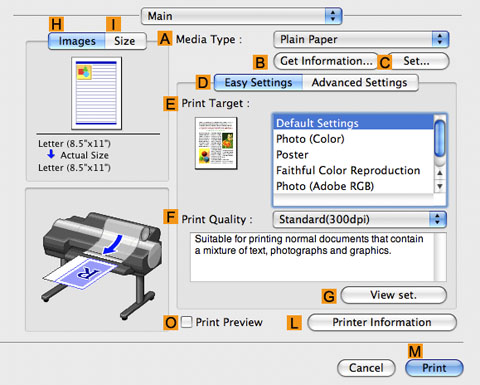
- In the AMedia Type list, select the type of paper that is loaded. In this case, click Plain Paper.
- Make your selection in the EPrint Target list.

Note • You can check the settings values selected in the EPrint Target list by clicking GView Settings. - Click the Page Setup tab to display the Page Setup sheet.

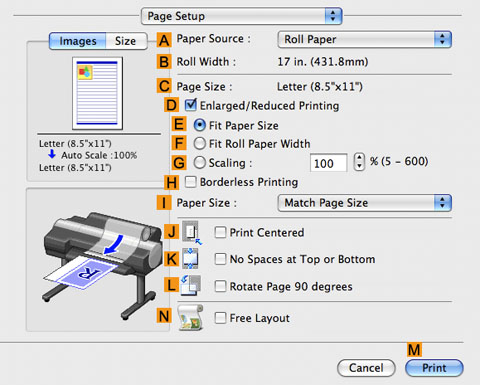
- In APage Size, click the size of the original as specified in the application software. In this case, click ISO A2.
- Select and click a roll paper in the LPaper Source list.
- Select the width of the loaded roll in the MRoll Paper Width list—in this case, ISO A2/A3 Roll (420.0mm).
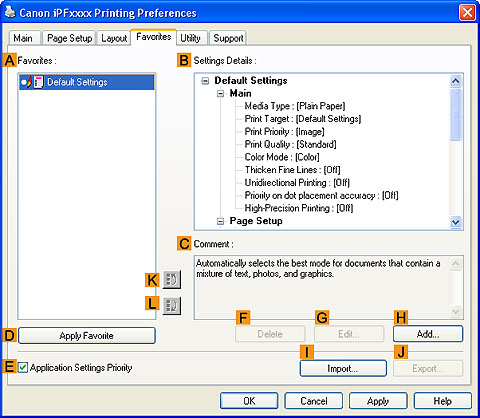
- Click the Layout tab to display the Layout sheet.
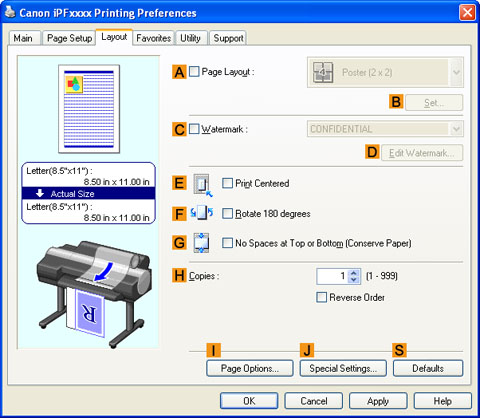
- Select the CWatermark check box.
- Click FILE COPY in the Watermarks list.
Note • Click DEdit Watermark to open the Edit Watermark dialog box. In the Edit Watermark dialog box, you can create custom watermarks and change the position and angle of watermarks. - Confirm the print settings and print as desired.
Note • For tips on confirming print settings, see "Confirming Print Settings (3.1.3)"
2. 12. 3. Enhanced Printing Options > Other useful settings >
Making the Original Orientation Match the Paper Orientation
Making the Original Orientation Match the Paper Orientation
•Orientation
Paper is usually loaded in the printer in portrait orientation. When you have an original in landscape orientation, you can specify the printing orientation so that the original is printed in landscape orientation.
 |
•Rotate 180 degrees
The original is rotated 180 degrees to print it upside down.
•Mirror
A mirror image of the original is printed.
For instructions on specifying the original orientation before printing, refer to the following topics, as appropriate for your computer and operating system.
2. 12. 4. Enhanced Printing Options > Other useful settings >
Making the Original Orientation Match the Paper Orientation (Windows)
Making the Original Orientation Match the Paper Orientation (Windows)
This topic describes how to print an original in landscape orientation after matching the paper orientation, based on the following example.
•Document: An original in landscape orientation
•Page size: A4 (210.0 × 297.0 mm)/Letter (8.3 × 11.7 in)
•Paper: Roll
•Paper type: Plain Paper
•Roll paper width: A2/A3 roll (420.0 mm [16.5 in])
- Choose Print in the application menu.
- Select the printer in the dialog box, and then open the printer driver dialog box.(See "Accessing the Printer Driver Dialog Box from Applications (3.1.6)")
- Make sure the Main sheet is displayed.
- In the AMedia Type list, select the type of paper that is loaded. In this case, click Plain Paper.
- Make your selection in the EPrint Target list.
- Make your selection in the FPrint Quality list.
- Click the Page Setup tab to display the Page Setup sheet.
- In the APage Size list, click the size of the original as specified in the application. In this case, click ISO A4 or Letter (8.5"x11").
- In HOrientation, click JLandscape.
- Select and click a roll paper in the LPaper Source list.
- Select the width of the loaded roll in the MRoll Paper Width list—in this case, ISO A2/A3 Roll (420.0mm).
- Confirm the print settings and print as desired.
Note • For tips on confirming print settings, see "Confirming Print Settings (3.1.3)"
2. 12. 5. Enhanced Printing Options > Other useful settings >
Making the Original Orientation Match the Paper Orientation (Mac OS X)
Making the Original Orientation Match the Paper Orientation (Mac OS X)
This topic describes how to print an original in landscape orientation after matching the paper orientation, based on the following example.
•Document: An original in landscape orientation
•Page size: A4 (210.0 × 297.0 mm [8.3 × 11.7 in])
•Paper: Roll paper
•Paper type: Plain Paper
•Roll paper width: A2/A3 roll (420.0 mm [16.5 in])
- This sets the BFormat for and CPaper Size.
Note • The configuration method varies depending on the OS and application software you are using.If Page Setup is displayed in the application menu, the settings are configured by opening the Page Attributes dialog box from Page Setup. If it is not displayed, the settings are configured in the upper part of the printer driver displayed when you select Print from the application software menu.
- Select the printer in the APrinter list.
- In the FPaper Size list, click the size of the original. In this case, click ISO A4.
- In GOrientation, click the icon of the document in landscape orientation.
- If you configured the settings using the Page Attributes dialog box, click FOK to close the dialog box, and then select Print from the application software menu.
- Access the Main pane.
- In the AMedia Type list, select the type of paper that is loaded. In this case, click Plain Paper.
- Make your selection in the EPrint Target list.
- Make your selection in the FPrint Quality list.
- Access the Page Setup pane.
- Select and click a roll paper in the APaper Source list.
- Make sure the width of the loaded roll is displayed in the BRoll Width list—in this case, ISO A2/A3 (420.0mm).
Note • If the width of the roll loaded in the printer is not shown in BRoll Width, click LPrinter Information on the Main pane to update the printer information. - Make sure the CPage Size setting matches the original size as selected in CPaper Size in the Page Attributes dialog box—in this case, ISO A4.
- Confirm the print settings, and then click MPrint to start printing.
Note • For tips on confirming print settings, see "Confirming Print Settings (4.1.3)"
2. 12. 6. Enhanced Printing Options > Other useful settings >
Using Favorites
Using Favorites
You can register print settings as Favorites to reuse settings from a particular job that met your expectations, or settings for a particular page size that you will use repeatedly.
•Favorites
Registering a favorite for later use. You can choose the settings you have registered from a list before printing, and you can check the settings details.
| Note | ||
|
• You can also save the favorite settings as files. Using these files is a convenient way to print under the same conditions on another computer. (In Windows.)
|
||
For instructions on using favorites to print, refer to the following topics, as appropriate for your computer and operating system.
2. 12. 7. Enhanced Printing Options > Other useful settings >
Using Favorites (Windows)
Using Favorites (Windows)
| Registering a favorite | |||||||
|
This section describes the procedure for registering printing settings that have been changed in the driver as Favorites.
|
| Printing using the favorite | |||||||||||
|
Follow the steps below to print using the favorite you have registered.
|
2. 12. 8. Enhanced Printing Options > Other useful settings >
Using Favorites (Mac OS X)
Using Favorites (Mac OS X)
| Note | ||
|
• In the printing dialog box, click Save As in the Presets list to save the current print settings. This is a standard feature of the operating system. For details, refer to the Mac OS documentation.
|
||
2. 12. 9. Enhanced Printing Options > Other useful settings >
Cutting Roll Paper After Printing
Cutting Roll Paper After Printing
| Note | ||
|
• It may not be possible to cut certain types of paper, such as adhesive paper. For details on types of paper that cannot be used with the auto cut feature, see the Paper Reference Guide. (See "Types of Paper (6.1.1)")
|
||
•Automatic Cutting
Roll paper is cut automatically after printing. If you prefer, you can print continuously without cutting the roll, or you can print a cut line.
For instructions on cutting roll paper after printing, refer to the following topics, as appropriate for your computer and operating system.
2. 12. 10. Enhanced Printing Options > Other useful settings >
Cutting Roll Paper After Printing (Windows)
Cutting Roll Paper After Printing (Windows)
This topic describes how to cut roll paper automatically after printing (using the auto cut function), as well as how to print a cut line for manual cutting.
| Note | ||
|
• The auto cut function is activated on the printer by default and when the printer driver is installed. Follow the steps below to reactivate the function if it is disabled, or to select the setting for printing a cut line instead.
|
||
- Choose Print in the application menu.
- Select the printer in the dialog box, and then display the printer driver dialog box.(See "Accessing the Printer Driver Dialog Box from Applications (3.1.6)")
- Click the Page Setup tab to display the Page Setup sheet.
- Select and click a roll paper in the LPaper Source list.
- Click NRoll Paper Options to display the Roll Paper Options dialog box.
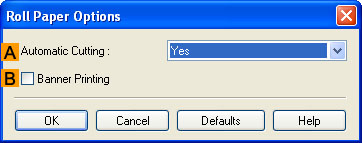
- To enable automatic cutting, click Yes in the AAutomatic Cutting list. If you prefer to cut the paper later yourself, click Print Cut Guideline.
- Click OK to close the Roll Paper Options dialog box.
- Confirm the print settings and print as desired.
Note • For tips on confirming print settings, see "Confirming Print Settings (3.1.3)"Roll paper will be automatically cut after printing.
2. 12. 11. Enhanced Printing Options > Other useful settings >
Cutting Roll Paper After Printing (Mac OS X)
Cutting Roll Paper After Printing (Mac OS X)
This topic describes how to cut roll paper automatically after printing (using the auto cut function), as well as how to print a cut line for manual cutting.
| Note | ||
|
• The auto cut function is activated on the printer by default and when the printer driver is installed. Follow the steps below to reactivate the function if it is disabled, or to select the setting for printing a cut line instead.
|
||
- This sets the BFormat for and CPaper Size.
Note • The configuration method varies depending on the OS and application software you are using.If Page Setup is displayed in the application menu, the settings are configured by opening the Page Attributes dialog box from Page Setup.If it is not displayed, the settings are configured in the upper part of the printer driver displayed when you select Print from the application software menu. - Select the printer in the APrinter list.
- Choose the original size in the FPaper Size list.
- If you configured the settings using the Page Attributes dialog box, click FOK to close the dialog box, and then select Print from the application software menu.
- Access the Page Setup pane.
- Select and click a roll paper in the APaper Source list.
- Access the Main pane.
- In the AMedia Type list, select the type of paper that is loaded.
- Click CSet to display the Paper Detailed Settings dialog box.
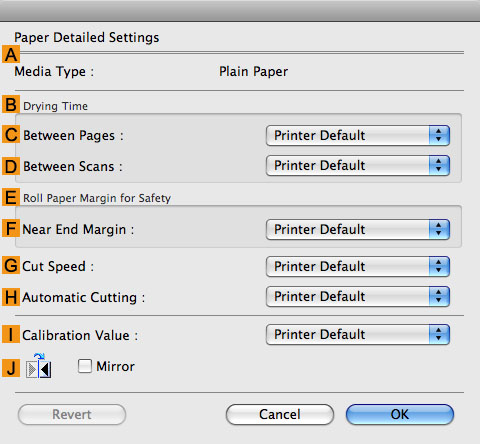
- To enable automatic cutting, click Printer Default in the HAutomatic Cutting list. If you prefer to cut the paper later yourself, click Print Cut Guideline.

Important • If the automatic cut function has been deactivated on the printer, change the auto cut setting on the printer Control Panel. - Click OK to close the Paper Detailed Settings dialog box.
- Confirm the print settings, and then click MPrint to start printing.
Note • For tips on confirming print settings, see "Confirming Print Settings (4.1.3)"
2. 12. 12. Enhanced Printing Options > Other useful settings >
Printing in Ideal Colors for Light in the Viewing Environment
Printing in Ideal Colors for Light in the Viewing Environment
You can print in the colors that look best when viewed under the light where the printed image will be displayed.
There are two ways to adjust the color tone for the ambient light, as follows.
•By selecting color tones on Chart before printing
On the printed Chart, note the number of the set of colors with the desired color tone and enter this number in the printer driver before printing.
| Important | ||
|
• This function is only supported in Windows and Mac OS X 10.4 or later.
• The colors in this function may differ slightly depending on the system software used (Windows 32/64 bit or Macintosh).
|
||
For instructions on selecting color tones on Chart before printing, refer to the following topic:
•Printing in Colors Matching the Measured Ambient Light
Measure the light level in the viewing environment and enter the results in the printer driver before printing.
| Important | ||
|
• This function requires the i1 spectrophotometer. The Light Source Measure Tool must also be installed.
• You can install the Light Source Measure Tool from the User Software CD-ROM.
• For a list of supported i1 devices, refer to the manual provided with the Light Source Measure Tool.
• This function is only supported in Windows and Mac OS X 10.4 or later.
• The colors in this function may differ slightly depending on the system software used (Windows 32/64 bit or Macintosh).
|
||
For instructions on measuring light levels before printing, refer to the following topic:
2. 12. 13. Enhanced Printing Options > Other useful settings >
Selecting Color Tones on Charts Before Printing (Windows)
Selecting Color Tones on Charts Before Printing (Windows)
Print Chart, note the number of the chart with your desired color tone, and enter this number in the printer driver before printing.
| Important | ||
|
• This function requires that the Light Source Check Tool be installed.
• You can install the Light Source Check Tool from the User Software CD-ROM.
|
||
- Choose Print in the application menu.
- Select the printer in the dialog box, and then display the printer driver dialog box.(See "Accessing the Printer Driver Dialog Box from Applications (3.1.6)")
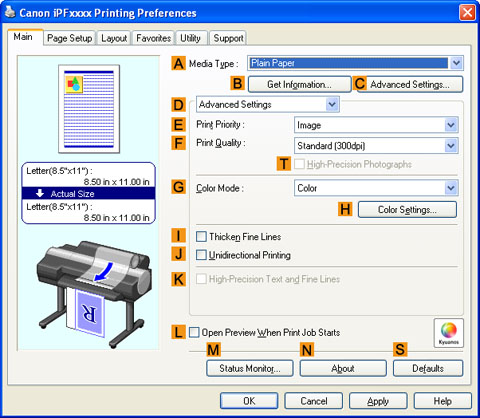
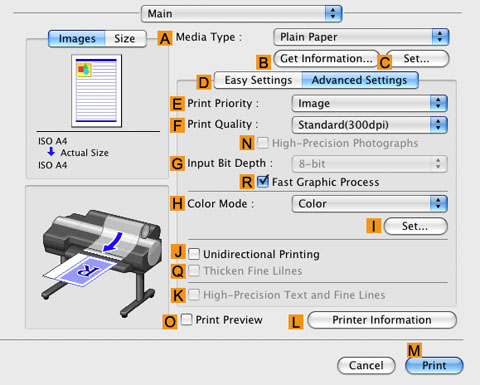
- Make sure the Main sheet is displayed.
- In the AMedia Type list, select the type of paper that is loaded (for example, Premium Glossy Paper 200 ).
Important • Ambient light matching may not be available, depending on the type of paper used. For more information, see the Paper Reference Guide.(See "Types of Paper (6.1.1)") - Click DAdvanced Settings to switch the print mode.
- In FPrint Quality, click Highest or High.
Important • Ambient Light Adjust is only available when the FPrint Quality is set to Highest or High. - Click Color in the GColor Mode list.
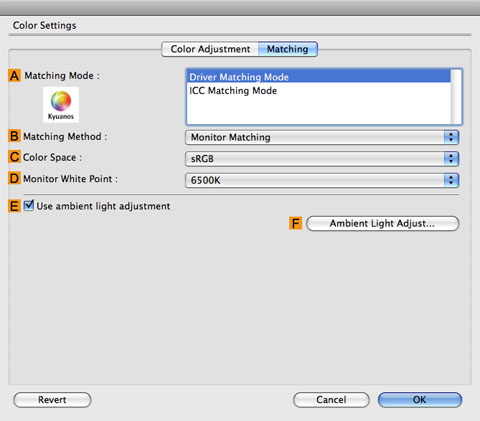
- Click HColor Settings to display the Color Settings dialog box.
- Click the Matching tab to display the Matching sheet.
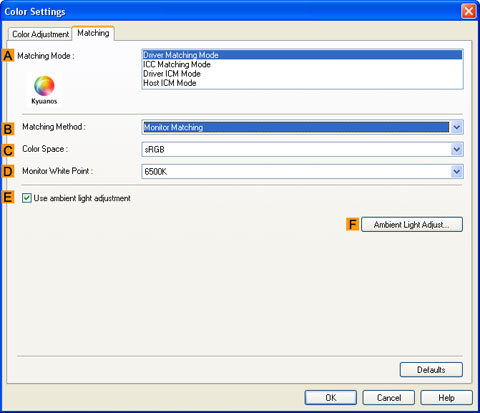
- Make sure Driver Matching Mode is selected in AMatching Mode.
Note • To specify monitor matching, select Monitor Matching in BMatching Method. In this case, select the same color space as when the file was opened in CColor Space and the monitor color temperature in DMonitor White Point. - Select EUse ambient light adjustment.
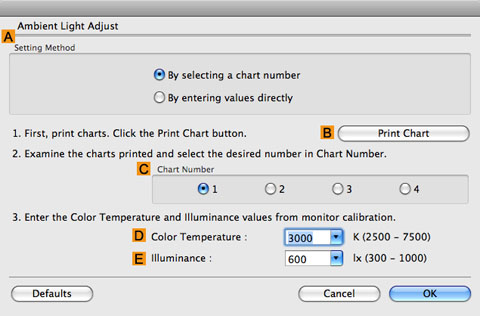
- Click FAmbient Light Adjust to display the Ambient Light Adjust dialog box.
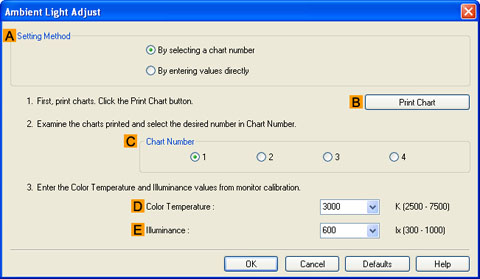
- Confirm that By selecting a chart number is selected in ASetting Method.
If it is not selected already, select it.
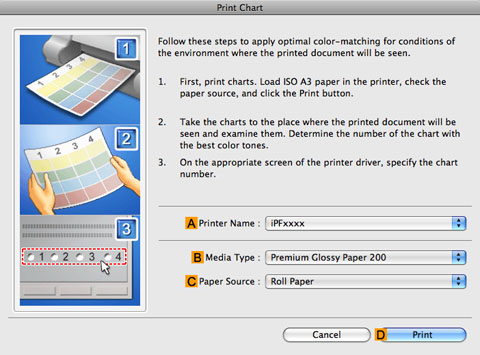
- Click BPrint Chart.
Light Source Check Tool now starts up.
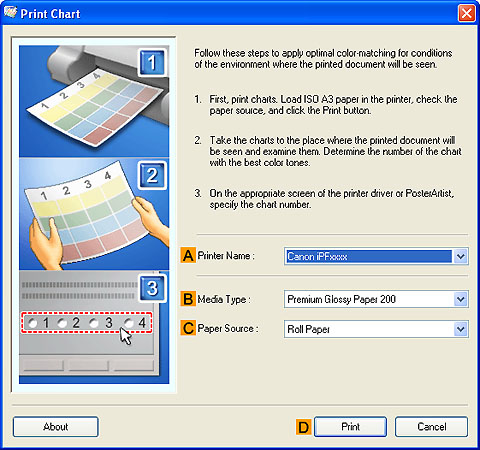
- Check the settings and click DPrint.
The Chart is printed.
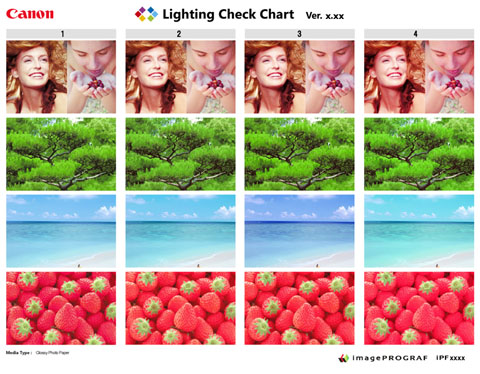
- In the viewing environment, determine the number of the set of images on the Chart in which all four vertical images have the best overall color tone.
Note • Choose the number of the set of images in which the people, the blue of the sky, and the red of the strawberries look the most natural overall. - In the Ambient Light Adjust dialog box, select the number of your preferred chart in CChart Number.
- If Matching Method is set to Monitor Matching on the Matching sheet, enter the DColor Temperature and EIlluminance as measured during monitor calibration.
- Click OK.
- Confirm the print settings and print as desired.
2. 12. 14. Enhanced Printing Options > Other useful settings >
Selecting Color Tones on Charts Before Printing (Mac OS X)
Selecting Color Tones on Charts Before Printing (Mac OS X)
Print Chart, note the number of the chart with your desired color tone, and enter this number in the printer driver before printing.
- Choose Print in the application menu.
- Select the printer in the dialog box, and then display the printer driver dialog box. (See "Accessing the Printer Driver Dialog Box from Applications (4.1.6).")
- Make sure the Main panel is displayed.
- In the AMedia Type list, select the type of paper that is loaded (for example, Premium Glossy Paper 200 ).
Important • Ambient light matching may not be available, depending on the type of paper used. For more information, see the Paper Reference Guide. (See "Types of Paper (6.1.1).") - Click DAdvanced Settings to switch the print mode.
- In FPrint Quality, click Highest or High.
Important • Ambient Light Adjust is only available when the FPrint Quality is set to Highest or High. - Click Color in the HColor Mode list.
- Click ISet to display the Color Settings dialog box.
- Click the Matching tab to display the Matching panel.
- Make sure Driver Matching Mode is selected in AMatching Mode.
Note • To specify monitor matching, select Monitor Matching in BMatching Method. In this case, select the same color space as when the file was opened in CColor Space and the monitor color temperature in DMonitor White Point. - Select EUse ambient light adjustment.
- Click FAmbient Light Adjust to display the Ambient Light Adjust dialog box.
- Confirm that By selecting a chart number is selected in ASetting Method.
If it is not selected already, select it.
- Click BPrint Chart.
Light Source Check Tool now starts up.
- Check the settings and click DPrint.
The Chart is printed.
- In the viewing environment, determine the number of the set of images on the Chart in which all four vertical images have the best overall color tone.
Note • Choose the number of the set of images in which the people, the blue of the sky, and the red of the strawberries look the most natural overall. - In the Ambient Light Adjust dialog box, select the number of your preferred chart in CChart Number.
- If Matching Method is set to Monitor Matching on the Matching panel, enter the DColor Temperature and EIlluminance as measured during monitor calibration.
- Click OK.
- Confirm the print settings and print as desired.
2. 12. 15. Enhanced Printing Options > Other useful settings >
Printing in Colors Matching the Measured Ambient Light (Windows)
Printing in Colors Matching the Measured Ambient Light (Windows)
Measure the light level in the viewing environment and enter the results in the printer driver before printing.
| Important | ||
|
• This function requires the i1 spectrophotometer. The Light Source Measure Tool must also be installed.
• You can install the Light Source Measure Tool from the User Software CD-ROM.
• For a list of supported i1 devices, refer to the manual provided with the Light Source Measure Tool.
|
||
- Using the i1 spectrophotometer and the Light Source Measure Tool, determine the Lighting Source Type, Color Temperature, and Illuminance in the viewing environment.
Note • For detailed instructions on the i1 and Light Source Measure Tool, refer to the provided instructions. - Choose Print in the application menu.
- Select the printer in the dialog box, and then display the printer driver dialog box. (See "Accessing the Printer Driver Dialog Box from Applications (3.1.6)")
- Make sure the Main sheet is displayed.
- In the AMedia Type list, select the type of paper that is loaded (for example, Premium Glossy Paper 200 ).
Important • Ambient light matching may not be available, depending on the type of paper used. For more information, see the Paper Reference Guide. (See "Types of Paper (6.1.1)") - Click DAdvanced Settings to switch the print mode.
- In FPrint Quality, click Highest or High.
Important • Ambient Light Adjust is only available when the FPrint Quality is set to Highest or High. - Click Color in the GColor Mode list.
- Click HColor Settings to display the Color Settings dialog box.
- Click the Matching tab to display the Matching sheet.
- Make sure Driver Matching Mode is selected in AMatching Mode.
Note • To specify monitor matching, select Monitor Matching in BMatching Method. In this case, select the same color space as when the file was opened in CColor Space and the monitor color temperature in DMonitor White Point. - Select EUse ambient light adjustment.
- Click FAmbient Light Adjust to display the Ambient Light Adjust dialog box.
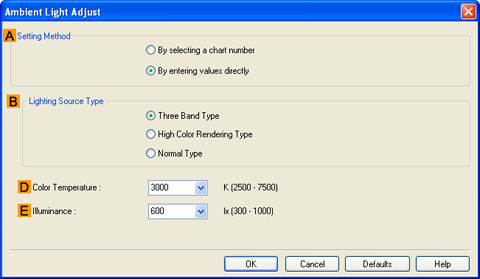
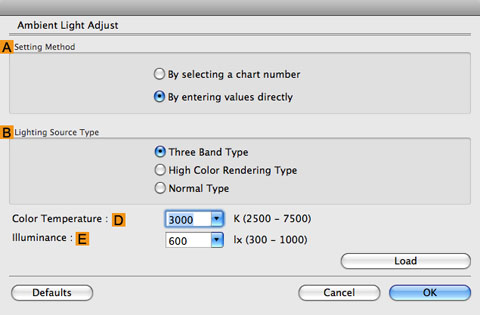
- Select By entering values directly in ASetting Method.
- Select the BLighting Source Type and DColor Temperature determined in step 1.
If you have selected Monitor Matching in Matching Method on the Matching sheet, also select EIlluminance.
Note • If you will print repeatedly using the settings values you set this one time, we recommend completing the settings by accessing the printer driver dialog box from the operating system menu.(See "Accessing the Printer Driver Dialog Box from the Operating System Menu (3.1.7)") - Click OK.
- Confirm the print settings and print as desired.
2. 12. 16. Enhanced Printing Options > Other useful settings >
Printing in Colors Matching the Measured Ambient Light (Mac OS X)
Printing in Colors Matching the Measured Ambient Light (Mac OS X)
Measure the light level in the viewing environment and enter the results in the printer driver before printing.
| Important | ||
|
• This function requires the i1 spectrophotometer. The Light Source Measure Tool must also be installed.
• You can install the Light Source Measure Tool from the User Software CD-ROM.
• For a list of supported i1 devices, refer to the manual provided with the Light Source Measure Tool.
|
||
- Using the i1 spectrophotometer and the Light Source Measure Tool, determine the Lighting Source Type, Color Temperature, and Illuminance in the viewing environment.
Note • For detailed instructions on the i1 and Light Source Measure Tool, refer to the provided instructions. - Choose Print in the application menu.
- Select the printer in the dialog box, and then display the printer driver dialog box. (See "Accessing the Printer Driver Dialog Box from Applications (4.1.6).")
- Make sure the Main panel is displayed.
- In the AMedia Type list, select the type of paper that is loaded (for example, Premium Glossy Paper 200 ).
Important • Ambient light matching may not be available, depending on the type of paper used. For more information, see the Paper Reference Guide. (See "Types of Paper (6.1.1).") - Click DAdvanced Settings to switch the print mode.
- In FPrint Quality, click Highest or High.
Important • Ambient Light Adjust is only available when the FPrint Quality is set to Highest or High. - Click Color in the HColor Mode list.
- Click ISet to display the Color Settings dialog box.
- Click the Matching tab to display the Matching panel.
- Make sure Driver Matching Mode is selected in AMatching Mode.
Note • To specify monitor matching, select Monitor Matching in BMatching Method. In this case, select the same color space as when the file was opened in CColor Space and the monitor color temperature in DMonitor White Point. - Select EUse ambient light adjustment.
- Click FAmbient Light Adjust to display the Ambient Light Adjust dialog box.
- Select By entering values directly in ASetting Method.
- Select the BLighting Source Type and DColor Temperature determined in step 1.
If you have selected Monitor Matching in Matching Method on the Matching panel, also select EIlluminance.
- Click OK.
- Confirm the print settings and print as desired.
2. 12. 17. Enhanced Printing Options > Other useful settings >
Printing Images to Match Monitor Colors
Printing Images to Match Monitor Colors
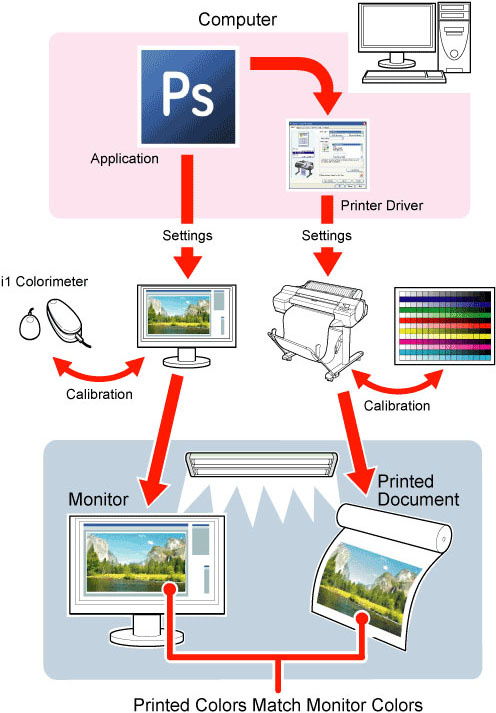
Adjusting the colors printed so that they more closely match the colors displayed on the monitor is called "monitor matching." Using this mode requires adjustment or configuration of the settings of your monitor, the source application, the file for printing, and the printer driver.
 |
| Important | ||
|
• Monitor matching may not be applied, or these settings may not be configurable or adjustable, depending on your monitor and the source application.
|
||
| Note | ||
|
• Printing in exactly the same colors as displayed on the monitor may not be possible due to differences in the monitor and printer color gamuts.
• Calibrating your monitor requires a measuring device.
• Because colors appear different under sunlight at different times of day, we recommend following this procedure in a room not exposed to sunlight.
|
||
•Monitor Matching
The sequence in monitor matching is as follows.
- Calibrate the printer.
Calibration improves color consistency by compensating for slight differences in how color appears due to individual variation among printheads or conditions in various printing environments.(See "Using Color Calibration for Color Adjustment (7.4.1).")
- Calibrate the monitor.
Normally, you can use a colorimeter such as the i1-Display.Set the white point to 6500 K or 5000 K, the gamma to 2.2, and the brightness to 120 cd, and activate light source measurement.The exact procedure varies depending on your monitor and measurement device.
- Open the file to print and configure settings in the source application.
Display the file in the sRGB or Adobe RGB color space.Configure settings to prevent color conversion by the application.In Photoshop CS3, for example, select Color Management in the Print dialog box, and then select No Color Management in Color Handling.
- Configure and adjust printer driver settings.
Select Monitor Matching in Matching Method. Specify the Monitor White Point set during monitor calibration and the Color Temperature and Illuminance measured in the ambient light.In Color Space, select the color space used when displaying the file in the source application.If you own an i1-Pro, using Light Source Measure Tool enables more precision measurement of the ambient light.
Note • If you will print repeatedly using the settings values you set this one time, we recommend completing the settings by accessing the printer driver dialog box from the operating system menu. (See "Accessing the Printer Driver Dialog Box from the Operating System Menu (Windows) (3.1.7)")
For instructions on configuring printer driver settings for monitor matching, refer to the following topic, as appropriate for your computer and operating system.
2. 12. 18. Enhanced Printing Options > Other useful settings >
Printing Images to Match Monitor Colors (Windows)
Printing Images to Match Monitor Colors (Windows)
By calibrating your monitor and configuring settings in the source application in advance, you can complete settings to print in colors that are as close as possible to the colors displayed on the monitor.
| Important | ||
|
• Before using this feature, you must calibrate the monitor and configure settings in the source application. (See "Printing Images to Match Monitor Colors (2.12.17)")
|
||
- Choose Print in the application menu.
- Select the printer in the dialog box, and then display the printer driver dialog box. (See "Accessing the Printer Driver Dialog Box from Applications (3.1.6)")
- Make sure the Main sheet is displayed.
- In the AMedia Type list, select the type of paper that is loaded (for example, Premium Glossy Paper 200 ).
Important • Ambient light matching may not be available, depending on the type of paper used. For more information, see the Paper Reference Guide. (See "Types of Paper (6.1.1)") - Click DAdvanced Settings to switch the print mode.
- In FPrint Quality, click Highest or High.
Important • Ambient Light Adjust is only available when the FPrint Quality is set to Highest or High. - Click Color in the GColor Mode list.
- Click HColor Settings to display the Color Settings dialog box.
- Click the Matching tab to display the Matching sheet.
- Make sure Driver Matching Mode is selected in AMatching Mode.
- In BMatching Method, select Monitor Matching.
- In CColor Space, select the color space used when displaying the file in the source application.
- In DMonitor White Point, select the white point set on the monitor.
Note • For greater precision in monitor matching, we recommend configuring the settings for ambient light matching. (See "Printing in Ideal Colors for Light in the Viewing Environment (2.12.12)") - Click OK.
- Confirm the print settings and print as desired.
2. 12. 19. Enhanced Printing Options > Other useful settings >
Printing Images to Match Monitor Colors (Mac OS X)
Printing Images to Match Monitor Colors (Mac OS X)
By calibrating your monitor and configuring settings in the source application in advance, you can complete settings to print in colors that are as close as possible to the colors displayed on the monitor.
| Important | ||
|
• Before using this feature, you must calibrate the monitor and configure settings in the source application. (See "Printing Images to Match Monitor Colors (2.12.17).")
|
||
- Choose Print in the application menu.
- Select the printer in the dialog box, and then display the printer driver dialog box. (See "Accessing the Printer Driver Dialog Box from Applications (4.1.6).")
- Make sure the Main panel is displayed.
- In the AMedia Type list, select the type of paper that is loaded (for example, Premium Glossy Paper 200 ).
Important • Ambient light matching may not be available, depending on the type of paper used. For more information, see the Paper Reference Guide. (See "Types of Paper (6.1.1).") - Click DAdvanced Settings to switch the print mode.
- In FPrint Quality, click Highest or High.
Important • Ambient Light Adjust is only available when the FPrint Quality is set to Highest or High. - Click Color in the HColor Mode list.
- Click ISet to display the Color Settings dialog box.
- Click the Matching tab to display the Matching panel.
- Make sure Driver Matching Mode is selected in AMatching Mode.
- In BMatching Method, select Monitor Matching.
- In CColor Space, select the color space used when displaying the file in the source application.
- In DMonitor White Point, select the white point set on the monitor.
Note • For greater precision in monitor matching, we recommend configuring the settings for ambient light matching. (See "Printing in Ideal Colors for Light in the Viewing Environment (2.12.12).") - Click OK.
- Confirm the print settings and print as desired.