7. 4. 1. Adjustments for Better Print Quality > Color adjustment >
Using Color Calibration for Color Adjustment
Using Color Calibration for Color Adjustment
The calibration function improves color consistency by compensating for slight differences in how color appears due to individual variation among printheads or conditions in various printing environments.
We recommend color calibration in the following situations.
•After initial printer installation
•After Printhead replacement
•If colors seem different from before, despite using the same printing environment, under the same conditions
•To ensure uniform colors when printing on multiple printers (however, be sure to use the same version of firmware and printer driver, under the same settings)
Executing color calibration will print a test pattern, which the printer will read to set the adjustment value automatically.
| Important | ||
|
• Color calibration requires one of the following types of paper. Note that various environmental conditions are recommended for various types of paper. Use the printer only where the recommended environmental conditions for the paper are met. For details on recommended environmental conditions for various paper, see the Paper Reference Guide. (See "Types of Paper (6.1.1).")
• The color calibration adjustment value is applied in all print jobs, including jobs with paper other than the paper used for color calibration, ensuring that the optimal value is always applied when printing.
• You can choose whether or not to apply color calibration in printing from the printer driver or the Control Panel menu. Printer driver settings are given priority.
For details on the Control Panel menu, see "Menu Settings (9.2.4)."
For details on printer driver settings, refer to the following topics.
• Printer Driver Settings (Windows) (3.1.1)
• Printer Driver Settings (Mac OS X) (4.1.1)
• Before color calibration, ensure the printer is not exposed to direct sunlight or other strong sources of light.
• If, when reinstalling the printer driver, you change the region selection of the Media Configuration Tool, the region-specific paper information originally registered on the printer before installation will be deleted. Using paper with deleted information when executing color calibration will prevent the resulting calibration adjustment value from being applied to all other types of the paper. If you wish to apply calibration results, prepare paper compatible with calibration in the newly selected region and perform calibration again. (See Media Configuration Tool Guide (Windows) or Media Configuration Tool Guide (Macintosh).)
• To restore the default settings, select System Setup >Reset PaprSetngs >Yes in the Control Panel menu. Because paper information added or modified by the Media Configuration Tool is deleted, if you have calibrated the printer using paper with information added by the Media Configuration Tool, color calibration executed this way can no longer be applied to any type of paper. If you wish to apply calibration results, prepare calibration-compatible paper that was in the original settings and perform calibration again. (See Media Configuration Tool Guide (Windows) or Media Configuration Tool Guide (Macintosh).)
|
||
| Note | ||
|
• We recommend executing color calibration with one type of paper. Using the same type of paper for color calibration can improve color consistency.
• For better color consistency, we recommend executing color calibration under the same conditions of temperature and humidity each time.
• After color calibration, you can adjust colors further in the printer driver, if desired. (See "Adjusting the Color in the Printer Driver (2.3.1).")
• You can confirm the date and paper used for color calibration by accessing Status Print in the Control Panel menu, or by referring to imagePROGRAF Status Monitor (in Windows) or imagePROGRAF Printmonitor (in Mac OS X).
For details on the Control Panel menu, see "Menu Settings (9.2.4)."
For details on imagePROGRAF Status Monitor, refer to the imagePROGRAF Status Monitor help.
For details on imagePROGRAF Printmonitor, refer to the imagePROGRAF Printmonitor help.
|
||
Items to Prepare
Execute color calibration as follows.
- Load the paper.
- On the Tab Selection screen of the Control Panel, press
 or
or  to select the Settings/Adj. tab (
 ).
).
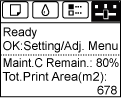

Note • If the Tab Selection screen is not displayed, press the Menu button. - Press the OK button.
The Set./Adj. Menu is displayed.
- Press
 or
or  to select Adjust Printer, and then press the OK button.
 - Press or to select Calibration, and then press the OK button.
- Press or to select Auto Adjust, and then press the OK button.
The printer now measures environmental conditions, checks the paper, and prints a test pattern for color calibration. The printer automatically reads the test pattern and sets the adjustment value.
7. 4. 2. Adjustments for Better Print Quality > Color adjustment >
Printing in Ideal Colors for Light in the Viewing Environment
Printing in Ideal Colors for Light in the Viewing Environment
You can print in the colors that look best when viewed under the light where the printed image will be displayed.
There are two ways to adjust the color tone for the ambient light, as follows.
•By selecting color tones on Chart before printing
On the printed Chart, note the number of the set of colors with the desired color tone and enter this number in the printer driver before printing.
| Important | ||
|
• This function is only supported in Windows and Mac OS X 10.4 or later.
• The colors in this function may differ slightly depending on the system software used (Windows 32/64 bit or Macintosh).
|
||
For instructions on selecting color tones on Chart before printing, refer to the following topic:
•Printing in Colors Matching the Measured Ambient Light
Measure the light level in the viewing environment and enter the results in the printer driver before printing.
| Important | ||
|
• This function requires the i1 spectrophotometer. The Light Source Measure Tool must also be installed.
• You can install the Light Source Measure Tool from the User Software CD-ROM.
• For a list of supported i1 devices, refer to the manual provided with the Light Source Measure Tool.
• This function is only supported in Windows and Mac OS X 10.4 or later.
• The colors in this function may differ slightly depending on the system software used (Windows 32/64 bit or Macintosh).
|
||
For instructions on measuring light levels before printing, refer to the following topic:
7. 4. 3. Adjustments for Better Print Quality > Color adjustment >
Selecting Color Tones on Charts Before Printing (Windows)
Selecting Color Tones on Charts Before Printing (Windows)
Print Chart, note the number of the chart with your desired color tone, and enter this number in the printer driver before printing.
| Important | ||
|
• This function requires that the Light Source Check Tool be installed.
• You can install the Light Source Check Tool from the User Software CD-ROM.
|
||
- Choose Print in the application menu.
- Select the printer in the dialog box, and then display the printer driver dialog box.(See "Accessing the Printer Driver Dialog Box from Applications (3.1.6)")
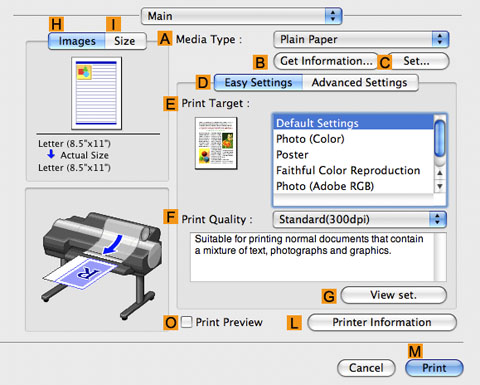
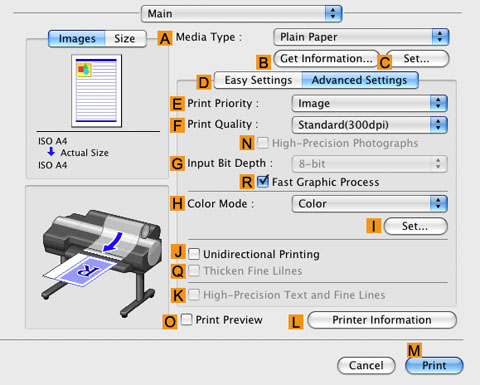
- Make sure the Main sheet is displayed.
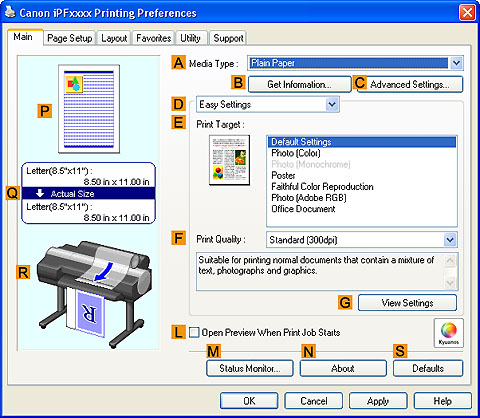
- In the AMedia Type list, select the type of paper that is loaded (for example, Premium Glossy Paper 200 ).

Important • Ambient light matching may not be available, depending on the type of paper used. For more information, see the Paper Reference Guide.(See "Types of Paper (6.1.1)") - Click DAdvanced Settings to switch the print mode.
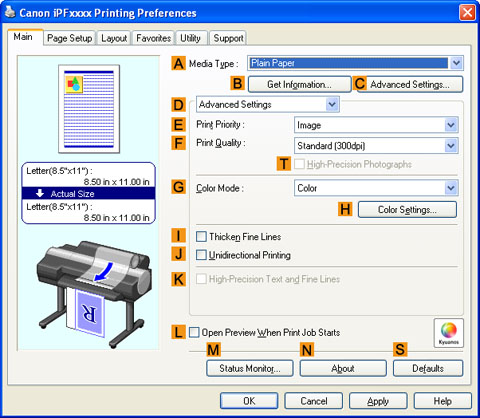
- In FPrint Quality, click Highest or High.
Important • Ambient Light Adjust is only available when the FPrint Quality is set to Highest or High. - Click Color in the GColor Mode list.
- Click HColor Settings to display the Color Settings dialog box.
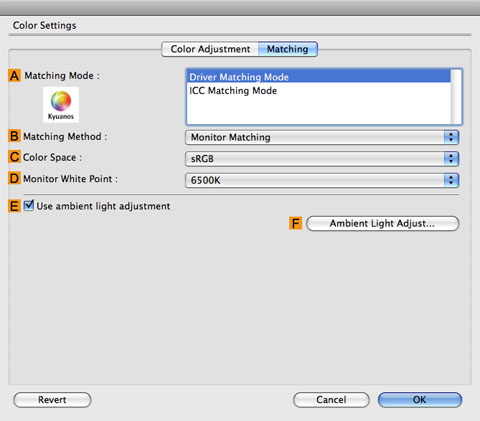
- Click the Matching tab to display the Matching sheet.
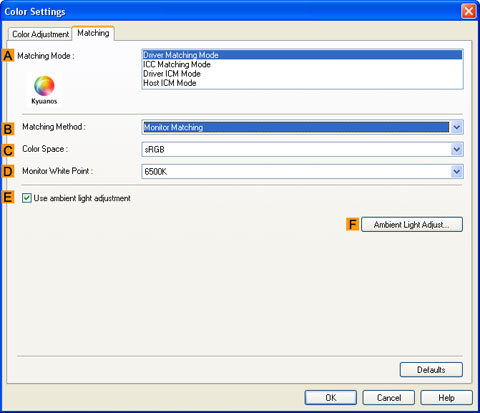
- Make sure Driver Matching Mode is selected in AMatching Mode.
Note • To specify monitor matching, select Monitor Matching in BMatching Method. In this case, select the same color space as when the file was opened in CColor Space and the monitor color temperature in DMonitor White Point. - Select EUse ambient light adjustment.
- Click FAmbient Light Adjust to display the Ambient Light Adjust dialog box.
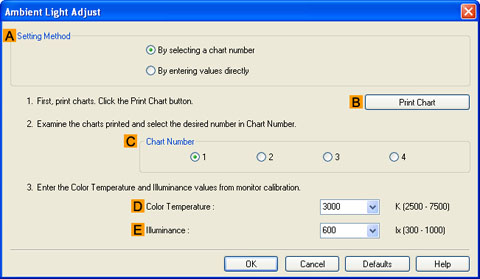
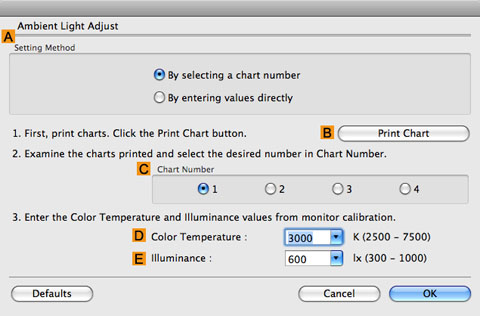
- Confirm that By selecting a chart number is selected in ASetting Method.
If it is not selected already, select it.
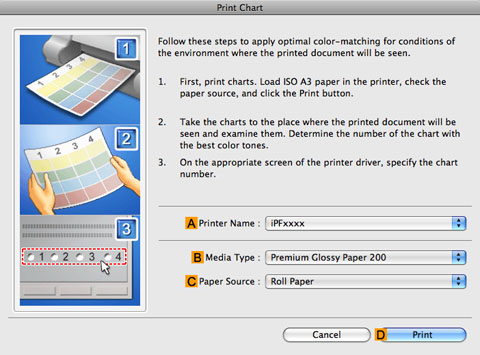
- Click BPrint Chart.
Light Source Check Tool now starts up.
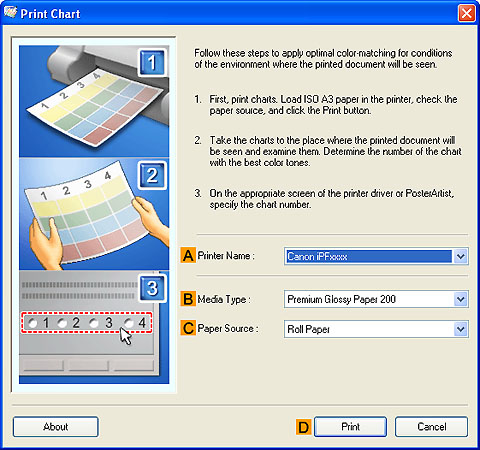
- Check the settings and click DPrint.
The Chart is printed.
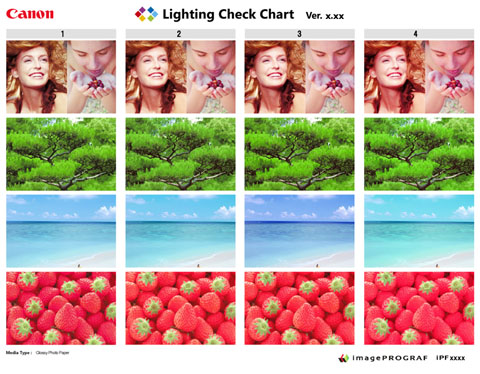
- In the viewing environment, determine the number of the set of images on the Chart in which all four vertical images have the best overall color tone.
Note • Choose the number of the set of images in which the people, the blue of the sky, and the red of the strawberries look the most natural overall. - In the Ambient Light Adjust dialog box, select the number of your preferred chart in CChart Number.
- If Matching Method is set to Monitor Matching on the Matching sheet, enter the DColor Temperature and EIlluminance as measured during monitor calibration.
- Click OK.
- Confirm the print settings and print as desired.
7. 4. 4. Adjustments for Better Print Quality > Color adjustment >
Selecting Color Tones on Charts Before Printing (Mac OS X)
Selecting Color Tones on Charts Before Printing (Mac OS X)
Print Chart, note the number of the chart with your desired color tone, and enter this number in the printer driver before printing.
- Choose Print in the application menu.
- Select the printer in the dialog box, and then display the printer driver dialog box. (See "Accessing the Printer Driver Dialog Box from Applications (4.1.6).")
- Make sure the Main panel is displayed.
- In the AMedia Type list, select the type of paper that is loaded (for example, Premium Glossy Paper 200 ).
Important • Ambient light matching may not be available, depending on the type of paper used. For more information, see the Paper Reference Guide. (See "Types of Paper (6.1.1).") - Click DAdvanced Settings to switch the print mode.
- In FPrint Quality, click Highest or High.
Important • Ambient Light Adjust is only available when the FPrint Quality is set to Highest or High. - Click Color in the HColor Mode list.
- Click ISet to display the Color Settings dialog box.
- Click the Matching tab to display the Matching panel.
- Make sure Driver Matching Mode is selected in AMatching Mode.
Note • To specify monitor matching, select Monitor Matching in BMatching Method. In this case, select the same color space as when the file was opened in CColor Space and the monitor color temperature in DMonitor White Point. - Select EUse ambient light adjustment.
- Click FAmbient Light Adjust to display the Ambient Light Adjust dialog box.
- Confirm that By selecting a chart number is selected in ASetting Method.
If it is not selected already, select it.
- Click BPrint Chart.
Light Source Check Tool now starts up.
- Check the settings and click DPrint.
The Chart is printed.
- In the viewing environment, determine the number of the set of images on the Chart in which all four vertical images have the best overall color tone.
Note • Choose the number of the set of images in which the people, the blue of the sky, and the red of the strawberries look the most natural overall. - In the Ambient Light Adjust dialog box, select the number of your preferred chart in CChart Number.
- If Matching Method is set to Monitor Matching on the Matching panel, enter the DColor Temperature and EIlluminance as measured during monitor calibration.
- Click OK.
- Confirm the print settings and print as desired.
7. 4. 5. Adjustments for Better Print Quality > Color adjustment >
Printing in Colors Matching the Measured Ambient Light (Windows)
Printing in Colors Matching the Measured Ambient Light (Windows)
Measure the light level in the viewing environment and enter the results in the printer driver before printing.
| Important | ||
|
• This function requires the i1 spectrophotometer. The Light Source Measure Tool must also be installed.
• You can install the Light Source Measure Tool from the User Software CD-ROM.
• For a list of supported i1 devices, refer to the manual provided with the Light Source Measure Tool.
|
||
- Using the i1 spectrophotometer and the Light Source Measure Tool, determine the Lighting Source Type, Color Temperature, and Illuminance in the viewing environment.
Note • For detailed instructions on the i1 and Light Source Measure Tool, refer to the provided instructions. - Choose Print in the application menu.
- Select the printer in the dialog box, and then display the printer driver dialog box. (See "Accessing the Printer Driver Dialog Box from Applications (3.1.6)")
- Make sure the Main sheet is displayed.
- In the AMedia Type list, select the type of paper that is loaded (for example, Premium Glossy Paper 200 ).
Important • Ambient light matching may not be available, depending on the type of paper used. For more information, see the Paper Reference Guide. (See "Types of Paper (6.1.1)") - Click DAdvanced Settings to switch the print mode.
- In FPrint Quality, click Highest or High.
Important • Ambient Light Adjust is only available when the FPrint Quality is set to Highest or High. - Click Color in the GColor Mode list.
- Click HColor Settings to display the Color Settings dialog box.
- Click the Matching tab to display the Matching sheet.
- Make sure Driver Matching Mode is selected in AMatching Mode.
Note • To specify monitor matching, select Monitor Matching in BMatching Method. In this case, select the same color space as when the file was opened in CColor Space and the monitor color temperature in DMonitor White Point. - Select EUse ambient light adjustment.
- Click FAmbient Light Adjust to display the Ambient Light Adjust dialog box.
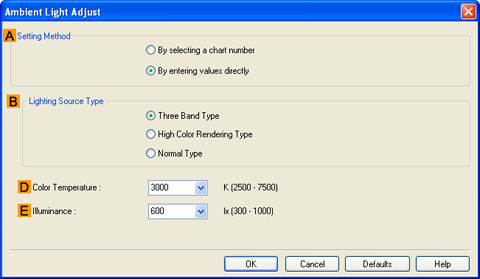
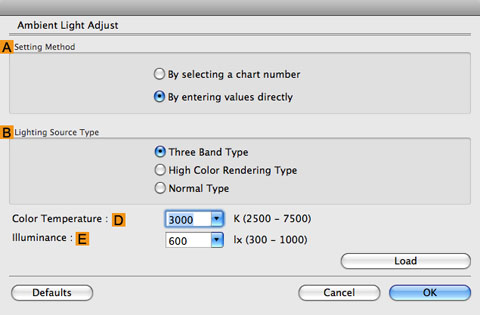
- Select By entering values directly in ASetting Method.
- Select the BLighting Source Type and DColor Temperature determined in step 1.
If you have selected Monitor Matching in Matching Method on the Matching sheet, also select EIlluminance.
Note • If you will print repeatedly using the settings values you set this one time, we recommend completing the settings by accessing the printer driver dialog box from the operating system menu.(See "Accessing the Printer Driver Dialog Box from the Operating System Menu (3.1.7)") - Click OK.
- Confirm the print settings and print as desired.
7. 4. 6. Adjustments for Better Print Quality > Color adjustment >
Printing in Colors Matching the Measured Ambient Light (Mac OS X)
Printing in Colors Matching the Measured Ambient Light (Mac OS X)
Measure the light level in the viewing environment and enter the results in the printer driver before printing.
| Important | ||
|
• This function requires the i1 spectrophotometer. The Light Source Measure Tool must also be installed.
• You can install the Light Source Measure Tool from the User Software CD-ROM.
• For a list of supported i1 devices, refer to the manual provided with the Light Source Measure Tool.
|
||
- Using the i1 spectrophotometer and the Light Source Measure Tool, determine the Lighting Source Type, Color Temperature, and Illuminance in the viewing environment.
Note • For detailed instructions on the i1 and Light Source Measure Tool, refer to the provided instructions. - Choose Print in the application menu.
- Select the printer in the dialog box, and then display the printer driver dialog box. (See "Accessing the Printer Driver Dialog Box from Applications (4.1.6).")
- Make sure the Main panel is displayed.
- In the AMedia Type list, select the type of paper that is loaded (for example, Premium Glossy Paper 200 ).
Important • Ambient light matching may not be available, depending on the type of paper used. For more information, see the Paper Reference Guide. (See "Types of Paper (6.1.1).") - Click DAdvanced Settings to switch the print mode.
- In FPrint Quality, click Highest or High.
Important • Ambient Light Adjust is only available when the FPrint Quality is set to Highest or High. - Click Color in the HColor Mode list.
- Click ISet to display the Color Settings dialog box.
- Click the Matching tab to display the Matching panel.
- Make sure Driver Matching Mode is selected in AMatching Mode.
Note • To specify monitor matching, select Monitor Matching in BMatching Method. In this case, select the same color space as when the file was opened in CColor Space and the monitor color temperature in DMonitor White Point. - Select EUse ambient light adjustment.
- Click FAmbient Light Adjust to display the Ambient Light Adjust dialog box.
- Select By entering values directly in ASetting Method.
- Select the BLighting Source Type and DColor Temperature determined in step 1.
If you have selected Monitor Matching in Matching Method on the Matching panel, also select EIlluminance.
- Click OK.
- Confirm the print settings and print as desired.
7. 4. 7. Adjustments for Better Print Quality > Color adjustment >
Printing Images to Match Monitor Colors
Printing Images to Match Monitor Colors
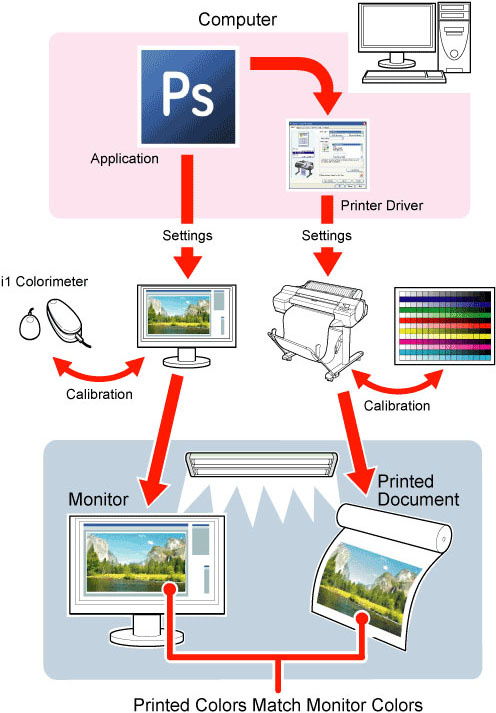
Adjusting the colors printed so that they more closely match the colors displayed on the monitor is called "monitor matching." Using this mode requires adjustment or configuration of the settings of your monitor, the source application, the file for printing, and the printer driver.
 |
| Important | ||
|
• Monitor matching may not be applied, or these settings may not be configurable or adjustable, depending on your monitor and the source application.
|
||
| Note | ||
|
• Printing in exactly the same colors as displayed on the monitor may not be possible due to differences in the monitor and printer color gamuts.
• Calibrating your monitor requires a measuring device.
• Because colors appear different under sunlight at different times of day, we recommend following this procedure in a room not exposed to sunlight.
|
||
•Monitor Matching
The sequence in monitor matching is as follows.
- Calibrate the printer.
Calibration improves color consistency by compensating for slight differences in how color appears due to individual variation among printheads or conditions in various printing environments.(See "Using Color Calibration for Color Adjustment (7.4.1).")
- Calibrate the monitor.
Normally, you can use a colorimeter such as the i1-Display.Set the white point to 6500 K or 5000 K, the gamma to 2.2, and the brightness to 120 cd, and activate light source measurement.The exact procedure varies depending on your monitor and measurement device.
- Open the file to print and configure settings in the source application.
Display the file in the sRGB or Adobe RGB color space.Configure settings to prevent color conversion by the application.In Photoshop CS3, for example, select Color Management in the Print dialog box, and then select No Color Management in Color Handling.
- Configure and adjust printer driver settings.
Select Monitor Matching in Matching Method. Specify the Monitor White Point set during monitor calibration and the Color Temperature and Illuminance measured in the ambient light.In Color Space, select the color space used when displaying the file in the source application.If you own an i1-Pro, using Light Source Measure Tool enables more precision measurement of the ambient light.
Note • If you will print repeatedly using the settings values you set this one time, we recommend completing the settings by accessing the printer driver dialog box from the operating system menu. (See "Accessing the Printer Driver Dialog Box from the Operating System Menu (Windows) (3.1.7)")
For instructions on configuring printer driver settings for monitor matching, refer to the following topic, as appropriate for your computer and operating system.
7. 4. 8. Adjustments for Better Print Quality > Color adjustment >
Printing Images to Match Monitor Colors (Windows)
Printing Images to Match Monitor Colors (Windows)
By calibrating your monitor and configuring settings in the source application in advance, you can complete settings to print in colors that are as close as possible to the colors displayed on the monitor.
| Important | ||
|
• Before using this feature, you must calibrate the monitor and configure settings in the source application. (See "Printing Images to Match Monitor Colors (7.4.7)")
|
||
- Choose Print in the application menu.
- Select the printer in the dialog box, and then display the printer driver dialog box. (See "Accessing the Printer Driver Dialog Box from Applications (3.1.6)")
- Make sure the Main sheet is displayed.
- In the AMedia Type list, select the type of paper that is loaded (for example, Premium Glossy Paper 200 ).
Important • Ambient light matching may not be available, depending on the type of paper used. For more information, see the Paper Reference Guide. (See "Types of Paper (6.1.1)") - Click DAdvanced Settings to switch the print mode.
- In FPrint Quality, click Highest or High.
Important • Ambient Light Adjust is only available when the FPrint Quality is set to Highest or High. - Click Color in the GColor Mode list.
- Click HColor Settings to display the Color Settings dialog box.
- Click the Matching tab to display the Matching sheet.
- Make sure Driver Matching Mode is selected in AMatching Mode.
- In BMatching Method, select Monitor Matching.
- In CColor Space, select the color space used when displaying the file in the source application.
- In DMonitor White Point, select the white point set on the monitor.
Note • For greater precision in monitor matching, we recommend configuring the settings for ambient light matching. (See "Printing in Ideal Colors for Light in the Viewing Environment (7.4.2)") - Click OK.
- Confirm the print settings and print as desired.
7. 4. 9. Adjustments for Better Print Quality > Color adjustment >
Printing Images to Match Monitor Colors (Mac OS X)
Printing Images to Match Monitor Colors (Mac OS X)
By calibrating your monitor and configuring settings in the source application in advance, you can complete settings to print in colors that are as close as possible to the colors displayed on the monitor.
| Important | ||
|
• Before using this feature, you must calibrate the monitor and configure settings in the source application. (See "Printing Images to Match Monitor Colors (7.4.7).")
|
||
- Choose Print in the application menu.
- Select the printer in the dialog box, and then display the printer driver dialog box. (See "Accessing the Printer Driver Dialog Box from Applications (4.1.6).")
- Make sure the Main panel is displayed.
- In the AMedia Type list, select the type of paper that is loaded (for example, Premium Glossy Paper 200 ).
Important • Ambient light matching may not be available, depending on the type of paper used. For more information, see the Paper Reference Guide. (See "Types of Paper (6.1.1).") - Click DAdvanced Settings to switch the print mode.
- In FPrint Quality, click Highest or High.
Important • Ambient Light Adjust is only available when the FPrint Quality is set to Highest or High. - Click Color in the HColor Mode list.
- Click ISet to display the Color Settings dialog box.
- Click the Matching tab to display the Matching panel.
- Make sure Driver Matching Mode is selected in AMatching Mode.
- In BMatching Method, select Monitor Matching.
- In CColor Space, select the color space used when displaying the file in the source application.
- In DMonitor White Point, select the white point set on the monitor.
Note • For greater precision in monitor matching, we recommend configuring the settings for ambient light matching. (See "Printing in Ideal Colors for Light in the Viewing Environment (7.4.2).") - Click OK.
- Confirm the print settings and print as desired.