3. 1. 1. Windows Software > Printer Driver >
Printer Driver Settings (Windows)
Printer Driver Settings (Windows)
•Accessing the Printer Driver Dialog Box from Applications (3.1.6)
•Accessing the Printer Driver Dialog Box from the Operating System Menu (3.1.7)
For information on the Windows printer driver settings, refer to the following topics.
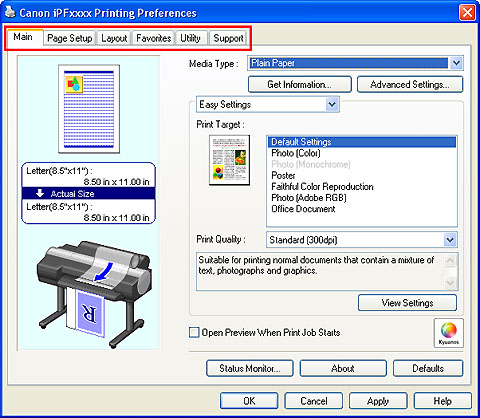 |
•Main Sheet (3.1.8)
You can specify the type of paper, color processing, print quality, print preview, and other settings. Choose Easy Settings to specify basic print settings based on the printing application or Advanced Settings to complete more detailed settings as desired.
•Paper Detailed Settings Dialog Box (3.1.10)
•View Settings Dialog Box for the Printing Application (3.1.11)
•Color Adjustment Sheet: Color (3.1.12)
•Object Adjustment dialog box: Color (3.1.13)
•Matching Sheet (3.1.14)
•Ambient Light Adjust dialog box (3.1.15)
•Light Source Check Tool (3.1.16)
•Color Adjustment Sheet: Monochrome (3.1.17)
•Object Adjustment dialog box: Monochrome (3.1.18)
•Gray Adjustment Sheet (3.1.19)
•Page Setup Sheet (3.1.20)
You can specify the page size of the original, borderless printing, enlargement or reduction, the orientation, the paper size and feed source, and automatic cutting.
•Layout Sheet (3.1.23)
You can specify the page layout, watermarks, the orientation, the number of copies, and print processing options.
•Favorites Sheet (3.1.26)
Groups of print settings you select on each sheet can be saved as a favorite. Favorites you have added can be edited or used at the time of printing as desired.
•Utility Sheet (3.1.27)
You can specify settings related to maintenance for the Printhead and feed amount, as well as settings for Color imageRUNNER Enlargement Copy.
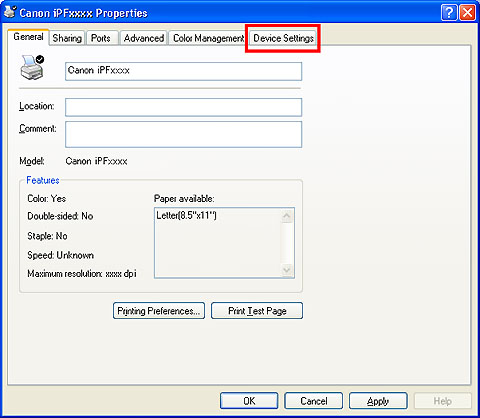
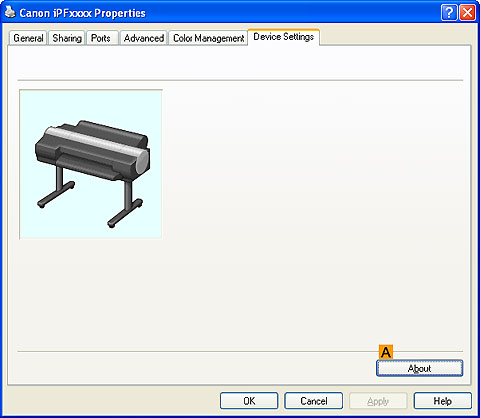
•Device Settings Sheet (3.1.30)
You can display settings for optional equipment installed on the printer and see the version information for the printer driver.
imagePROGRAF Free Layout is a feature for freely arranging originals from various source applications on a single page as desired before printing. For details, see Free Layout.
Color imageRUNNER Enlargement Copy is a feature for automatic enlargement and printing of scanned originals from a Color imageRUNNER. For details, see Color imageRUNNER Enlargement Copy.
| Note | ||
|
• Color imageRUNNER Enlargement Copy and imagePROGRAF Free Layout cannot be used on 64-bit version of Windows.
|
||
3. 1. 2. Windows Software > Printer Driver >
Specifying Paper in the Printer Driver (Windows)
Specifying Paper in the Printer Driver (Windows)
| Important | ||
|
• Always specify the same type and size of paper in the printer menu and printer driver.
|
||
- Choose Print in the application menu.
- Select the printer in the dialog box, and then display the printer driver dialog box.(See "Accessing the Printer Driver Dialog Box from Applications (3.1.6)")
- Make sure the Main sheet is displayed.
- In the AMedia Type list, select the type of paper that is loaded.

Note • Click the BGet Information button to display the Paper Information on Printer dialog box. On the Paper Information on Printer dialog box, you can obtain information on the paper in the printer and configure printer driver settings for the feed source and type of paper.This function requires that the Status Monitor be installed. - Click the Page Setup tab to display the Page Setup sheet.

- In the APage Size list, select the size of the original as specified in the application.
- In the LPaper Source list, select how paper is supplied.
- If you have selected roll paper in LPaper Source, select the width of the loaded roll in MRoll Paper Width.
| Note | ||
|
• A variety of settings are available in the printer driver to suit different printing applications.
For details on available printing conditions, see "Printer Driver Settings (3.1.1)"
|
||
3. 1. 3. Windows Software > Printer Driver >
Confirming Print Settings (Windows)
Confirming Print Settings (Windows)
•Checking a preview of the settings
A preview of the settings is displayed on the left side of the Main, Page Setup, and Layout sheets. By checking illustrations and numerical values in the preview, you can confirm current settings for the page size, orientation, paper source, layout, and so on.
|
| Note | ||
|
• To confirm the Print Target specified in Easy Settings, click GView Settings on the Main sheet to display the View Settings dialog box.
|
||
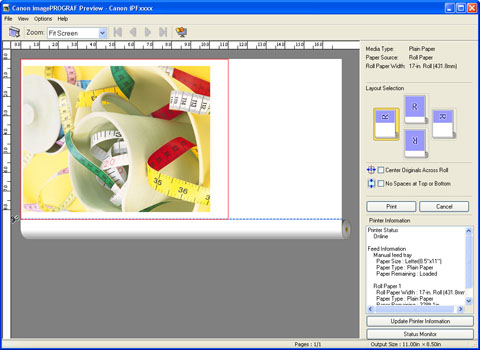
•Checking a print preview
You can check an image of the original just as it will be printed.
When you activate this feature, imagePROGRAF Preview or PageComposer is started before printing. Confirming how documents will be printed this way helps prevent printing errors.
For details on print previews, see "Checking the Layout in a Preview Before Printing (2.11.1)"
3. 1. 4. Windows Software > Printer Driver >
Checking the Layout in a Preview Before Printing (Windows)
Checking the Layout in a Preview Before Printing (Windows)
- Choose Print in the application menu.
- Select the printer in the dialog box, and then display the printer driver dialog box.(See "Accessing the Printer Driver Dialog Box from Applications (3.1.6)")
- Make sure the Main sheet is displayed.
- Select the LOpen Preview When Print Job Starts check box.
- After you click OK, when you print a job, the imagePROGRAF Preview window will be displayed.
Note • If PageComposer is running, access the Special Settings dialog box from the Layout sheet and clear Enable Preview Switching. - On the main window, you can check the layout and change settings as needed.
- To print, click Print in the File menu.
| Note | ||
|
• For details on imagePROGRAF Preview functions, see Preview.
|
||
3. 1. 5. Windows Software > Printer Driver >
Using Favorites (Windows)
Using Favorites (Windows)
| Registering a favorite | |||||||
|
This section describes the procedure for registering printing settings that have been changed in the driver as Favorites.
|
| Printing using the favorite | |||||||||||
|
Follow the steps below to print using the favorite you have registered.
|
3. 1. 6. Windows Software > Printer Driver >
Accessing the Printer Driver Dialog Box from Applications (Windows)
Accessing the Printer Driver Dialog Box from Applications (Windows)
- Choose Print from the File menu to display the dialog box for printing conditions.
- Select the printer, and then display the printer driver dialog box.
Note • The dialog box for specifying printing conditions varies depending on the source application. In some cases, when you select the printer, a sheet for configuring the printer driver is added to the dialog box.In the following case, click Preferences.•Example: Print dialog box displayed by the application software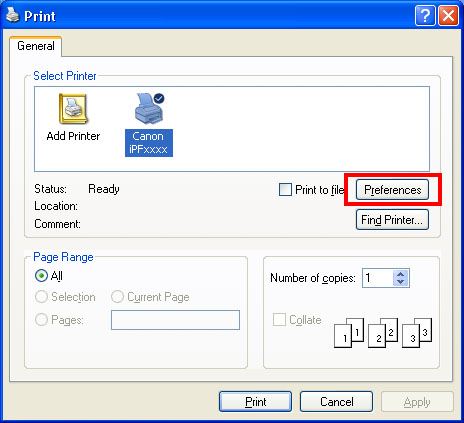 Six sheets of print settings are displayed by the printer driver: Main, Page Setup, Layout, Favorites, Utility, and Support.
Note • The titles of dialog boxes may vary depending on the application, and sheets other than these six sheets may be displayed.
| Important | ||
|
• If you access the printer driver dialog box from the source application, changes you make to the settings will only apply temporarily to that application. Because these are sizes you specify temporarily in the printer driver, the sizes will not be available after you exit the application.
• You can also access the printer driver dialog box from the Windows system menu.
To use the settings continuously in all applications, open the printer driver from the system menu to make the settings.
See "Accessing the Printer Driver Dialog Box from the Operating System Menu (3.1.7)".
|
||
3. 1. 7. Windows Software > Printer Driver >
Accessing the Printer Driver Dialog Box from the Operating System Menu (Windows)
Accessing the Printer Driver Dialog Box from the Operating System Menu (Windows)
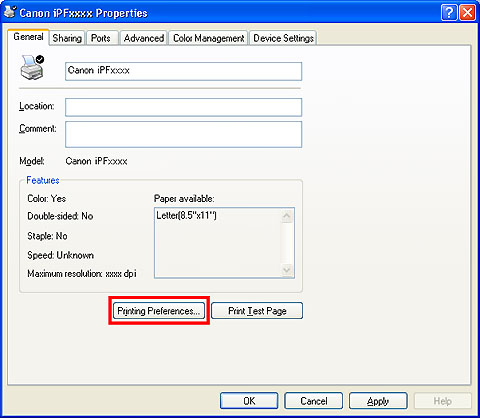
- Click start > Printers and Faxes (or Printers ).
- Select the printer, and then display the printer properties dialog box.
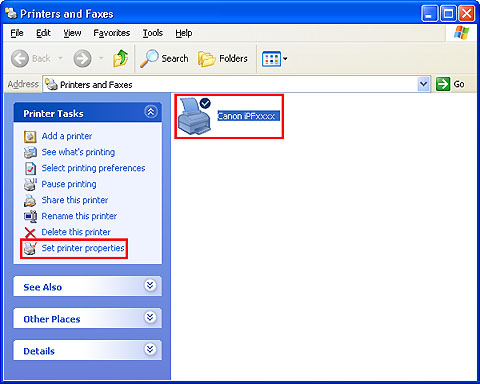
- Click Printing Preferences to display the Printing Preferences dialog box, titled with the name of this printer.
Note • The Device Settings sheet is also an extension of the printer driver.(See "Device Settings Sheet (3.1.30)")Six sheets of print settings are displayed by the printer driver: Main, Page Setup, Layout, Favorites, Utility, and Support.
| Important | ||
|
• If you access the printer driver dialog box from the operating system menu, changes you make to the settings will apply to all applications you use for printing.
• You can also access the printer driver dialog box from applications.
See "Accessing the Printer Driver Dialog Box from Applications (3.1.6)".
|
||
3. 1. 8. Windows Software > Printer Driver >
Main Sheet (Windows)
Main Sheet (Windows)
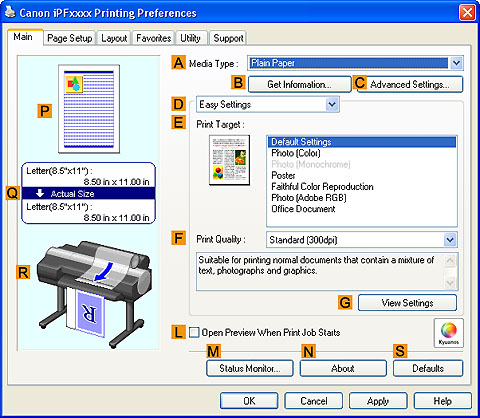
The following settings are available on the Main sheet. For details on settings items, refer to the printer driver help file.
| Note | ||
|
• On the Main sheet, choose Easy Settings to specify basic print settings based on the particular printing application, or switch to Advanced Settings to complete more detailed settings as desired.
|
||
| Common Items | |
•AMedia Type
Select the type of paper.
For information on the types of paper the printer supports, refer to the Paper Reference Guide.(See "Types of Paper (6.1.1)")
•BGet Information
Displays Paper Information on Printer. You can update the printer driver settings for the feed source, media type, and roll width by selecting the feed source.
•Paper Information on Printer Dialog Box (3.1.9)
•CAdvanced Settings
Displays Paper Detailed Settings. You can configure the printing settings to match the type of media, such as the ink drying time.
•Paper Detailed Settings Dialog Box (3.1.10)
•LOpen Preview When Print Job Starts
If you turn this on, imagePROGRAF Preview starts before printing.
This allows you to check on-screen previews of documents before printing.
•Checking the Layout in a Preview Before Printing (2.11.1)
•MStatus Monitor
Starts imagePROGRAF Status Monitor.
You can check the printer status, job status, and other conditions.
You can also set up email notification if printer errors occur by completing the Email Notice settings.
For details, refer to the Status Monitor help file.
•NAbout
Displays version information for the printer driver.
•SDefaults
Restores all settings on the sheet to the default values.
|
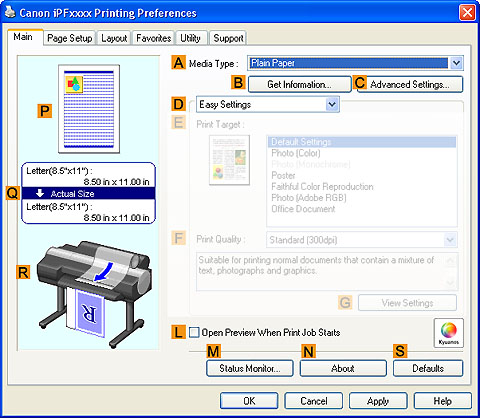
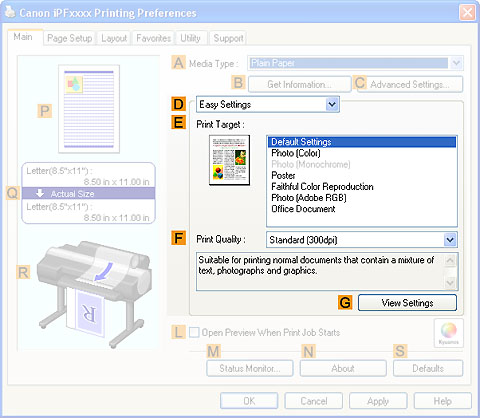
| Configuration using Easy Settings | ||||||
•EPrint Target
Choose presets that match the type of document to be printed.
•FPrint Quality
Choose the level of print quality.
•Giving Priority to Particular Graphic Elements and Colors for Printing (2.3.4)
•GView Settings
Displays the EPrint Target setting values.
You can view and change the order of EPrint Target setting values.
•View Settings Dialog Box for the Printing Application (3.1.11)
|
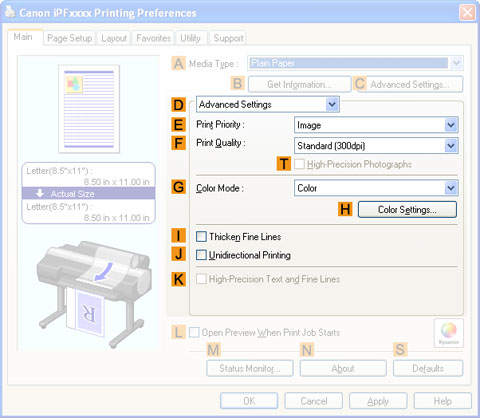
| Configuration using Advanced Settings | ||||||||||||||||
•EPrint Priority
Choose the graphic elements that you want to emphasize for printing.
•Giving Priority to Particular Graphic Elements and Colors for Printing (2.3.4)
•FPrint Quality
Choose the level of print quality.
•Giving Priority to Particular Graphic Elements and Colors for Printing (2.3.4)
•THigh-Precision Photographs
Print with improved gradation and uniformity, particularly for high-precision photographs. However, this takes more time than regular printing.
•GColor Mode
Choose the color mode.
•Giving Priority to Particular Graphic Elements and Colors for Printing (2.3.4)
•HColor Settings
Click to display the Color Settings dialog box for more advanced color settings.
•Adjusting the Color in the Printer Driver (2.3.1)
•IThicken Fine Lines
Activate this option to print fine lines more distinctly.
•JUnidirectional Printing
Select this checkbox to prevent problems such as misaligned lines and improve the print quality. However, the printing speed becomes slower.
•KHigh-Precision Text and Fine Lines
Print increasing ink impact accuracy, particularly for sharper text and fine lines. However, this takes more time than regular printing.
|
3. 1. 9. Windows Software > Printer Driver >
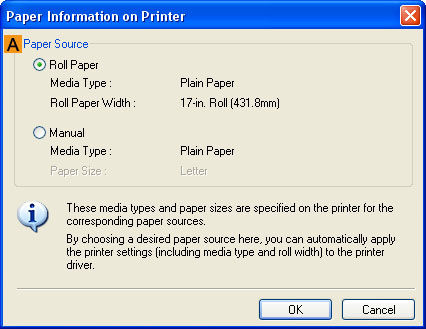
Paper Information on Printer Dialog Box (Windows)
Paper Information on Printer Dialog Box (Windows)
On the Paper Information on Printer dialog box, you can obtain information on the paper in the printer and configure printer driver settings for the paper source and media type.
 |
| Note | ||
|
• To display the Paper Information on Printer dialog box, on the Main sheet, click Get Information by Media Type.(See "Main Sheet (3.1.8)")
|
||
•APaper Source
Shows the paper source supported by the printer, as well as information about the loaded paper. To update the paper source and media type settings in the printer driver, select the desired Paper Source option and click OK.
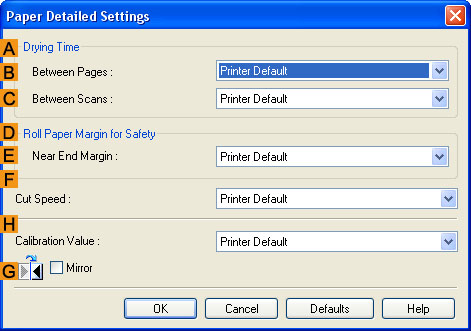
3. 1. 10. Windows Software > Printer Driver >
Paper Detailed Settings Dialog Box (Windows)
Paper Detailed Settings Dialog Box (Windows)
The Paper Detailed Settings dialog box offers the following settings. For details on settings items, refer to the printer driver help.
 |
| Note | ||
|
• To display the Paper Detailed Settings dialog box, on the Main sheet, click Settings by Media Type.(See "Main Sheet (3.1.8)")
|
||
•ADrying Time
Specify the time that the printer waits for ink to dry, as needed. The Drying Time setting is only valid for rolls.
•(See "Specifying the Ink Drying Time for Rolls (6.2.11)")
•BBetween Pages
Specify the time the printer waits after printing a page until ejecting the paper, as needed.
•CBetween Scans
Specify the time the printer waits after printing a line on the page until printing the next line, as needed.
•DRoll Paper Margin for Safety
You can specify the length of a margin on the leading edge of paper to ensure that paper susceptible to curling is held firmly against the Platen.
•ENear End Margin
Specify the length of the Near End Margin (the leading edge margin) of the roll, as needed.
•FCut Speed
Select the speed of automatic cutting, as needed. You can adjust this setting if paper is not cut well when automatic cutting is used.
•HCalibration Value
You can specify whether to apply the results of calibration performed on the printer to image processing.
•GMirror
Specify whether to print a mirror image, as needed. Select this option to print a version of the document or image with the left and right sides inverted.
3. 1. 11. Windows Software > Printer Driver >
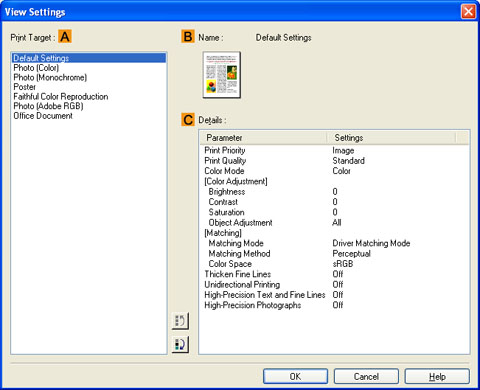
View Settings Dialog Box for the Printing Application (Windows)
View Settings Dialog Box for the Printing Application (Windows)
 |
| Note | ||
|
• To display the View Settings dialog box, on the Main sheet, click View Settings by Print Target.(See "Main Sheet (3.1.8)")
|
||
•APrint Target
Shows all Print Target options (settings items for the printing application).
•BName
Identifies the item selected in Print Target by its name and an icon.
•CDetails
Here, you can confirm detailed settings values for each listed item for the selected Print Target.
3. 1. 12. Windows Software > Printer Driver >
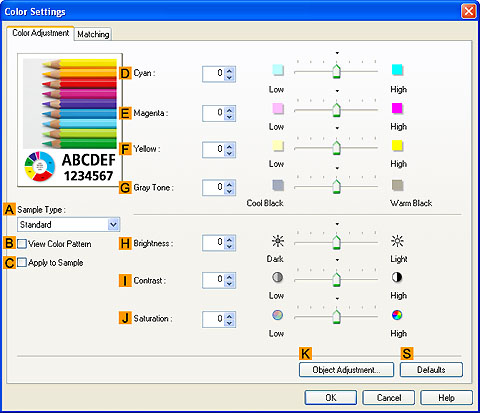
Color Adjustment Sheet: Color (Windows)
Color Adjustment Sheet: Color (Windows)
If the color tone as printed is not as you expected, you can adjust it on the Color Adjustment sheet.
 |
| Note | ||
|
• To display the Color Adjustment sheet, on the Main sheet, click Color Settings by Color Mode in Advanced Settings.(See "Main Sheet (3.1.8)")
|
||
•ASample Type
Choose a sample image from Standard, Portrait, Landscape, or Graphics.
•BView Color Pattern
Select this checkbox to display the color pattern.
•CApply to Sample
Select this checkbox to apply the changed settings to the sample image.
•DCyan / EMagenta / FYellow
Fine-tune color tones by adjusting the levels of each color.
•GGray Tone
Adjust the color tone of grays as desired. Choose Cool Black (tinged with blue) or Warm Black (tinged with red).
•HBrightness
Adjust the overall image brightness as desired. You can adjust the brightness if the printed document is lighter or darker than the original image (that is, the original photo that was scanned or the original graphic as it appears on the computer screen).
•IContrast
Adjust the contrast of the darkest and lightest portions relative to each other, as desired. Increasing the Contrast makes images sharper, and reducing the Contrast softens images.
•JSaturation
Adjust the color intensity as desired. Increasing the Saturation setting makes colors more vivid, and reducing the Saturation makes colors more subdued.
•KObject Adjustment
Select this option to display the Object Adjustment dialog box, in which you can specify objects subject to color adjustment.
•Object Adjustment dialog box: Color (3.1.13)
•SDefaults
Click to restore all settings on the sheet to the default values.
| Note | ||
|
• For details on settings items, see "Adjusting the Color in the Printer Driver (2.3.1)"
|
||
3. 1. 13. Windows Software > Printer Driver >
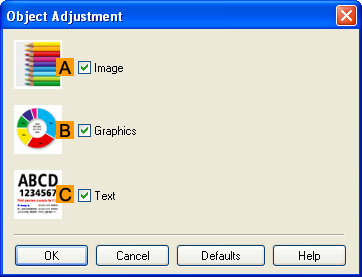
Object Adjustment dialog box: Color
Object Adjustment dialog box: Color
In the Object Adjustment dialog box, you can specify what type of print jobs to apply color adjustment to. If an original comprises images, graphics, and text, you can specify which portion to apply color adjustment to.
 |
| Note | ||
|
• To display the Object Adjustment dialog box, click Object Adjustment on the Color Adjustment sheet.
|
||
•AImage
Select this option to apply color adjustment to image areas, such as photos.
•BGraphics
Select this option to apply color adjustment to graphics, such as lines and circles.
•CText
Select this option to apply color adjustment to text.
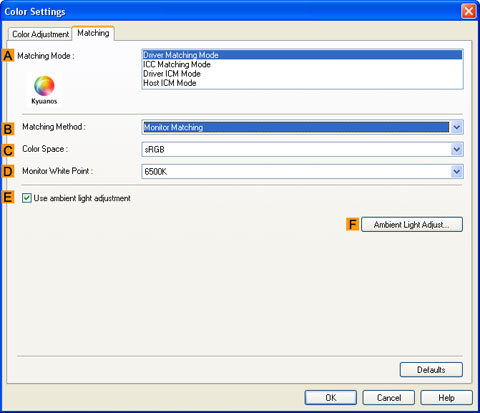
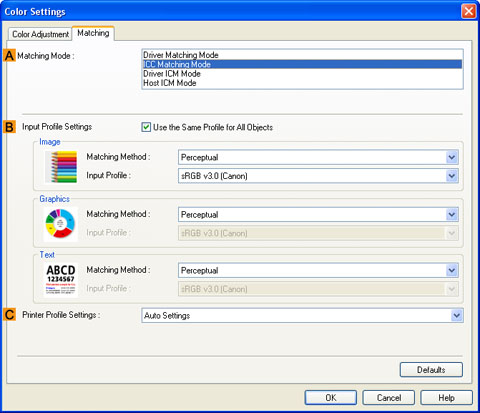
3. 1. 14. Windows Software > Printer Driver >
Matching Sheet (Windows)
Matching Sheet (Windows)
On the Matching sheet, you can specify color matching to compensate for differences in the appearance of colors on various devices.
| Important | ||
|
• If No color correction is selected under Color Mode, the Matching sheet is not displayed.
|
||
| Note | ||
|
• To display the Matching sheet, on the Main sheet, click Color Settings in Color Mode in Advanced Settings, and then click the Matching sheet. (Refer to "Main Sheet (3.1.8)")
|
||
| Driver Matching Mode | |
|
The following options are available when you select Driver Matching Mode in the AMatching Mode list.
•AMatching Mode
Select the color matching mode to use, as desired.
Normally, select Driver Matching Mode. For color matching based on ICC profiles, select ICC Matching Mode, Driver ICM Mode, or Host ICM Mode, depending on your color matching system.
•BMatching Method
Select the color matching method that suits the document to be printed. Various Matching Method options are available depending on your selection in Matching Mode.
•CColor Space
Select the applicable color space as desired.
•DMonitor White Point
Enter the color temperature set on the monitor.
Displayed when the BMatching Method is set to Monitor Matching.
•EUse ambient light adjustment
Select this option for adjustment of colors to suit the ambient light in the viewing environment.
•FAmbient Light Adjust
Click to display the Ambient Light Adjust dialog box, which enables you to complete settings for printing to match the ambient light.
•Ambient Light Adjust dialog box (3.1.15)
|
| ICC Matching Mode, Driver ICM Mode and Host ICM Mode | ||||||
|
The following options are available when you select ICC Matching Mode, Driver ICM Mode, or Host ICM Mode in the AMatching Mode list.
•AMatching Mode
Select the color matching mode to use, as desired.
•BInput Profile Settings
You can select Image, Graphics, or Text. You can choose Matching Method and Input Profile.
Various options are available depending on your selected Matching Mode.
To apply the same input profile automatically for Graphics and Text, select Use the Same Profile for All Objects. To apply separate input profiles to Graphics and Text, clear Use the Same Profile for All Objects and specify the individual settings.
•CPrinter Profile Settings
Specify the printer profile as desired. Normally, select Auto Settings.
|
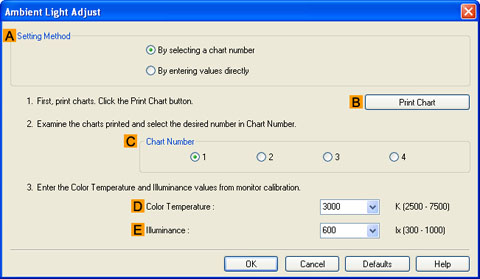
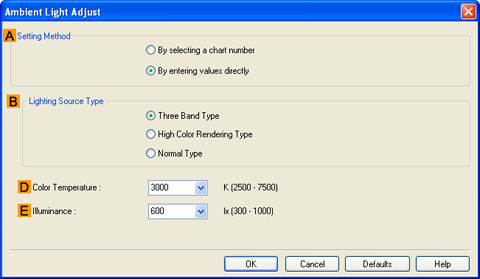
3. 1. 15. Windows Software > Printer Driver >
Ambient Light Adjust dialog box
Ambient Light Adjust dialog box
The Ambient Light Adjust dialog box is used to select the setting method and to enter and select the information required for the settings.
| When you select By selecting a chart number in Setting Method | |
•ASetting Method
You can choose configuration based on the printed Chart or based on using the i1 colorimeter.
•BPrint Chart
Click to start the Light Source Check Tool, for printing Chart. The Light Source Check Tool must be installed to use this function.
•Light Source Check Tool (3.1.16)
•CChart Number
In Chart, select the number of the pattern with your desired colors.
•DColor Temperature
Enter the DColor Temperature measured during monitor calibration. Displayed when the BMatching Method is set to Monitor Matching on the Matching sheet.
•EIlluminance
Enter the EIlluminance measured during monitor calibration. Displayed when the BMatching Method is set to Monitor Matching on the Matching sheet.
|
| When you select By entering values directly in Setting Method | ||||||
•ASetting Method
You can choose configuration based on the printed Chart or based on using the i1 colorimeter.
•BLighting Source Type
Select the light source measured using the i1 colorimeter.
•DColor Temperature
Enter the Color Temperature measured using the i1 colorimeter.
•EIlluminance
Enter the Illuminance measured using the i1 colorimeter.
Displayed when the BMatching Method is set to Monitor Matching on the Matching sheet.
|
3. 1. 16. Windows Software > Printer Driver >
Light Source Check Tool
Light Source Check Tool
 |
•APrinter Name
The printer name is displayed here.
•CPaper Source
Choose the paper source, as desired.
Options displayed in the list vary depending on the selection in Media Type in the Main sheet.
•DPrint
Click to print the Chart.
3. 1. 17. Windows Software > Printer Driver >
Color Adjustment Sheet: Monochrome (Windows)
Color Adjustment Sheet: Monochrome (Windows)
 |
| Note | ||
|
• To display the Color Adjustment sheet, on the Main sheet, click Color Settings by Color Mode in Advanced Settings.(See "Main Sheet (3.1.8)")
|
||
•ASample Type
Choose a sample image from Standard, Portrait, Landscape, or Graphics.
•BView Color Pattern
Select this checkbox to display the color pattern.
•CApply to Sample
Select this checkbox to apply the changed settings to the sample image.
•DCyan / EMagenta / FYellow
Not available.
•GGray Tone
Not available.
•HBrightness
Adjust the overall image brightness as desired. You can adjust the brightness if the printed document is lighter or darker than the original image (that is, the original photo that was scanned or the original graphic as it appears on the computer screen).
•IContrast
Adjust the contrast of the darkest and lightest portions relative to each other, as desired. Increasing the Contrast makes images sharper, and reducing the Contrast softens images.
•JSaturation
Not available.
•KObject Adjustment
Select this option to display the Object Adjustment dialog box, in which you can specify objects subject to color adjustment.
•Object Adjustment dialog box: Monochrome (3.1.18)
•SDefaults
Click to restore all settings on the sheet to the default values.
| Note | ||
|
• For details on settings items, see "Adjusting the Color in the Printer Driver (2.3.1)"
|
||
3. 1. 18. Windows Software > Printer Driver >
Object Adjustment dialog box: Monochrome
Object Adjustment dialog box: Monochrome
In the Object Adjustment dialog box, you can specify what type of print jobs to apply color adjustment to. If an original comprises images, graphics, and text, you can specify which portion to apply color adjustment to.
 |
| Note | ||
|
• To display the Object Adjustment dialog box, click Object Adjustment on the Color Adjustment sheet.
|
||
•AImage
Select this option to apply color adjustment to image areas, such as photos.
•BGraphics
Select this option to apply color adjustment to graphics, such as lines and circles.
•CText
Select this option to apply color adjustment to text.
3. 1. 19. Windows Software > Printer Driver >
Gray Adjustment Sheet (Windows)
Gray Adjustment Sheet (Windows)
| Gray Adjustment | ||||||
|
On the Gray Adjustment sheet, you can adjust the color balance, brightness, contrast, and other image qualities.
•ASample Type
The image at left is updated to reflect any changes you make to setting items on the sheet, enabling you to check the results of adjustment.
•BSample List
Select a sample image, as desired.
•CColor Balance
Click the list to select a color balance that suits the printing application.
•DX / EY
Adjust the color balance as you check the color tone in the adjustment area.
You can adjust the square area in the center by clicking or dragging it.
Drag the vertical or horizontal scroll bars for adjustment, as desired.
You can click the arrows by the DX (horizontal) and EY (vertical) boxes or enter the values directly.
•FBrightness
Adjust the overall image brightness as desired. You can adjust the brightness if the printed document is lighter or darker than the original image (that is, the original photo that was scanned or the original graphic as it appears on the computer screen).
•GContrast
Adjust the contrast of the darkest and lightest portions relative to each other, as desired. Increasing the GContrast makes images sharper, and reducing the GContrast softens images.
•HHighlight
Adjust the brightness of the lightest portion.
•IShadow
Adjust the brightness of the darkest portion.
•SDefaults
Click to restore all settings on the sheet to the default values.
|
3. 1. 20. Windows Software > Printer Driver >
Page Setup Sheet (Windows)
Page Setup Sheet (Windows)
The following settings are available on the Page Setup sheet. For details on settings items, refer to the printer driver help file.
|
•APage Size
Select the page size as specified in the source application.
For details on available page sizes, see "Paper Sizes (6.1.2)"
•BBorderless Printing
 |
Borderless printing is available if roll paper is selected in the LPaper Source list. Choose from the following options when this setting is activated.
•DFit Paper Size
Scales the document image to match the paper size.
•EScale to fit Roll Paper Width
Scales the document image to match the roll width.
•FPrint Image with Actual Size
Prints documents at their actual size. This function is available when you have selected the size same as the width of Roll Paper for either the length or width of the document from the APage Size list.
•GPaper Size
Available when DFit Paper Size is selected.
Choose the size of the paper you will print on.
For details on available paper sizes, see "Paper Sizes (6.1.2)"
Paper sizes compatible with borderless printing are shown in the list.
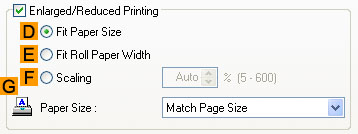
•CEnlarged/Reduced Printing
 |
Choose from the following options when this setting is activated.
•DFit Paper Size
Scales the document image to match the paper size.
•EFit Roll Paper Width
Scales the document image to match the roll width.
•FScaling
Resizes the document image based on a specified scaling value. Enter a value in a range of 5–600.
•GPaper Size
Choose the size of the paper you will print on.
For details on available paper sizes, see "Paper Sizes (6.1.2)"
•HOrientation
Choose the printing orientation.
•Making the Original Orientation Match the Paper Orientation (2.12.3)
•KRotate Page 90 degrees (Conserve Paper)
Activate this setting to rotate the document image by 90 degrees before printing.
•Conserving Roll Paper by Rotating Originals 90 Degrees (2.10.1)
•LPaper Source
Choose the feed source, as desired.
Options displayed in the list vary depending on the selection in Media Type on the Main sheet.
•MRoll Paper Width
Choose the roll width.
For details on available roll widths, see "Paper Sizes (6.1.2)"
•NRoll Paper Options
Complete optional roll paper settings. Click to display the Roll Paper Options dialog box.
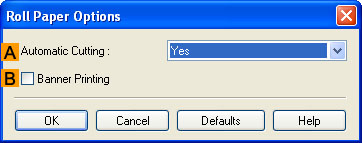 |
Under AAutomatic Cutting, you can specify Yes or No and Print Cut Guideline.
•Cutting Roll Paper After Printing (2.12.9)
Select BBanner Printing when printing multiple pages continuously.
•Printing Multiple Pages Continuously (2.8.4)
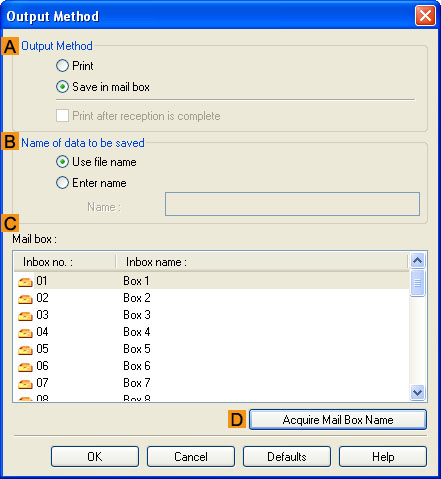
•POutput Method
Click to display the Output Method dialog box, which enables you to complete the Output Method and Name of data to be saved settings.
•Output Method dialog box (3.1.21)
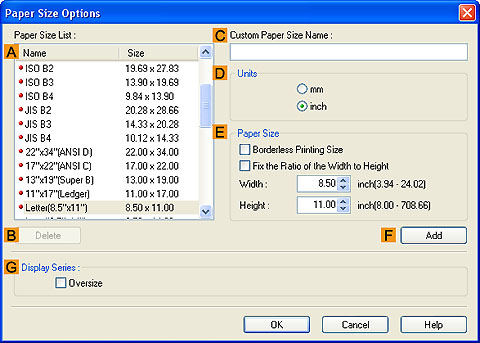
•OSize Options
Click to display the Paper Size Options dialog box, which enables you to register additional paper sizes or select the size system for use.
•Paper Size Options Dialog Box (3.1.22)
•SDefaults
Restores all settings on the sheet to the default values.
3. 1. 21. Windows Software > Printer Driver >
Output Method dialog box
Output Method dialog box
The Output Method dialog box allows you to select the Output Method and set the save settings when saving to the box.
 |
| Note | ||
|
• To display the Output Method dialog box, on the Page Setup sheet, click Output Method. (Refer to "Page Setup Sheet (3.1.20)")
|
||
•AOutput Method
If Print is selected, the print job is saved to the printer hard disk after printing has finished.
If Save in mail box is selected, the print job is saved to the printer hard disk. If you choose Save in mail box, also specify the destination personal box in the Mail box list.
If Print after reception is complete is checked, the print job is first saved completely on the printer hard disk before printing begins.
These can be selected as Print options.
•BName of data to be saved
To use the file name, choose Use file name.
Otherwise choose Enter name and enter a name in Name.
•CMail box
Displays a list of mail boxes. If you choose Save in mail box, also specify the destination personal box from the list.
•DAcquire Mail Box Name
When this is clicked, the box name acquired from the printer main unit is displayed in Mail box.
3. 1. 22. Windows Software > Printer Driver >
Paper Size Options Dialog Box (Windows)
Paper Size Options Dialog Box (Windows)
In the Paper Size Options dialog box, you can create and register your own Custom Paper Size. The sizes you define are listed with standard paper sizes for selection later as needed.
 |
| Note | ||
|
• To display the Paper Size Options dialog box, on the Page Setup sheet, click Paper Size Options.(See "Page Setup Sheet (3.1.20)")
|
||
•APaper Size List
Shows the names and sizes of paper that can be used with the printer driver.
•BDelete
Custom paper sizes created by users can be deleted from the APaper Size List, as needed.
However, they cannot be deleted in the following situations.
•If a standard paper size of the printer driver is selected.
•If an oversized paper size is selected.
•If a paper size marked with a red circle is selected.
•CCustom Paper Size Name
You can name Custom Paper Size as desired.
•DUnits
Specify the desired unit of measure for the Custom Paper Size height and width.
•EPaper Size
Specify the desired Width and Height. You can make your selection from sizes that are compatible with Borderless Printing by selecting Borderless Printing Size. To maintain the aspect ratio of the Width and Height as you resize the paper, select Fix the Ratio of the Width to Height.
•FAdd
Enables you to register the custom paper size you have specified or overwrite an existing custom paper size.
•GDisplay Series
You can limit the number of options shown in Page Size, Paper Size, and Paper Size List.
3. 1. 23. Windows Software > Printer Driver >
Layout Sheet (Windows)
Layout Sheet (Windows)
The following settings are available on the Layout sheet. For details on settings items, refer to the printer driver help.
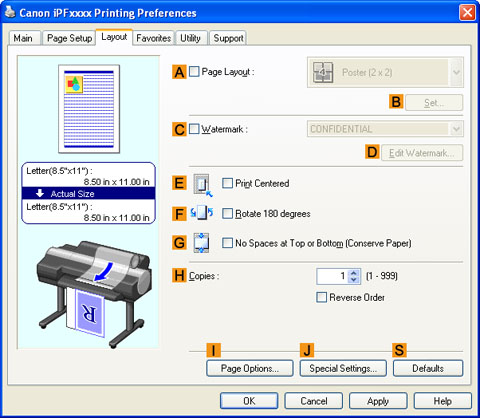 |
•APage Layout
Activate this setting to select a particular page layout.
•BSet
Click to display one of the following dialog boxes depending on the selection in APage Layout. In these dialog boxes, you can specify layout details and which pages to print, as well as other settings.
•Page Layout Printing
•Pages to Print
•Free Layout Settings
•CWatermark
Activating this option makes two settings available, Watermarks and DEdit Watermark.
•Printing With Watermarks (2.12.1)
•Watermarks
Lists the provided watermarks. Choose the watermark to print.
•DEdit Watermark
Click to display the Edit Watermark dialog box for creating your own, original watermark.
•EPrint Centered
Activate this setting to print document images in the center of the paper.
•FRotate 180 degrees
Activate this option to rotate document images by 180 degrees before printing.
•GNo Spaces at Top or Bottom (Conserve Paper)
Activate this setting to print the next image skipping blank areas above and below printable data in documents, which enables you to conserve the paper.
•Conserving Roll Paper by Printing Originals Without Top and Bottom Margins (2.10.4)
•HCopies
Enter the number of copies to print, in a range of 1–999.
•Reverse Order
Activate this option to print pages in reverse order.
•IPage Options
Click to display the Page Options dialog box, which enables you to complete settings for printing the user name, date, or page number in the header or footer.
•Page Options Dialog Box (3.1.24)
•JSpecial Settings
If the printing results are not as you expected, click this option to change how printing is processed.
•Special Settings Dialog Box (3.1.25)
•SDefaults
Click to restore all settings on the sheet to the default values.
3. 1. 24. Windows Software > Printer Driver >
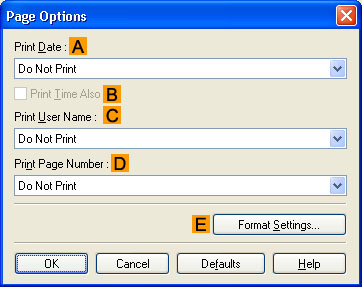
Page Options Dialog Box (Windows)
Page Options Dialog Box (Windows)
 |
| Note | ||
|
• To display the Page Options dialog box, on the Layout sheet, click Page Options.(See "Layout Sheet (3.1.23)")
|
||
•APrint Date
Select where the date is printed, as desired. To print the time as well, select BPrint Time Also.
•CPrint User Name
Select where the user name is printed, as desired.
•DPrint Page Number
Select where the page number is printed, as desired.
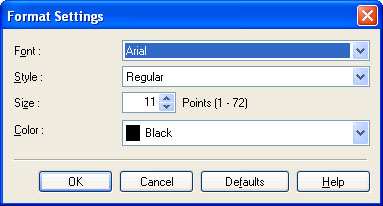
•EFormat Settings
Click to display the Format Settings dialog box, which enables you to complete format-related settings.
 |
| Note | ||
|
• If you specify the same position for multiple items, the items are printed from left to right in this order: date, user name, and page number.
• When you print multiple pages per sheet using Page Layout Printing or similar functions, these items will be printed for each page.
|
||
3. 1. 25. Windows Software > Printer Driver >
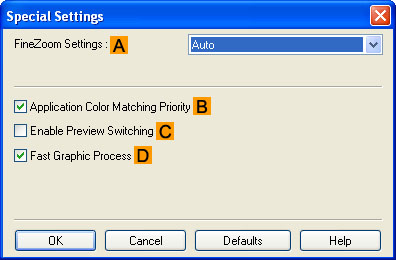
Special Settings Dialog Box (Windows)
Special Settings Dialog Box (Windows)
If the printing results are not as you expected, you can change how printing is processed in the Special Settings dialog box.
 |
| Note | ||
|
• To display the Special Settings dialog box, on the Layout sheet, click Special Settings.(See "Layout Sheet (3.1.23)")
|
||
•AFineZoom Settings
This function is used in large-format printing. Normally, choose Auto. If documents are not printed correctly on large-format paper, it may help to select Yes, and if fine lines are not visible or if images are distorted when printed, it may help to select No.
•BApplication Color Matching Priority
You can give applications priority in color management.
•CEnable Preview Switching
When this option is selected, PageComposer starts if you print with Open Preview When Print Job Starts selected on the Main sheet.
•DFast Graphic Process
If image colors are inconsistent in printed documents or if lines are printed in varying thicknesses, clearing this option may help produce the expected results.
| Note | ||
|
• This function cannot be used on 64-bit version of Windows.
|
||
3. 1. 26. Windows Software > Printer Driver >
Favorites Sheet (Windows)
Favorites Sheet (Windows)
The following settings are available on the Favorites sheet. For details on settings items, refer to the printer driver help.
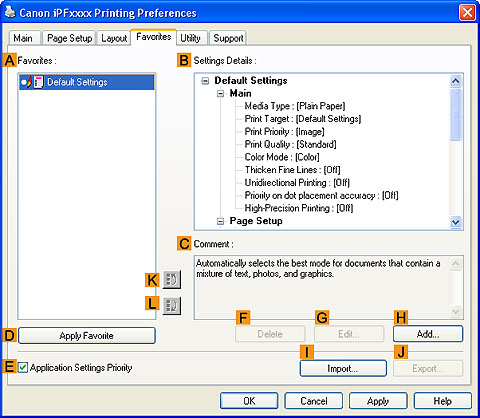 |
•AFavorites
Printing favorites you have created are listed with Default Settings favorites.
•Using Favorites (2.12.6)
•BSettings Details
Displays details of the favorite selected in the AFavorites.
•CComment
Displays notes registered in the favorite.
•DApply Favorite
Click to change the current print settings to those of the favorite selected in the AFavorites.
•EApplication Settings Priority
Activate this setting to use settings values specified in the source application in preference to favorite settings selected in the AFavorites, when clicking DApply Favorite. For details on the settings items used in preference, refer to the printer driver help.
•FDelete
Click to delete the selected favorite from the AFavorites list.
•GEdit
Click to display the Edit dialog box, which enables you to change the name and icon for the favorite selected in the AFavorites list.
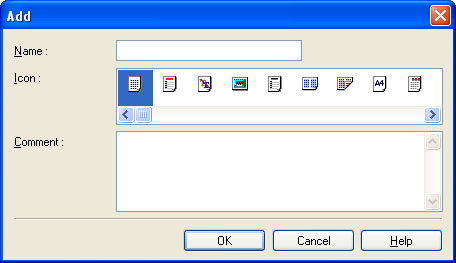
•HAdd
Click to display the Add dialog box, which enables you to add the current print settings as a favorite.
 |
•IImport
Click to display the Open dialog box, which enables you to import favorite settings saved as a file.
•JExport
Click to display the Save As dialog box, which enables you to save the favorite settings as a file.
•KUp
Click to move the selected favorite up in the AFavorites list.
•LDown
Click to move the selected favorite down in the AFavorites list.
3. 1. 27. Windows Software > Printer Driver >
Utility Sheet (Windows)
Utility Sheet (Windows)
The following items can be executed on the Utility sheet. For details on the utilities, refer to the relevant utility help.
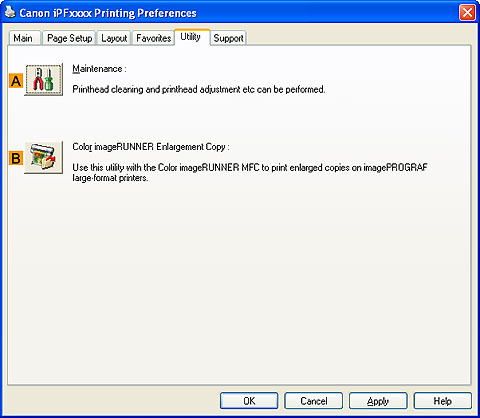 |
•AMaintenance
Click to start the imagePROGRAF Status Monitor, which offers the following maintenance for the printer.
•Nozzle (ink ejecting outlet) check
•Nozzle (ink ejecting outlet) cleaning
•Head alignment adjustment
•Feed amount adjustment
•BColor imageRUNNER Enlargement Copy
Click to launch Color imageRUNNER Enlargement Copy (iR enlargement copy), which enables you to create hot folders used for Color imageRUNNER Enlargement Copy and assign print settings to hot folders.
•Printing Enlargements of Scanned Originals from a Color imageRUNNER (3.4.9)
For details, see Color imageRUNNER Enlargement Copy.
| Note | ||
|
• This function is not available on 64-bit version of Windows.
|
||
3. 1. 28. Windows Software > Printer Driver >
Support Sheet (Windows)
Support Sheet (Windows)
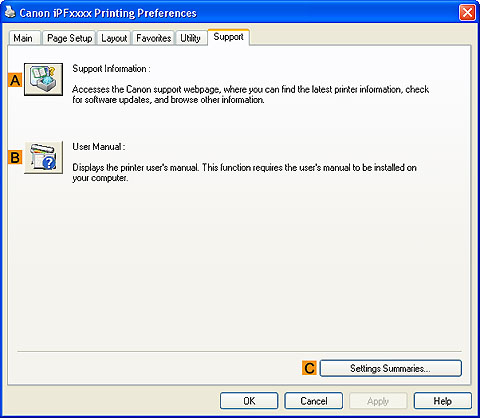 |
•ASupport Information
Click to access the Canon support webpage, where you can find the latest information on the printer and consumables, check for printer driver updates, and browse other information.
•BUser Manual
Click to view the printer user's manual. This function requires the user's manual to be installed on your computer.
•CSettings Summaries
Click to display the View Settings dialog box, which enables you to confirm the settings for the Main, Page Setup, Layout, and Favorites sheets.
3. 1. 29. Windows Software > Printer Driver >
Settings Summaries Dialog Box (Windows)
Settings Summaries Dialog Box (Windows)
The Settings Summaries dialog box enables you to confirm the settings for the Main, Page Setup, Layout, and Favorites sheets.
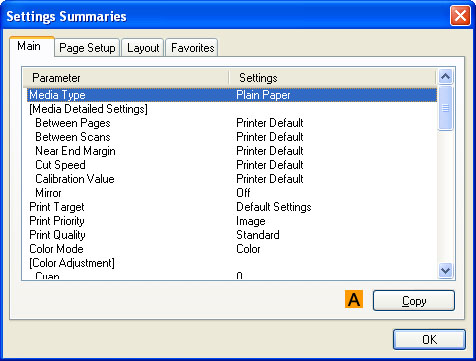 |
•ACopy
Click to copy the settings information to the clipboard. You can paste the settings information into a file created with a text editor or similar application.