2. 2. 1. Enhanced Printing Options > Printing Photos and Office Documents >
Printing Photos and Images
Printing Photos and Images
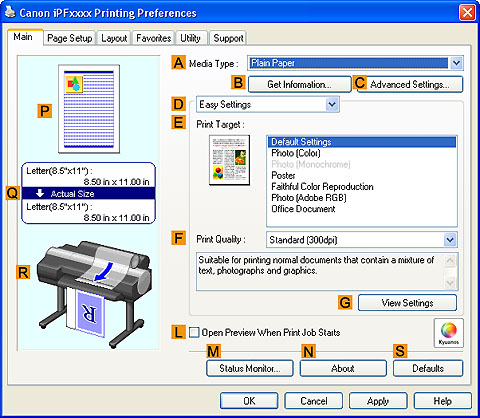
•Easy Settings
Simply choose the printing application in the list for optimal printing results.
•Print Target
Choose presets that match the type of document to be printed.
| Print targets for photos and images | ||||||||||
|


•Print Quality
Choose the print quality.
The printing mode is determined by a combination of the print quality and resolution.
For instructions on printing photos and images, refer to the following topics, as appropriate for your computer and operating system.
•Printing Photos and Images (Windows) (2.2.2)
•Printing Photos and Images (Mac OS X) (2.2.3)
2. 2. 2. Enhanced Printing Options > Printing Photos and Office Documents >
Printing Photos and Images (Windows)
Printing Photos and Images (Windows)
•Document: Photo image from a digital camera
•Page size: 10×12 inches (254.0×304.8 mm)
•Paper: Roll
•Paper type: Premium Glossy Paper 200
•Roll paper width: 10 inches (254.0 mm)
- Choose Print in the application menu.
- Select the printer in the dialog box, and then display the printer driver dialog box.(See "Accessing the Printer Driver Dialog Box from Applications (3.1.6)")
- Make sure the Main sheet is displayed.
- In the AMedia Type list, select the type of paper that is loaded. In this case, click Premium Glossy Paper 200.
In the AMedia Type, choose the type of paper used for printing, such as Glossy Paper, Coated Paper, and so on. Make sure the paper you select is loaded in the printer.

Note • The paper type setting in the printer driver and related software (as well as on the Control Panel ) is updated when you install the Media Configuration Tool from the User Software CD-ROM or if you change paper information by using the Media Configuration Tool. For details, see Media Configuration Tool. - After confirming that DEasy Settings is selected, click Photo (Color) in the EPrint Target list.
Note • You can check the settings values selected in the EPrint Target list by clicking GView Settings. - Click the Page Setup tab to display the Page Setup sheet.

- In the APage Size list, click the size of the original as specified in the application. In this case, click 10"x12".
- Select and click a roll paper in the LPaper Source list.
- Select the width of the loaded roll in the MRoll Paper Width list—in this case, 10-in. Roll (254.0mm).
- Specify additional printing conditions.
For details on available printing conditions, see "Printer Driver Settings (3.1.1)"
- Confirm the print settings and print as desired.
Note • For instructions on confirming print settings, see "Confirming Print Settings (3.1.3)"
2. 2. 3. Enhanced Printing Options > Printing Photos and Office Documents >
Printing Photos and Images (Mac OS X)
Printing Photos and Images (Mac OS X)
•Document: Photo image from a digital camera
•Page size: 10×12 inches (254.0×304.8 mm)
•Paper: Roll paper
•Paper type: Premium Glossy Paper 200
•Roll paper width: 10 inches (254.0 mm)
- This sets the BFormat for and CPaper Size.
Note • The configuration method varies depending on the OS and application software you are using.If Page Setup is displayed in the application menu, the settings are configured by opening the Page Attributes dialog box from Page Setup. If it is not displayed, the settings are configured in the upper part of the printer driver displayed when you select Print from the application software menu.
- Select the printer in the APrinter list.
- In the FPaper Size list, click the size of the original. In this case, click 10"x12".
- If you configured the settings using the Page Attributes dialog box, click FOK to close the dialog box, and then select Print from the application software menu.
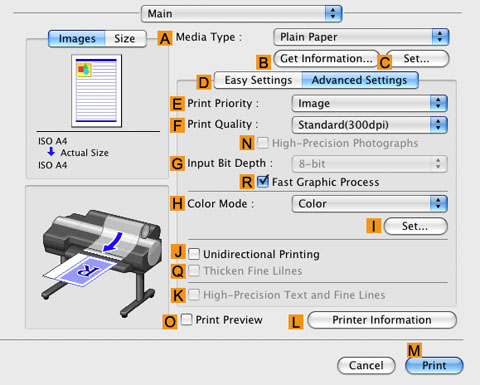
- Access the Main pane.
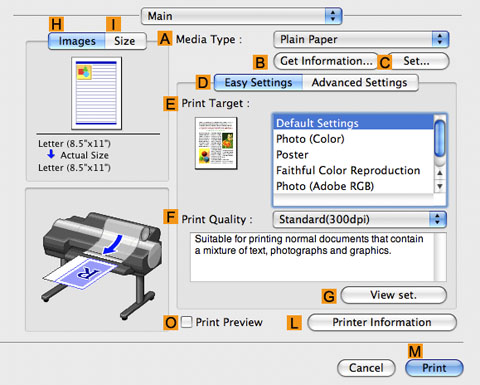
- In the AMedia Type list, select the type of paper that is loaded. In this case, click Premium Glossy Paper 200.
Make sure the paper you select is loaded in the printer.
Note • The types of paper indicated in the printer driver and related software (as well as on the Control Panel ) are updated when you install the Media Configuration Tool from the User Software CD-ROM or if you change paper information by using the Media Configuration Tool. For details, see Media Configuration Tool. - After confirming that DEasy Settings is selected, click Photo (Color) in the EPrint Target list.
Note • For information on settings optimized for printing photos and images, see "Printing Photos and Images (2.2.1)"• You can check the settings values selected in the EPrint Target list by clicking GView set.. - Make your selection in the FPrint Quality list.
- Access the Page Setup pane.
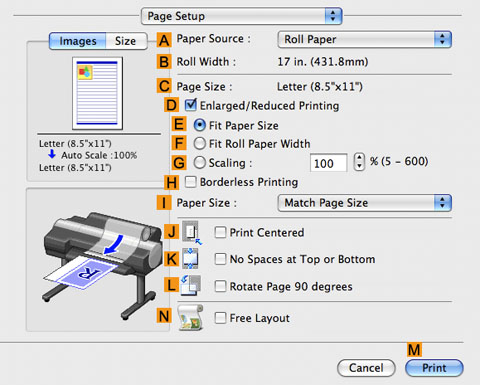
- Select and click a roll paper in the APaper Source list.
- Make sure the width of the loaded roll is displayed in the BRoll Width list—in this case, 10 in. (254.0mm).
Note • If the width of the roll loaded in the printer is not shown in BRoll Width, click LPrinter Information on the Main pane to update the printer information. - Make sure CPage Size on the Page Setup pane shows the original size as specified in CPaper Size in the Page Attributes dialog box—in this case, 10"x12".
- Specify additional printing conditions.
For details on available printing conditions, see "Printer Driver Settings (4.1.1)"
- Confirm the print settings, and then click MPrint to start printing.
Note • For tips on confirming print settings, see "Confirming Print Settings (4.1.3)"
2. 2. 4. Enhanced Printing Options > Printing Photos and Office Documents >
Printing from Photoshop
Printing from Photoshop
You can print images in the Adobe RGB color space that you have created in Photoshop, the Adobe Systems photo retouching application. Using the dedicated Photoshop printer driver plug-in (provided with the printer) makes it easy to print Adobe RGB images more attractively.
•Using the Plug-in to Print
The imagePROGRAF Print Plug-In for Photoshop is a dedicated plug-in provided with the printer that you can load in Photoshop and customize for your printing needs. By using the plug-in, you can print while preserving the 16-bit RGB data from Photoshop without losing the exceptional color gradations of original image. Some of the settings and customizations available in the plug-in are as follows.
•Automatic detection of the color space (sRGB or Adobe RGB) for automatic selection of the optimal profile. This feature eliminates the need to complete intricate settings when printing Adobe RGB images.
•Advanced gray adjustment, including adjustment of tone curves, in addition to an array of standard adjustments for color balance, brightness, contrast, highlight, and shadow.
•Fine-tune color tones in Photoshop while viewing a preview that accurately reproduces printing results.
•With print log management, you can save and load setting parameters from past print jobs.
| Note | ||
|
• imagePROGRAF Print Plug-In for Photoshop for Windows and Macintosh are provided with the printer.
|
||
For instructions and details on which versions of Photoshop are compatible with the imagePROGRAF Print Plug-In for Photoshop, refer to the following topics, as appropriate for your computer and operating system.
•Print Plug-In (Windows)
•Print Plug-In (Macintosh)
•Using the Printer Driver to Print
The printer driver offers the following settings and adjustments.
•Choose the standard sRBG color space or Adobe RGB as desired.
•Adjust the color balance, brightness, contrast, saturation, and gray levels.
For instructions on using the printer driver to print Adobe RGB images created in Photoshop, refer to the following topics, as appropriate for your computer and operating system.
2. 2. 5. Enhanced Printing Options > Printing Photos and Office Documents >
Printing Adobe RGB Images (Windows)
Printing Adobe RGB Images (Windows)
•Document: Adobe RGB image created in Photoshop
•Page Size: 10×12 inches (254.0×304.8 mm)
•Paper: Roll
•Paper type: Premium Glossy Paper 200
•Roll Paper Width: 10 inches (254.0 mm)
| Important | ||
|
• In Photoshop, select no color-matching.
• In the printer driver settings, select Driver Matching Mode and choose Adobe RGB in Color Space.
|
||
- In Photoshop, create an image in the Adobe RGB color space.
Note • The following procedures are based on the example of Photoshop CS2.• For instructions on creating Adobe RGB images, refer to the Photoshop documentation. - Choose Print with Preview from the File menu to display the Print dialog box.
- Make sure the setting mode is Color Management.
- In the Color Handling list in Options, click No Color Management.
- Click Print to display the Print dialog box.
- Select the printer and click Properties to display the printer driver dialog box.
- Make sure the Main sheet is displayed.
- In the AMedia Type list, select the type of paper that is loaded. In this case, click Premium Glossy Paper 200.
- Click DAdvanced Settings to switch the print mode.
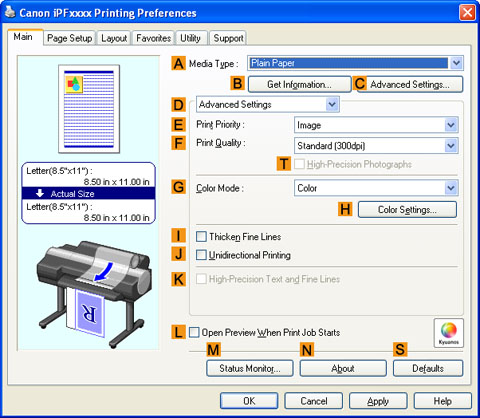
- Click Image in the EPrint Priority list.
- Select the print quality in the FPrint Quality list.
Note • Options displayed in the FPrint Quality list vary depending on the paper type. - Click Color in the GColor Mode list.
- Click HColor Settings to display the Color Settings dialog box.
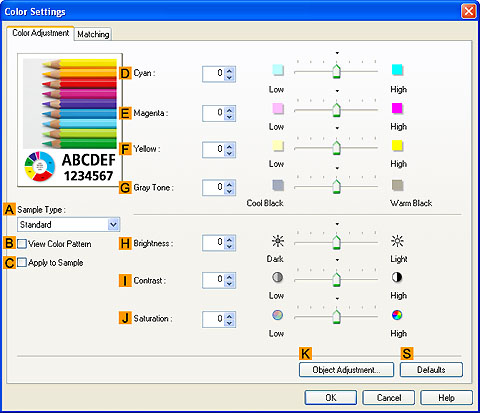
- Click the Matching tab to display the Matching sheet.
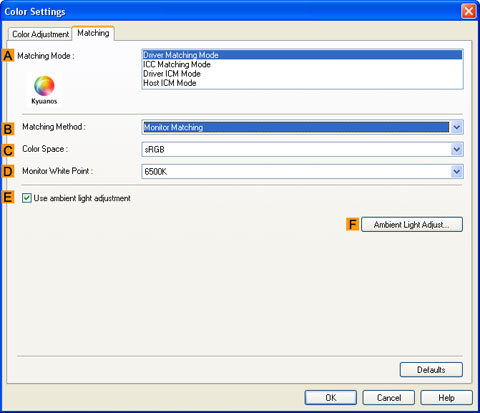
- In AMatching Mode, click Driver Matching Mode.
- In CColor Space, click Adobe RGB.
- Click OK to close the Color Settings dialog box.
- Click the Page Setup tab to display the Page Setup sheet.
- In the APage Size list, click the size of the original as specified in the source application. In this case, click 10"x12".
- Select and click a roll paper in the LPaper Source list.
- Select the width of the loaded roll in the MRoll Paper Width list. In this case, click 10-in. Roll (254.0mm), and then click OK.
- Confirm the print settings and print as desired.
Note • For tips on confirming print settings, see "Confirming Print Settings (3.1.3)"
2. 2. 6. Enhanced Printing Options > Printing Photos and Office Documents >
Printing Adobe RGB Images (Mac OS X)
Printing Adobe RGB Images (Mac OS X)
•Document: Adobe RGB image created in Photoshop
•Page size: 10×12 inches (254.0×304.8 mm)
•Paper: Roll
•Paper type: Premium Glossy Paper 200
•Roll paper width: 10 inches (254.0 mm)
| Important | ||
|
• In Photoshop, select no color-matching.
• In the printer driver settings, select Driver Matching Mode and choose Adobe RGB in Color Space.
|
||
- In Photoshop, create an image in the Adobe RGB color space.
Note • The following procedures are based on the example of Photoshop CS2.• For instructions on creating Adobe RGB images, refer to the Photoshop documentation. - Choose Print with Preview from the Photoshop menu to display the Print dialog box.
- Make sure the setting mode is Color Management.
- In the Color Handling list in Options, click No Color Management.
- Click Print.
- Access the Main pane.
- In the AMedia Type list, select the type of paper that is loaded. In this case, click Premium Glossy Paper 200.
- Click DAdvanced Settings to switch the print mode.
- Click Image in the EPrint Priority list.
- Select the print quality in the FPrint Quality list.
Note • Options displayed in the FPrint Quality list vary depending on the type of paper. - Click Color in the HColor Mode list.
- Click ISet to display the Color Settings dialog box.
- Click Matching to display the Matching pane.
- In Matching Mode, click Driver Matching Mode.
- In Color Space, click Adobe RGB.
- Click OK to close the Color Settings dialog box.
- Access the Page Setup pane.
- Select and click a roll paper in the APaper Source list.
- Make sure the width of the loaded roll paper is displayed in the BRoll Width list—here, 10-in. Roll (254.0mm).
Note • If the width of the roll loaded in the printer is not shown in BRoll Width, click LPrinter Information on the Main pane to update the printer information. - Make sure CPage Size in the Page Setup pane matches the size of the original as specified in Photoshop—in this case, 10"x12".
- Confirm the print settings, and then click MPrint to start printing.
Note • For tips on confirming print settings, see "Confirming Print Settings (4.1.3)."
2. 2. 7. Enhanced Printing Options > Printing Photos and Office Documents >
Printing Office Documents
Printing Office Documents
•Easy Settings
Simply choose the printing application in the list for optimal printing results.
•Print Target
Choose presets that match the type of document to be printed.
| Print targets for office documents | |||||
|

•Print Quality
Choose the print quality.
The printing mode is determined by a combination of the print quality and resolution.
For instructions on printing office documents, refer to the following topics, as appropriate for your computer and operating system.
•Printing Office Documents (Windows) (2.2.8)
•Printing Office Documents (Mac OS X) (2.2.9)
2. 2. 8. Enhanced Printing Options > Printing Photos and Office Documents >
Printing Office Documents (Windows)
Printing Office Documents (Windows)
•Document: Office document created using word-processing or spreadsheet programs
•Page size: A4 (210.0 × 297.0 mm [8.3 × 11.7 in])
•Paper: Sheets
•Paper type: Plain Paper
•Paper size: A4 (210.0 × 297.0 mm [8.3 × 11.7 in])
- Choose Print in the application menu.
- Select the printer in the dialog box, and then display the printer driver dialog box.(See "Accessing the Printer Driver Dialog Box from Applications (3.1.6)")
- Make sure the Main sheet is displayed.
- In the AMedia Type list, select the type of paper that is loaded. In this case, click Plain Paper.
- After confirming that DEasy Settings is selected, click Office Document in the EPrint Target list.
Note • You can check the settings values selected in the EPrint Target list by clicking GView Settings. - Click the Page Setup tab to display the Page Setup sheet.
- In the APage Size list, click the size of the original as specified in the application. In this case, click ISO A4.
- Click Manual in the LPaper Source list.
- Specify additional printing conditions.
For details on available printing conditions, see "Printer Driver Settings (3.1.1)"
- Confirm the print settings and print as desired.
Note • For tips on confirming print settings, see "Confirming Print Settings (3.1.3)"
2. 2. 9. Enhanced Printing Options > Printing Photos and Office Documents >
Printing Office Documents (Mac OS X)
Printing Office Documents (Mac OS X)
•Document: Office document created using word-processing or spreadsheet programs
•Page size: A4 (210.0 × 297.0 mm [8.3 × 11.7 in])
•Paper: Sheets
•Paper type: Plain Paper
•Paper size: A4 (210.0 × 297.0 mm [8.3 × 11.7 in])
- This sets the BFormat for and CPaper Size.
Note • The configuration method varies depending on the OS and application software you are using.If Page Setup is displayed in the application menu, the settings are configured by opening the Page Attributes dialog box from Page Setup.If it is not displayed, the settings are configured in the upper part of the printer driver displayed when you select Print from the application software menu. - Select the printer in the APrinter list.
- In the FPaper Size list, click the size of the original. In this case, click ISO A4 - for Paper Tray (Large Margins).
- If you configured the settings using the Page Attributes dialog box, click FOK to close the dialog box, and then select Print from the application software menu.
- Access the Main pane.
- In the AMedia Type list, select the type of paper that is loaded. In this case, click Plain Paper.
- After confirming that DEasy Settings is selected, click Office Document in the EPrint Target list.
Note • You can check the settings values selected in the EPrint Target list by clicking GView set.. - Make your selection in the FPrint Quality list.
- Access the Page Setup pane.
- Click Manual in the APaper Source list.
- Make sure the CPage Size setting matches the original size as selected in CPaper Size in the Page Attributes dialog box—in this case, ISO A4 - for Paper Tray (Large Margins).
- Specify additional printing conditions.
For details on available printing conditions, see "Printer Driver Settings (4.1.1)"
- Confirm the print settings, and then click MPrint to start printing.
Note • For tips on confirming print settings, see "Confirming Print Settings (4.1.3)"
2. 2. 10. Enhanced Printing Options > Printing Photos and Office Documents >
Using PosterArtist to Compose Originals
Using PosterArtist to Compose Originals
You can print a variety of source documents from word-processing or spreadsheet programs or screen shots from web browsers after composing an original with them using PosterArtist.
This topic describes how to use PosterArtist to compose originals from multiple applications, creating a poster layout for printing.
- Choose Print in the application menu.
- Select the printer in the dialog box, and then open the printer driver dialog box. (See "Accessing the Printer Driver Dialog Box from Applications (Windows) (3.1.6).")
- Make sure the Main sheet is displayed.
- Click the Layout tab to display the Layout sheet.
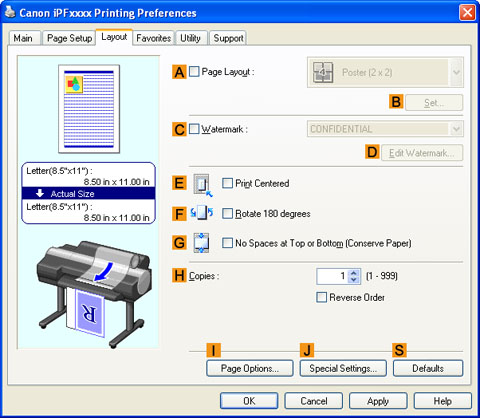
- Select the APage Layout check box.
- Click in the Edit Using PosterArtist in the APage Layout list.
- When you attempt to print, PosterArtist starts up and the PageCapture window is displayed. (At this point, the document will not be printed yet.)
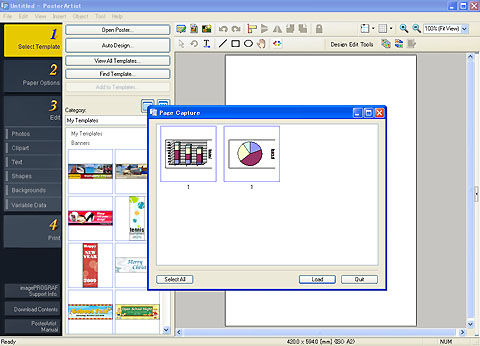
- Choose the page to load in PosterArtist.
- Edit and rearrange the image in the PosterArtist window as desired.
Without closing the PosterArtist window, repeat steps 1-8 to arrange originals from multiple applications on the same page.
Note • For details on how to edit and sort images, refer to the PosterArtist Manual. - Print from the PosterArtist menu.