2. 3. 1. Enhanced Printing Options > Adjusting Images >
Adjusting the Color in the Printer Driver
Adjusting the Color in the Printer Driver
Color settings specified in the application for your documents are essentially given priority over other settings for each print job, but further color adjustment is possible in the printer driver.
•Color Mode
Choose how the printer driver processes color, as desired.
The available options vary depending on the color mode.
*1: If No color correction is selected, the Matching sheet / Matching pane is not displayed.
•Color Adjustment
You can adjust colors separately for images, graphics, and text documents.
| Note | ||
|
• Click Object Adjustment to open the Object Adjustment dialog box, which allows you to select the color adjustment target from Image, Graphics, and Text.
|
||
•Matching
You can choose the color-matching mode and method.
By adjusting the color-matching mode and method, you can make printed colors match the colors of on-screen images more closely.
| Important | ||
|
• If No color correction is selected under Color Mode, the Matching cannot be changed.
|
||
•Gray Tone Adjustment
The following settings can be adjusted if Monochrome (Photo) is selected in Color Mode.
| Note | ||
|
• Be sure to calibrate your monitor colors correctly if you adjust the colors for printing. If monitor colors are not calibrated correctly, you may not obtain the desired printing results. For instructions on monitor calibration, refer to the documentation for your monitor and operating system.
|
||
For instructions on color adjustment, refer to the following topics, as appropriate for your computer and operating system.
2. 3. 2. Enhanced Printing Options > Adjusting Images >
Fine-Tuning Colors of Photos and Images (Windows)
Fine-Tuning Colors of Photos and Images (Windows)
You can specify your own print settings instead of using the Print Target presets. This topic describes how to fine-tune the color tone of photos before printing.
- Choose Print in the application menu.
- Select the printer in the dialog box, and then display the printer driver dialog box.(See "Accessing the Printer Driver Dialog Box from Applications (3.1.6)")
- Make sure the Main sheet is displayed.
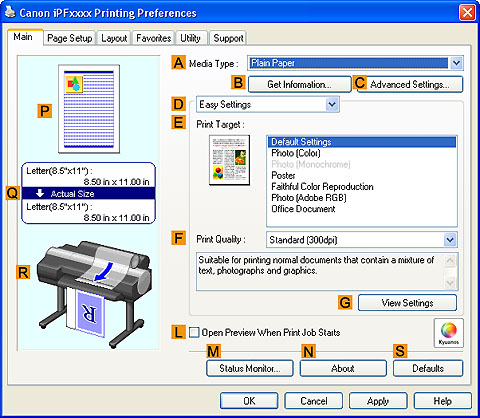
- In the AMedia Type list, select the type of paper that is loaded.
- Click DAdvanced Settings to switch the print mode.
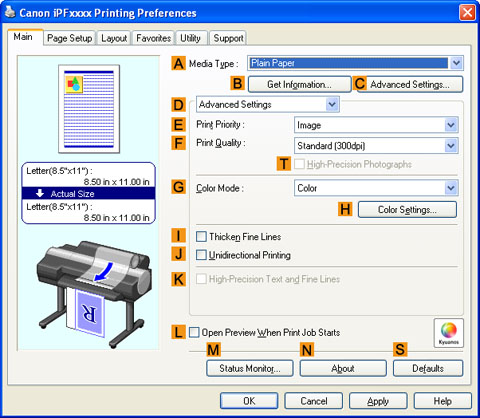
- Click Color in the GColor Mode list.
- Click HColor Settings to display the Color Settings dialog box.
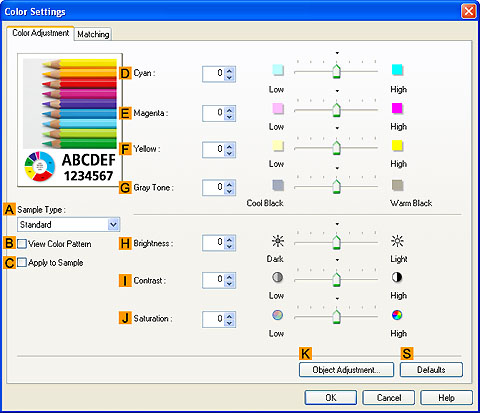
- On the Color Adjustment sheet, adjust the color tones, brightness, and so on as desired.

Note • Click Object Adjustment to open the Object Adjustment dialog box, which allows you to select the color adjustment target from Image, Graphics, and Text. - Close the Color Settings dialog box.
- Click the Page Setup tab to display the Page Setup sheet.

- Confirm the settings of APage Size, LPaper Source, and so on.
- Confirm the print settings and print as desired.
Note • For tips on confirming print settings, see "Confirming Print Settings (3.1.3)"
2. 3. 3. Enhanced Printing Options > Adjusting Images >
Fine-Tuning Colors of Photos and Images (Mac OS X)
Fine-Tuning Colors of Photos and Images (Mac OS X)
You can specify your own print settings instead of using the Print Target presets. This topic describes how to fine-tune the color tone of photos before printing.
- This sets the BFormat for and CPaper Size.
Note • The configuration method varies depending on the OS and application software you are using.If Page Setup is displayed in the application menu, the settings are configured by opening the Page Attributes dialog box from Page Setup. If it is not displayed, the settings are configured in the upper part of the printer driver displayed when you select Print from the application software menu.
- Select the printer in the APrinter list.
- Choose the original size in the FPaper Size list.
- If you configured the settings using the Page Attributes dialog box, click FOK to close the dialog box, and then select Print from the application software menu.
- Access the Main pane.
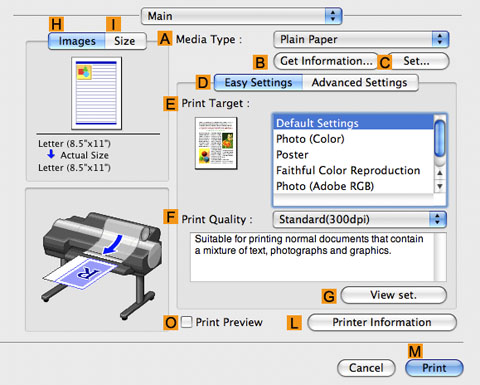
- In the AMedia Type list, select the type of paper that is loaded.
- Click DAdvanced Settings to switch the print mode.
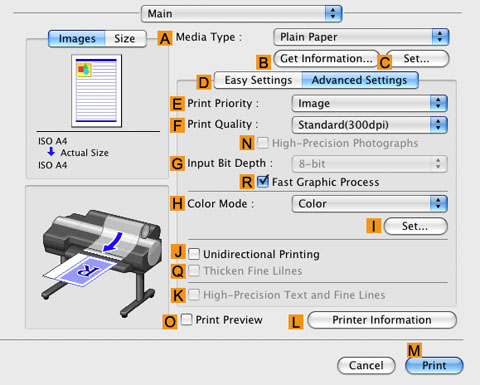
- Click Color in the HColor Mode list.
- Click ISet to display the Color Settings dialog box.
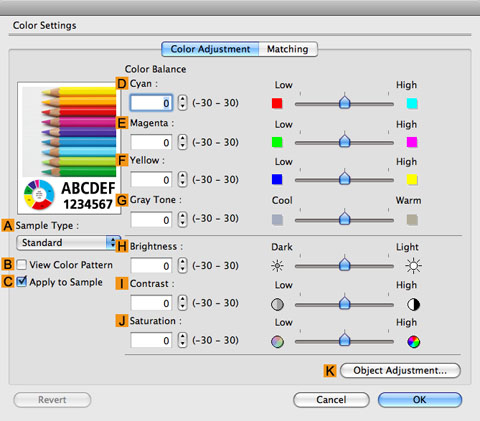
- On the Color Adjustment pane, adjust the color tones, brightness, and so on as desired.
Note • Click Object Adjustment to open the Object Adjustment dialog box, which allows you to select the color adjustment target from Images, Graphics, and Text. - Click OK to close the Color Settings dialog box.
- Access the Page Setup pane.
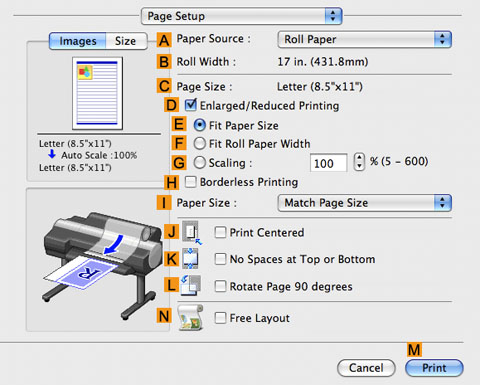
- Confirm the settings of APaper Source and CPage Size.
- Confirm the print settings, and then click MPrint to start printing.
Note • For tips on confirming print settings, see "Confirming Print Settings (4.1.3)"
2. 3. 4. Enhanced Printing Options > Adjusting Images >
Giving Priority to Particular Graphic Elements and Colors for Printing
Giving Priority to Particular Graphic Elements and Colors for Printing
You can specify detailed print settings as desired for the quality level, colors, and other criteria.
•Advanced Settings
For printing results that appear just as expected for your original, you can specify which graphic elements and colors to prioritize for printing.
•Print Priority
Choose the graphic elements that you want to emphasize for printing.
*1: Options suitable for the selected type of paper are listed under Print Priority.
•Print Quality
Choose the print quality.
The printing mode is determined by a combination of the print quality and resolution.
*1: Options suitable for the selected Print Priority are listed under Print Quality.
•Color Settings
| Setting Item | Options | Description |
| Color Mode (*1) | Color
Monochrome (Photo)
Monochrome
No color correction
|
Choose whether to print in color or monochrome.
(Refer to "Adjusting the Color in the Printer Driver (2.3.1)")
|
| Color Adjustment (Images) | Cyan
Magenta
Yellow
Gray Tone
Brightness
Contrast
Saturation
|
You can adjust the levels of cyan, magenta, and yellow as well as the brightness, contrast, saturation, and gray tone separately for images, graphics, and text documents.
If you choose Monochrome in Color Mode only Brightness and Contrast can be adjusted.
|
| Color Adjustment (Graphics) | ||
| Color Adjustment (Text) | ||
| Gray Adjustment | Color Balance
Brightness
Contrast
Highlight
Shadow
|
Choose the gray tone color balance ( Cool Black or Warm Black ) and adjust levels of brightness, contrast, highlight, and shadow as desired.
These levels can be adjusted when Monochrome (Photo) is selected in Color Mode.
|
| Color-Matching Modes | Driver Matching Mode
ICC Matching Mode
|
Choose the color-matching mode. Other color-matching modes may be provided by the computer operating system, such as ICM and ColorSync. |
| Color-Matching Method (*2) | Auto
Perceptual
Perceptual (People, Dark Areas)
Saturation
Monitor Matching
Colorimetric
other
|
Choose the color-matching method. The available options vary depending on your selection in Color-Matching Mode. |
| Color Space (*3) | sRGB
Adobe RGB
|
Choose a standard color space ( sRGB ) or an expanded color space ( Adobe RGB ). |
*1: Options suitable for the selected Print Priority and Media Type are listed under Color Mode.
*2: The order of options displayed varies depending on the operating system.
*3: Adobe RGB is not available if an incompatible combination of the paper type and print quality is selected.
•Enhancing printing quality
| Note | ||
|
• If you desire even higher quality, set the Print Quality to High or Highest in the printer driver and select the Unidirectional Printing and High-Precision Text and Fine Lines check boxes before printing.
|
||
For instructions on specifying the print quality and color settings before printing, refer to the following topics, as appropriate for your computer and operating system.
2. 3. 5. Enhanced Printing Options > Adjusting Images >
Choosing the Document Type and Printing Conditions (Windows)
Choosing the Document Type and Printing Conditions (Windows)
You can specify your own print settings instead of using the Print Target presets. This topic describes how print photographic images in monochrome.
- Choose Print in the application menu.
- Select the printer in the dialog box, and then display the printer driver dialog box.(Refer to "Accessing the Printer Driver Dialog Box from Applications (3.1.6)")
- Make sure the Main sheet is displayed.
- In the AMedia Type list, select the type of paper that is loaded.
- Click DAdvanced Settings to switch the print mode.
- Click Image in the EPrint Priority list.
- Click High (600dpi) in the FPrint Quality list.
Note • Options displayed in the FPrint Quality list vary depending on the type of paper. - Click Monochrome in the GColor Mode list.
- To adjust the brightness and contrast, click HColor Settings.
Note • For instructions on adjusting brightness and contrast, see "Adjusting the Color in the Printer Driver (2.3.1)." - Click the Page Setup tab to display the Page Setup sheet.
- Confirm the settings of APage Size, LPaper Source, and so on.
- Confirm the print settings and print as desired.
Note • For details on how to check the printing settings, refer to "Confirming Print Settings (3.1.3)".
2. 3. 6. Enhanced Printing Options > Adjusting Images >
Choosing the Document Type and Printing Conditions (Mac OS X)
Choosing the Document Type and Printing Conditions (Mac OS X)
You can specify your own print settings instead of using the Print Target presets. This topic describes how print photographic images in monochrome.
- Choose Page Setup from the application menu to display the Page Attributes dialog box.
- Select the printer in the BFormat for list.
- Choose the original size in the CPaper Size list.
- Click FOK to close the dialog box.
- In the application menu, choose Print.
- Access the Main pane.
- In the AMedia Type list, select the type of paper that is loaded.
- Click DAdvanced Settings to switch the print mode.
- Click Image in the EPrint Priority list.
- Click High (600dpi) in the FPrint Quality list.
Note • Options displayed in the FPrint Quality list vary depending on the paper type. - Click Monochrome in the HColor Mode list.
- To adjust the brightness and contrast, click ISet.
Note • For instructions on adjusting brightness and contrast, see "Adjusting the Color in the Printer Driver (2.3.1)" - Access the Page Setup pane.
- Confirm the settings of APaper Source and CPage Size.
- Confirm the print settings, and then click MPrint to start printing.
Note • For tips on confirming print settings, see "Confirming Print Settings (4.1.3)"