2. 6. 1. Enhanced Printing Options > Borderless Printing >
Borderless Printing on Paper of Equivalent Size
Borderless Printing on Paper of Equivalent Size
Take advantage of borderless printing to print documents such as posters (made up mainly of photos or images) without a surrounding margin, or border.
•Borderless Printing
In regular printing, a margin required by the printer is added around the original. With borderless printing, you can print documents without the margin, so that the printed image covers the entire surface of the paper.
| Important | ||
|
• Borderless printing is only available with rolls.
• Paper you can use for borderless printing is restricted to particular types of paper and rolls of particular widths. For information on types of paper compatible with borderless printing, refer to the Paper Reference Guide. (See "Types of Paper (6.1.1)")
• If you use an A1 orA2 roll for borderless printing, insert the provided Spacer for Borderless Printing onthe Roll Holder.(See "Loading Rolls on the Roll Holder (6.2.1)")
If you do not attach the Spacer for Borderless Printing,the Platen maybe soiled from borderless printing.
• Paper incompatible with the printer's auto cut function can be printed without borders on the left and right sides only.
• These features cannot be used in combination with borderless printing: special page layouts, centering originals, and printing cut lines on rolls.
• If Fit Paper Size or Print Image with Actual Size (Windows only) is selected when performing borderless printing, Rotate Page 90 degrees (Conserve Paper) cannot be selected.
• When borderless printing is used, the edge of the paper is cut during printing. Thus, ink density may be uneven at the edges. If you require higher image quality, specify No in Auto Cut in the printer driver. In this case, the paper can be printed without borders on the left and right sides only. After ejecting and cutting the printed document, use scissors to cut away the top and bottom edges.
• By factory default, the ink drying time is disabled for all paper. When you are using paper that takes longer for ink to adhere for borderless printing and the Cutter Unit touches printing surfaces that are not dry yet, it may damage the paper or the edge of the document that is cut, depending on frequency of use. In this case, follow these steps to change the ink drying time.
• On the Main sheet of the printer driver, click Settings in Media Type.
• Select the ink drying time in the Between Pages list of Drying Time.
|
||
•Borderless Printing Method
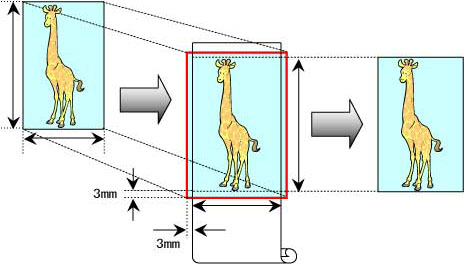
Choose the method of borderless printing that suits the original, as desired.
•Fit Paper Size
Enlarge or reduce the original to match the size of the paper you are using.
 |
| Note | ||
|
• The printer driver automatically enlarges originals 3 mm (0.12 in) past the dimensions of the paper on each side. The 3 mm portion beyond the edge on each side is not printed.
|
||
For instructions on borderless printing of photos, images, and other documents to match the paper size, refer to the following topics, as appropriate for your computer and operating system.
2. 6. 2. Enhanced Printing Options > Borderless Printing >
Borderless Printing by Resizing Originals to Match the Paper Size (Windows)
Borderless Printing by Resizing Originals to Match the Paper Size (Windows)
This topic describes how to enlarge originals before borderless printing to match the paper size, based on the following example.
If you use an A1 or A2 roll for borderless printing, insert the provided Spacer for Borderless Printing on the Roll Holder.(See "Loading Rolls on the Roll Holder (6.2.1)")
If you do not attach the Spacer for Borderless Printing, the Platen may be soiled from borderless printing.
•Document: Any type
•Page size: 10×12 inches (254.0×304.8 mm)
•Paper: Roll
•Paper type: Heavyweight Coated Paper
•Roll paper width: 10 inches (254.0 mm)
- In the application, create an original that takes up the entire space of the paper size.

Note • If you can specify the margin, as in Microsoft Word, set the margin at 0 mm. For instructions on specifying the margin, refer to the software documentation. - Choose Print in the application menu.
- Select the printer in the dialog box, and then display the printer driver dialog box.(See "Accessing the Printer Driver Dialog Box from Applications (3.1.6)")
- Make sure the Main sheet is displayed.
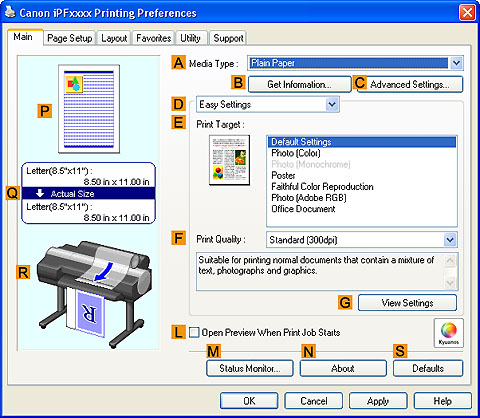
- In the AMedia Type list, select the type of paper that is loaded. In this case, click Heavyweight Coated Paper.
- Select the print target in the EPrint Target list.
- Click the Page Setup tab to display the Page Setup sheet.

- In the APage Size list, click the size of the original as specified in the application. In this case, click 10"x12".
- Select and click a roll paper in the LPaper Source list.
- Select the BBorderless Printing check box to display the Information dialog box.
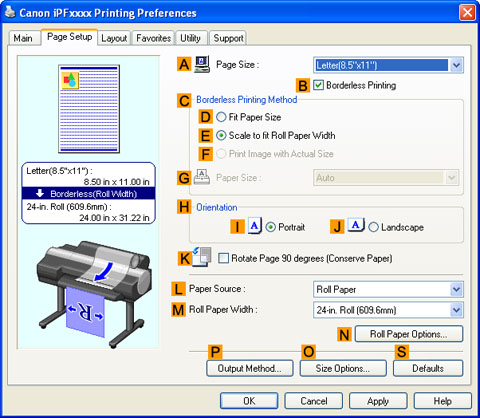
- Select the width of the loaded roll in the Roll Paper Width list—in this case, click 10-in. Roll (254.0mm).
- Click OK to close the Information dialog box.
- In CBorderless Printing Method, click DFit Paper Size.
- Click Match Page Size in the GPaper Size list.
- Confirm the print settings and print as desired.
Note • For tips on confirming print settings, see "Confirming Print Settings (3.1.3)"
2. 6. 3. Enhanced Printing Options > Borderless Printing >
Borderless Printing by Resizing Originals to Match the Paper Size (Mac OS X)
Borderless Printing by Resizing Originals to Match the Paper Size (Mac OS X)
This topic describes how to enlarge originals before borderless printing to match the paper size, based on the following example.
If you use an A1 or A2 roll for borderless printing, insert the provided Spacer for Borderless Printing on the Roll Holder.(See "Loading Rolls on the Roll Holder (6.2.1)")
If you do not attach the Spacer for Borderless Printing, the Platen may be soiled from borderless printing.
•Document: Any type
•Page size: 10×12 inches (254.0×304.8 mm)
•Paper: Roll
•Paper type: Heavyweight Coated Paper
•Roll paper width: 10 inches (254.0 mm)
- Choose Page Setup from the application menu to display the Page Attributes dialog box.

- Select the printer in the BFormat for list.
- In the CPaper Size list, click the size of the original. In this case, click 10"x12".
Note • All sizes are available in borderless printing if you resize originals to match the paper size. - Click FOK to close the dialog box.
- In the application, create an original that takes up the entire space of the paper size.
- Choose Print in the application menu.
- Access the Main pane.
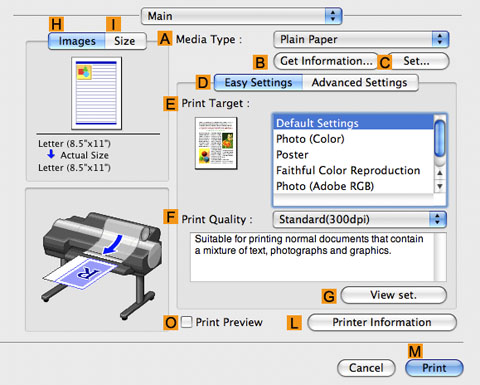
- In the AMedia Type list, select the type of paper that is loaded. In this case, click Heavyweight Coated Paper.
- Select the print target in the EPrint Target list.
- Access the Page Setup pane.
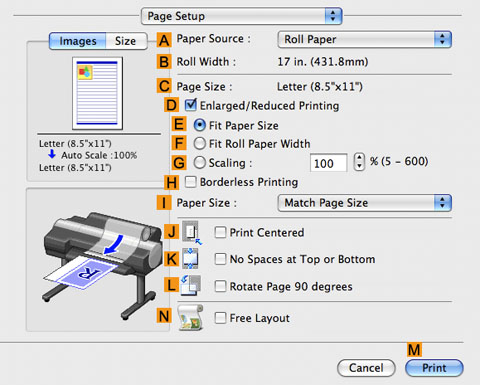
- Select and click a roll paper in the APaper Source list.
- Make sure the width of the loaded roll is displayed in the BRoll Width list—in this case, 10 in. (254.0mm).
Note • If the width of the loaded roll is not displayed in BRoll Width, click LPrinter Information on the Main pane and update the printer information. - Make sure the CPage Size setting matches the original size as selected in CPaper Size in the Page Attributes dialog box—in this case, 10"x12".
- Select the DEnlarged/Reduced Printing check box.
- Select the HBorderless Printing check box.
- Click EFit Paper Size under DEnlarged/Reduced Printing.
- In IPaper Size, click the paper size. In this case, click 10"x12" - Borderless.
- Confirm the print settings, and then click MPrint to start printing.
Note • For tips on confirming print settings, see "Confirming Print Settings (4.1.3)"
2. 6. 4. Enhanced Printing Options > Borderless Printing >
Borderless Printing by Resizing Originals to Fit the Roll Width
Borderless Printing by Resizing Originals to Fit the Roll Width
Take advantage of borderless printing to print documents such as posters (made up mainly of photos or images) without a surrounding margin, or border.
•Borderless Printing
In regular printing, a margin required by the printer is added around the original. With borderless printing, you can print documents without the margin, so that the printed image covers the entire surface of the paper.
| Important | ||
|
• Borderless printing is only available with rolls.
• Paper you can use for borderless printing is restricted to particular types of paper and rolls of particular widths. For information on types of paper compatible with borderless printing, refer to the Paper Reference Guide. (See "Types of Paper (6.1.1)")
• If you use an A1 orA2 roll for borderless printing, insert the provided Spacer for Borderless Printing onthe Roll Holder.(See "Loading Rolls on the Roll Holder (6.2.1)")
If you do not attach the Spacer for Borderless Printing,the Platen maybe soiled from borderless printing.
• Paper incompatible with the printer's auto cut function can be printed without borders on the left and right sides only.
• These features cannot be used in combination with borderless printing: special page layouts, centering originals, and printing cut lines on rolls.
• If Fit Paper Size or Print Image with Actual Size (Windows only) is selected when performing borderless printing, Rotate Page 90 degrees (Conserve Paper) cannot be selected.
• When borderless printing is used, the edge of the paper is cut during printing. Thus, ink density may be uneven at the edges. If you require higher image quality, specify No in Auto Cut in the printer driver. In this case, the paper can be printed without borders on the left and right sides only. After ejecting and cutting the printed document, use scissors to cut away the top and bottom edges.
• By factory default, the ink drying time is disabled for all paper. When you are using paper that takes longer for ink to adhere for borderless printing and the Cutter Unit touches printing surfaces that are not dry yet, it may damage the paper or the edge of the document that is cut, depending on frequency of use. In this case, follow these steps to change the ink drying time.
• On the Main sheet of the printer driver, click Settings in Media Type.
• Select the ink drying time in the Between Pages list of Drying Time.
|
||
•Borderless Printing Method
Choose the method of borderless printing that suits the original, as desired.
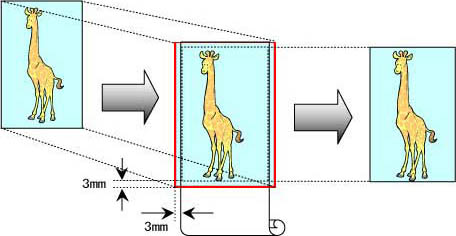
•Scale to fit Roll Paper Width
Enlarge or reduce the original as a whole to match the roll paper width.
 |
| Note | ||
|
• You can combine this function with rotating pages 90 degrees before printing so that the original width (relative to portrait orientation) matches the roll paper width in borderless printing.
|
||
For instructions on borderless printing of photos, images, and other documents to match the roll paper width, refer to the following topics, as appropriate for your computer and operating system.
2. 6. 5. Enhanced Printing Options > Borderless Printing >
Borderless Printing by Resizing Originals to Fit the Roll Width (Windows)
Borderless Printing by Resizing Originals to Fit the Roll Width (Windows)
This topic describes how to enlarge originals before borderless printing to match the roll width, based on the following example.
If you use an A1 or A2 roll for borderless printing, insert the provided Spacer for Borderless Printing on the Roll Holder.(See "Loading Rolls on the Roll Holder (6.2.1)")
If you do not attach the Spacer for Borderless Printing, the Platen may be soiled from borderless printing.
•Document: Any type
•Page size: A4 (210.0×297.0 mm)/Letter (8.3 × 11.7 in)
•Paper: Roll
•Paper type: Heavyweight Coated Paper
•Roll paper width: 10 inches (254.0 mm)
- In the application, create an original that takes up the entire space of the paper size.
Note • If you can specify the margin, as in Microsoft Word, set the margin at 0 mm. For instructions on specifying the margin, refer to the software documentation. - Choose Print in the application menu.
- Select the printer in the dialog box, and then display the printer driver dialog box.(See "Accessing the Printer Driver Dialog Box from Applications (3.1.6)")
- Make sure the Main sheet is displayed.
- In the AMedia Type list, select the type of paper that is loaded. In this case, click Heavyweight Coated Paper.
- Select the print target in the EPrint Target list.
- Click the Page Setup tab to display the Page Setup sheet.
- In the APage Size list, click the size of the original as specified in the application. In this case, click ISO A4 or Letter (8.5"x11").
- Select and click a roll paper in the LPaper Source list.
- Select the BBorderless Printing check box to display the Information dialog box.
- Select the width of the loaded roll in the Roll Paper Width list—in this case, click 10-in. Roll (254.0mm).
- Click OK to close the Information dialog box.
- In CBorderless Printing Method, make sure EScale to fit Roll Paper Width is selected.
- Confirm the print settings and print as desired.
Note • For tips on confirming print settings, see "Confirming Print Settings (3.1.3)"
2. 6. 6. Enhanced Printing Options > Borderless Printing >
Borderless Printing by Resizing Originals to Fit the Roll Width (Mac OS X)
Borderless Printing by Resizing Originals to Fit the Roll Width (Mac OS X)
This topic describes how to enlarge originals before printing to match the roll width, based on the following example.
If you use an A1 or A2 roll for borderless printing, insert the provided Spacer for Borderless Printing on the Roll Holder.(See "Loading Rolls on the Roll Holder (6.2.1)")
If you do not attach the Spacer for Borderless Printing, the Platen may be soiled from borderless printing.
•Document: Any type
•Page size: A4 (210.0×297.0 mm)/Letter (8.3 × 11.7 in)
•Paper: Roll
•Paper type: Heavyweight Coated Paper
•Roll paper width: 10 inches (254.0 mm)
- Choose Page Setup from the application menu to display the Page Attributes dialog box.
- Select the printer in the BFormat for list.
- In CPaper Size, click the size of the original. In this case, click ISO A4.
Note • All sizes are available in borderless printing if you resize originals to fit the roll width. - Click FOK to close the dialog box.
- In the application, create an original that takes up the entire space of the paper size.
- Choose Print in the application menu.
- Access the Main pane.
- In the AMedia Type list, select the type of paper that is loaded. In this case, click Heavyweight Coated Paper.
- Select the print target in the EPrint Target list.
- Access the Page Setup pane.
- Select and click a roll paper in the APaper Source list.
- Make sure the width of the loaded roll is displayed in the BRoll Width list—here, 10 in. (254.0mm).
Note • If the width of the loaded roll is not displayed in BRoll Width, click LPrinter Information on the Main pane and update the printer information. - Make sure the CPage Size setting matches the original size as selected in CPaper Size in the Page Attributes dialog box—in this case, ISO A4.
- Select the DEnlarged/Reduced Printing check box.
- Select the HBorderless Printing check box.
This ensures that FFit Roll Paper Width is automatically selected in DEnlarged/Reduced Printing.
- Confirm the print settings, and then click MPrint to start printing.
Note • For tips on confirming print settings, see "Confirming Print Settings (4.1.3)"
2. 6. 7. Enhanced Printing Options > Borderless Printing >
Borderless Printing at Actual Size
Borderless Printing at Actual Size
Take advantage of borderless printing to print documents such as posters (made up mainly of photos or images) without a surrounding margin, or border.
•Borderless Printing
In regular printing, a margin required by the printer is added around the original. With borderless printing, you can print documents without the margin, so that the printed image covers the entire surface of the paper.
| Important | ||
|
• Borderless printing is only available with rolls.
• Paper you can use for borderless printing is restricted to particular types of paper and rolls of particular widths. For information on types of paper compatible with borderless printing, refer to the Paper Reference Guide. (See "Types of Paper (6.1.1)")
• If you use an A1 orA2 roll for borderless printing, insert the provided Spacer for Borderless Printing onthe Roll Holder.(See "Loading Rolls on the Roll Holder (6.2.1)")
If you do not attach the Spacer for Borderless Printing,the Platen maybe soiled from borderless printing.
• Paper incompatible with the printer's auto cut function can be printed without borders on the left and right sides only.
• These features cannot be used in combination with borderless printing: special page layouts, centering originals, and printing cut lines on rolls.
• If Fit Paper Size or Print Image with Actual Size (Windows only) is selected when performing borderless printing, Rotate Page 90 degrees (Conserve Paper) cannot be selected.
• When borderless printing is used, the edge of the paper is cut during printing. Thus, ink density may be uneven at the edges. If you require higher image quality, specify No in Auto Cut in the printer driver. In this case, the paper can be printed without borders on the left and right sides only. After ejecting and cutting the printed document, use scissors to cut away the top and bottom edges.
• By factory default, the ink drying time is disabled for all paper. When you are using paper that takes longer for ink to adhere for borderless printing and the Cutter Unit touches printing surfaces that are not dry yet, it may damage the paper or the edge of the document that is cut, depending on frequency of use. In this case, follow these steps to change the ink drying time.
• On the Main sheet of the printer driver, click Settings in Media Type.
• Select the ink drying time in the Between Pages list of Drying Time.
|
||
•Borderless Printing Method
Choose the method of borderless printing that suits the original, as desired.
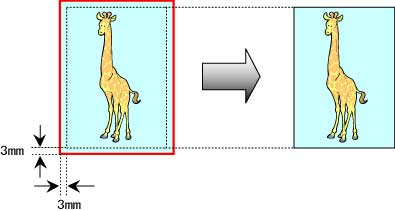
•Print Image with Actual Size
Prints originals at actual size, without enlarging or reducing them. Originals must be prepared in a size that exceeds the dimensions of the paper by 3 mm (0.12 in) on each side.
 |
| Note | ||
|
• Not all page sizes are available.
• Even if you prepare originals of the same size as the paper size, the originals are automatically enlarged when you print borderlessly in combination with resizing originals to match the paper size. This may affect image quality. When image quality is most important, make the original 3 mm longer on each side than the paper size so that the image can be printed at actual size in borderless printing.
|
||
For instructions on borderless printing of photos and images at actual size, refer to the following topics, as appropriate for your computer and operating system.
2. 6. 8. Enhanced Printing Options > Borderless Printing >
Borderless Printing at Actual Size (Windows)
Borderless Printing at Actual Size (Windows)
If you use an A1 or A2 roll for borderless printing, insert the provided Spacer for Borderless Printing on the Roll Holder.(See "Loading Rolls on the Roll Holder (6.2.1)")
If you do not attach the Spacer for Borderless Printing, the Platen may be soiled from borderless printing.
•Document: Any type
•Page size: 10×12 inches (254.0×304.8 mm)
•Paper: Roll
•Paper type: Heavyweight Coated Paper
•Roll paper width: 10 inches (254.0 mm)
- Create the original in the source application 3 mm (0.12 in) larger on each side than 254.0×304.8 mm (10 × 12 in) —that is, 260.0×310.8 mm (10.2 × 12.2 in)
Note • If you can specify the margin, as in Microsoft Word, set the margin at 0 mm. For instructions on specifying the margin, refer to the software documentation.• The extra 3 mm (0.12 in) on each side will not be printed. Create the original so that it fits inside the paper area to be printed on. - Choose Print in the application menu.
- Select the printer in the dialog box, and then display the printer driver dialog box.(See "Accessing the Printer Driver Dialog Box from Applications (3.1.6)")
- Make sure the Main sheet is displayed.
- In the AMedia Type list, select the type of paper that is loaded. In this case, click Heavyweight Coated Paper.
- Select the print target in the EPrint Target list.
- Click the Page Setup tab to display the Page Setup sheet.
- In the APage Size list, click the size of the original as specified in the source application. In this case, click 10"x12".
- Select and click a roll paper in the LPaper Source list.
- Select the BBorderless Printing check box to display the Information dialog box.
- Select the width of the loaded roll in the Roll Paper Width list—in this case, click 10-in. Roll (254.0mm).
- Click OK to close the Information dialog box.
- In CBorderless Printing Method, click FPrint Image with Actual Size.
- Confirm the print settings and print as desired.
Note • For tips on confirming print settings, see "Confirming Print Settings (3.1.3)"
2. 6. 9. Enhanced Printing Options > Borderless Printing >
Borderless Printing at Actual Size (Mac OS X)
Borderless Printing at Actual Size (Mac OS X)
If you use an A1 or A2 roll for borderless printing, insert the provided Spacer for Borderless Printing on the Roll Holder.(See "Loading Rolls on the Roll Holder (6.2.1)")
The platen may be soiled from borderless printing if you do not attach it.
•Document: Any type
•Page size: 10 × 12 inches (254.0×304.8 mm)–Borderless
•Paper: Roll
•Paper type: Heavyweight Coated Paper
•Roll paper width: 10 inches (254.0 mm)
- Choose Page Setup from the application menu to display the Page Attributes dialog box.
- Select the printer in the BFormat for list.
- In the CPaper Size list, choose a paper size supported for borderless printing. Here, click 10"x12" - Borderless.
Note • Paper sizes supported for borderless printing are indicated by -Borderless. - Click FOK to close the dialog box.
- In the application, create an original that takes up the entire space of the paper size.
- Choose Print in the application menu.
- Access the Main pane.
- In the AMedia Type list, select the type of paper that is loaded. In this case, click Heavyweight Coated Paper.
- Select the print target in the EPrint Target list.
- Access the Page Setup pane.
- Select and click a roll paper in the APaper Source list.
- Confirm that the roll paper width matches the paper size.
Make sure the width of the loaded roll is displayed in the BRoll Width list—in this case, 10 in. (254.0mm).
Note • If the width of the loaded roll is not displayed in BRoll Width, click LPrinter Information on the Main pane and update the printer information. - Make sure the CPage Size setting matches the original size as selected in CPaper Size in the Page Attributes dialog box—in this case, 10"x12" - Borderless.
- Confirm the print settings, and then click MPrint to start printing.
Note • For tips on confirming print settings, see "Confirming Print Settings (4.1.3)"