10. 3. 1. Network Setting > Initial Settings >
Configuring the IP Address on the Printer
Configuring the IP Address on the Printer
You must configure the printer's IP address before using the printer in a TCP/IP network.
The printer's IP address is configured automatically when you install the printer driver following the instructions in the Setup Guide.
Configure the IP address by using imagePROGRAF Device Setup Utility, the printer Control Panel, or ARP or PING commands, if the IP address is changed, or if you change the printer connection mode to a network connection. For details on configuring the IP address, refer to the following topics.
•Configuring the IP Address Using imagePROGRAF Device Setup Utility (10.3.2) (Windows)
•Configuring the IP Address Using the Printer Control Panel (10.3.3)
•Configuring the IP Address Using ARP and PING Commands (10.3.4)
| Important | ||
|
• If you use a DHCP server for automatic assignment of the printer's IP address, printing may no longer be possible after the printer is turned off and on. This is because an IP address different from before has been assigned. Thus, when using DHCP server functions, consult your network administrator and configure the settings in one of the following ways.
• Configure the setting for dynamic DNS updating
In the printer menu, either set DNS Dync update to On, or activate the setting Enable DNS Dynamic Update in RemoteUI.
(See "Menu Settings (9.2.4).")
(See "Configuring the Printer's TCP/IP Network Settings With RemoteUI (10.3.8).")
• Configure the setting for assignment of the same IP address each time the printer starts up
|
||
| Note | ||
|
• We recommend configuring the printer's IP address even if you will use the printer in networks other than TCP/IP networks. Configuring the printer's IP address enables you to use RemoteUI to configure the network settings and manage the printer with a web browser.
For details on RemoteUI, see "Using RemoteUI (10.2.1)."
|
||
10. 3. 2. Network Setting > Initial Settings >
Configuring the IP Address Using imagePROGRAF Device Setup Utility
Configuring the IP Address Using imagePROGRAF Device Setup Utility
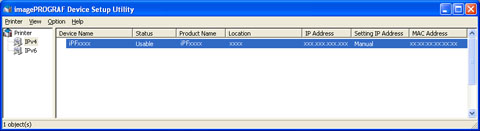
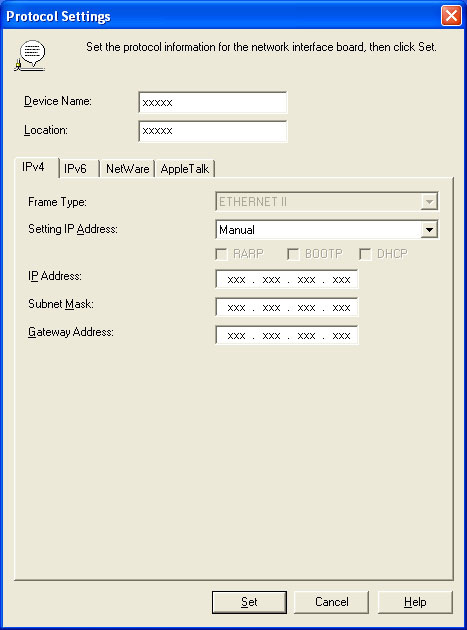
On a computer running Windows, you can use imagePROGRAF Device Setup Utility provided with the printer to configure the printer's IP address. This topic describes how to configure the IP address using imagePROGRAF Device Setup Utility.
| Important | ||
|
• To configure network settings, you must be logged in with administrative rights such as Administrator account. We recommend that your network administrator configure the network settings.
|
||
| Note | ||
|
• For instructions on installing imagePROGRAF Device Setup Utility, see "Installing imagePROGRAF Device Setup Utility (3.10.2)."
|
||
| When specifying an IPv4 IP address | |||||||
|
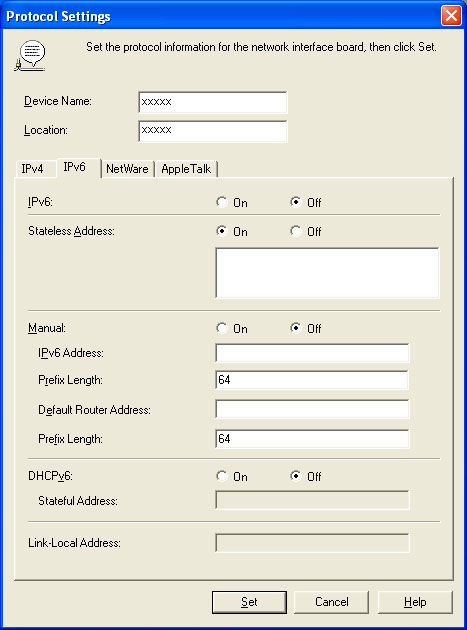
| When specifying an IPv6 IP address | |||||||
|
10. 3. 3. Network Setting > Initial Settings >
Configuring the IP Address Using the Printer Control Panel
Configuring the IP Address Using the Printer Control Panel
This topic describes how to configure the printer's IP address on the Control Panel.
- On the Tab Selection screen of the Control Panel, press
 or
or  to select the Settings/Adj. tab (
 ).
).

Note • If the Tab Selection screen is not displayed, press the Menu button. - Press the OK button.
The Set./Adj. Menu is displayed.
- Press
 or
or  to select Interface Setup, and then press the OK button.
 - Press or to select TCP/IP, and then press the OK button.
- Press or to select IPv4, and then press the OK button.
- Press or to select IPv4 Settings, and then press the OK button.
- Press or to select IP Address, and then press the OK button.
- After you press or to select the input field, numerical input is possible.
- Press the or button to enter the value.
Note • Hold down to increase the value continuously. However, 0 follows 2 for digits of 100 and 0 follows 9 for digits of 10 and 1.• Hold down to decrease the value continuously. However, 2 follows 0 for digits of 100 and 9 follows 0 for digits of 10 and 1.• Hold down or to increase or decrease the value continuously.• Make sure the IP address you enter for the printer is not the same as any computer IP address in your network. - Repeat steps 8 and 9 to complete the settings, and then press the OK button.
- Press the Menu button.
If you have changed the settings, a confirmation message is displayed. Press or to select Yes, and then press the OK button.

| Important | ||
|
• Be sure to complete step 11. This will activate the values you have entered.
• If an error message is displayed, check the settings and correct any invalid values.
|
||
| Note | ||
|
• You can also specify the subnet mask and default gateway on the Control Panel.
• The DNS can also be configured from the printer Control Panel.
|
||
10. 3. 4. Network Setting > Initial Settings >
Configuring the IP Address Using ARP and PING Commands
Configuring the IP Address Using ARP and PING Commands
This topic describes how to configure the IP address using ARP and PING commands.
To use the ARP and PING commands, you will need to know the printer's MAC address. You can confirm the MAC address on the Control Panel.
- Check the printer's MAC address.
You can confirm the MAC address on the Control Panel as follows:1.On the Tab Selection screen of the Control Panel, press or to select the Settings/Adj. tab ( ).
2.Press the OK button.The Set./Adj. Menu is displayed.3.Press or to select Interface Setup, and then press the OK button.4.Press or to select Ethernet Driver, and then press the OK button.5.Press or to select MAC Address, and then press the OK button.
Note • If the Tab Selection screen is not displayed, press the Menu button.• You can investigate the MAC address by printing an interface setting report.(See "Printing Interface Setting Reports (9.2.7).") - In Windows, open a command prompt, or in Mac OS X, start Terminal.
- Execute the following command to add entries to the ARP table for managing IP addresses and corresponding MAC addresses.
arp -s [IP address] [the printer's MAC address you have verified]Example: arp -s xxx.xxx.xxx.xxx xx-xx-xx-xx-xx-xx
Note • In Mac OS X when using Terminal, enter the arp command in the formatarp -s xxx.xxx.xxx.xxx xx-xx-xx-xx-xx-xx.For details, refer to the help file for the command line. - Execute the following command to send the IP address to the printer and configure it.
ping [IP address as specified in the ARP command] -l 479Example: ping xxx.xxx.xxx.xxx -l 479
Note • In -l, the l is the letter l.• In Mac OS X when using Terminal, enter the ping command in the formatping -s 479 xxx.xxx.xxx.xxx.For details, refer to the help file for the command line.
| Note | ||
|
• The subnet mask and default gateway are set to 0.0.0.0. Use RemoteUI to change the subnet mask and default gateway to match your network settings.
For details on RemoteUI, see "Using RemoteUI (10.2.1)."
|
||
10. 3. 5. Network Setting > Initial Settings >
Configuring TCP/IPv6 Network Settings
Configuring TCP/IPv6 Network Settings
Follow the steps below to configure the TCP/IPv6 network settings.
- On the Tab Selection screen of the Control Panel, press or to select the Settings/Adj. tab ( ).
Note • If the Tab Selection screen is not displayed, press the Menu button. - Press the OK button.
The Set./Adj. Menu is displayed.
- Press or to select Interface Setup, and then press the OK button.
- Press or to select TCP/IP, and then press the OK button.
- Press or to select IPv6, and then press the OK button.
- Press or to select IPv6 Support, and then press the OK button.
- Press or to select On, and then press the OK button.
| Important | ||
|
• Once you set IPv6 Support to On, the IPv6 StlessAddrs setting takes effect.
|
||
| Note | ||
|
• You can also configure IPv6 StlessAddrs and DHCPv6 from the printer Control Panel.
• The DNS can also be configured from the printer Control Panel.
|
||
10. 3. 6. Network Setting > Initial Settings >
Configuring the Printer Driver Destination (Windows)
Configuring the Printer Driver Destination (Windows)
This topic describes how to specify the printer driver destination if the printer's IP address is changed, or if you will use the printer over a network connection instead of via USB connection.
The procedure described below is the configuration based on the LPR or Raw protocol using the standard TCP/IP port in Windows ( Standard TCP/IP Port ).
| Important | ||
|
• If you will use the printer in a TCP/IP network, make sure the printer's IP address is configured correctly.
• Configuring the IP Address on the Printer (10.3.1)
|
||
- Open the Printers and Faxes (or Printers, Devices and Printers ) window.
- Right-click the icon of this printer and choose Properties (For Windows 7 and Windows Vista, Printer Properties ) to open the printer properties window.
- Click the Port tab to display the Port sheet.
- Click Add Port to display the Printer Ports dialog box.
- In the Available Port list, select Standard TCP/IP Port.
- Click New Port.
After the wizard starts, a window is displayed for the Welcome to the Add Standard TCP/IP Printer Port Wizard.
- Click Next.
- In Printer Name or IP Address, enter the printer's IP address. If the DNS is configured, you can also enter the DNS Domain Name.
- Follow the instructions on the screen to add a printer port.
- Click Close to close the Printer Ports dialog box.
- Make sure the printer port you added is displayed under Ports, and that the port is selected.
- Click Close to close the printer properties window.
10. 3. 7. Network Setting > Initial Settings >
Configuring the Printer Driver Destination (Macintosh)
Configuring the Printer Driver Destination (Macintosh)
10. 3. 8. Network Setting > Initial Settings >
Configuring the Printer's TCP/IP Network Settings With RemoteUI
Configuring the Printer's TCP/IP Network Settings With RemoteUI
| When using an IPv6 IP address | |||||||||||||||||||||||||||||||||||||||||||||||||||||||||||||||||||||
|
|||||||||||||||||||||||||||||||||||||||||||||||||||||||||||||||||||||