3. 8. 1. Windows Software > Accounting >
Accounting Manager
Accounting Manager
The Accounting Manager stores the printer's print job logs so that you can use the information for checking printing costs, etc.
The benefits of using the Accounting Manager are outlined below.
•Print Job Log Collection
This allows you to check which documents were printed from each printer, who printed them and when.
•Calculation of the Total Pages Used and the Total Cost
This allows you to use the collected print job logs to calculate totals for items such as the number of pages printed, the amount of paper used and the printing costs incurred.
•Regular Data Acquisition for Print Jobs
Job logs can be automatically collected periodically.
•Exporting Print Job Data
This allows you to export collected print job data as a CSV file.
| Important | ||
|
• The Accounting Manager in Status Monitor displays approximate estimates of the amount of paper consumed and the ink consumed per job. Canon cannot guarantee the accuracy of these estimates. These estimates will also vary depending on the conditions of printer use.
• Print job log collection is not performed when Set./Adj. Menu-> Printer Info-> Show Job Log of the control panel is Off. However,
• even if Show Job Log is set to Off, regularly acquired jobs that already have been retrieved at that time are displayed.
• When Show Job Log has been set to On again, all jobs within the printer at that time are displayed.
|
||
3. 8. 2. Windows Software > Accounting >
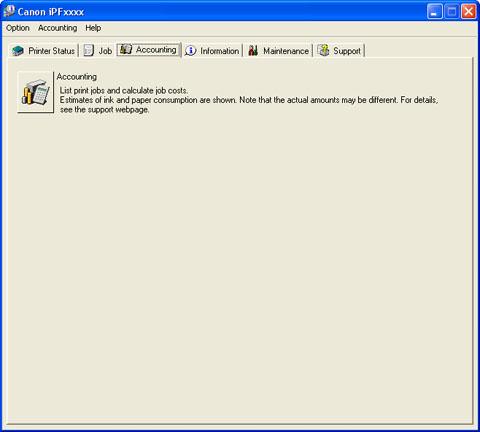
Launching the Accounting Manager
Launching the Accounting Manager
- Open the imagePROGRAF Status Monitor window.
- Select Accounting in the Accounting menu.
Or, open the Accounting sheet and click the Accounting button.
3. 8. 3. Windows Software > Accounting >
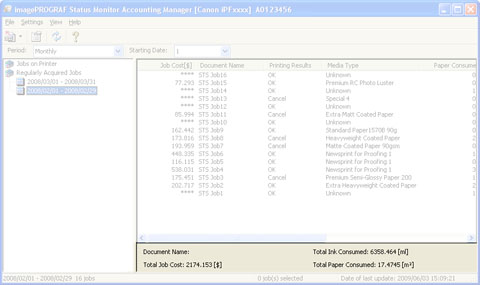
Accounting Manager Main Window
Accounting Manager Main Window
The Accounting Manager main window consists of a title bar, menu bar, toolbars, listed job selection area, job list area, totals area and status bar.
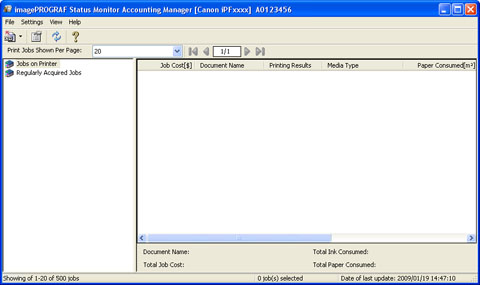 |
•Title Bar
This displays the printer model, its serial number and the port number it is using.
 |
•Menu Bar
Allows you to select the menu options required for operation.
 |
•Toolbars
Provide tool buttons and pull-down menus for the main operations.
 |
| Note | ||
|
• You can opt to either show or hide the toolbars in the View menu.
|
||
•Listed Job Selection Area
You can use this area to select which job log is displayed.
If you are using regular data acquisition, this area allows you to view the collective job logs for each specified period.
 |
For more information on how to select the job logs displayed, see Switching Between Displaying Jobs on Printer and Regularly Acquired Jobs (3.8.13).
•Job List Area
This area lists the details of acquired jobs.
Display a list of jobs within the printer or of jobs collected periodically. For details, refer to Job List Area (3.8.4).
 |
•Totals Area
Displays the total costs for the selected job and the amounts of paper and ink consumed.
 |
| Note | ||
|
• If you are viewing regularly acquired print jobs, selecting a period on the left side of the window displays the total costs for that period and the amounts of paper and ink consumed.
|
||
•Status Bar
Displays messages and other information.
 |
3. 8. 4. Windows Software > Accounting >
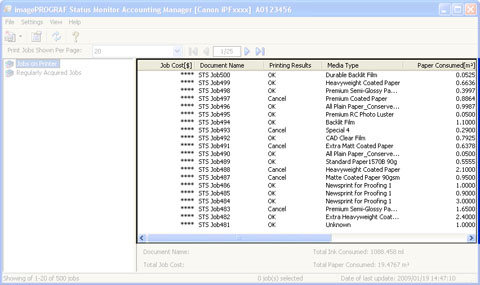
Job List Area
Job List Area
•Job Cost
This is the cost incurred in printing.
| Note | ||
|
• If the Unit Cost of Ink or Paper have not been set, **** is displayed in the Job Cost field.
|
||
•Document Name
This is the name of the printed document.
•Printing Results
Displays OK when printing is executed, and Cancel when it is not executed
•Media Type
This is the type of paper used in printing.
•Paper Consumed
This is the area of paper used in printing.
3. 8. 5. Windows Software > Accounting >
Accounting Manager Basic Procedures
Accounting Manager Basic Procedures
The first time you use the Accounting Manager, use the following procedures to configure the settings.
- Configure unit costs, including the costs of ink and paper.
For details of the unit cost settings, see Configuring Unit Costs in Accounting Manager (3.8.6).
- Set options such as the units displayed.
For details of the unit settings, see Configuring Units and Display Settings in Accounting Manager (3.8.10).
- If you are using Regular Data Acquisition, configure the Regular Data Acquisition settings.
For details of the Regular Data Acquisition settings, see Automatically Acquiring Print Job Logs at Regular Intervals (3.8.11).
- Specify the jobs to be listed.
For details of how to select the job logs displayed, see Switching Between Displaying Jobs on Printer and Regularly Acquired Jobs (3.8.13).
This displays the required print job logs and lists the details.
3. 8. 6. Windows Software > Accounting >
Configuring Unit Costs in Accounting Manager
Configuring Unit Costs in Accounting Manager
Select Unit Costs in the Settings menu to open the Unit Costs dialog box. Configure the unit cost settings in this dialog box.
| Note | ||
|
• When you select a job and then open the Unit Costs dialog box, items with unit costs that have not yet been configured for that job are shown highlighted.
|
||
3. 8. 7. Windows Software > Accounting >
Setting the Unit Cost for Ink
Setting the Unit Cost for Ink
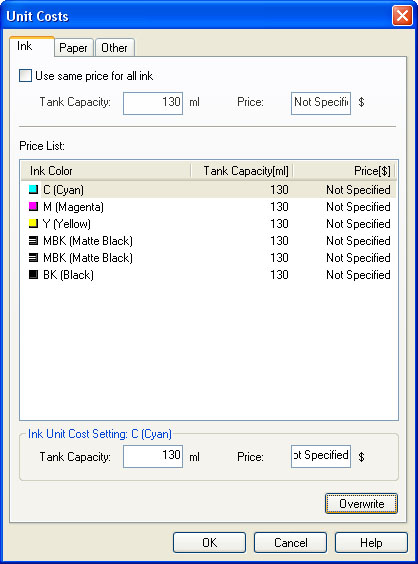 |
| To set the same unit cost for all the inks | |||||
|
| To set different unit costs for each ink color | |||||
|
3. 8. 8. Windows Software > Accounting >
Setting the Unit Cost for Paper
Setting the Unit Cost for Paper
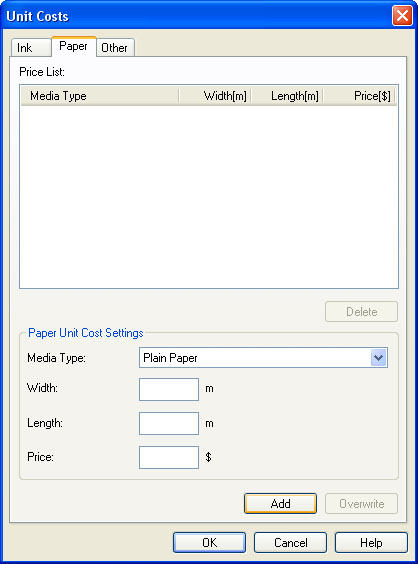 |
- Select a media type from the Media Type list.
- Enter the Width and Length of the paper, and the Price per area for the configured width x height.
- Click the Add button. To change the unit cost for a media type you have already set, click the Overwrite button.
- Click the OK button.
| Important | ||
|
• Your settings are not applied until you click the OK button.
|
||
3. 8. 9. Windows Software > Accounting >
Setting the Unit Cost for Items Other Than Ink and Paper
Setting the Unit Cost for Items Other Than Ink and Paper
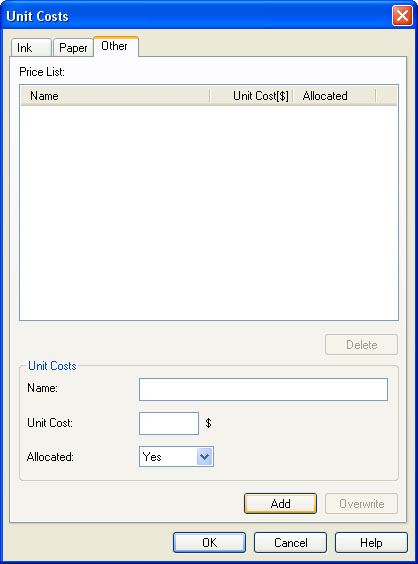 |
- Enter any name in the Name field.
- Enter a value in Unit Cost.
- Use Allocated to specify whether the costs are allocated as being incurred by the print job.
- Click the Add button. To change the unit cost for a media type you have already set, click the Overwrite button.
- Click the OK button.
| Important | ||
|
• Your settings are not applied until you click the OK button.
|
||
| Note | ||
|
• You can set unit costs for up to 5 items.
|
||
3. 8. 10. Windows Software > Accounting >
Configuring Units and Display Settings in Accounting Manager
Configuring Units and Display Settings in Accounting Manager
Select Units and Display in the Settings menu to open the Units and Display dialog box. Use this dialog box to configure the display settings.
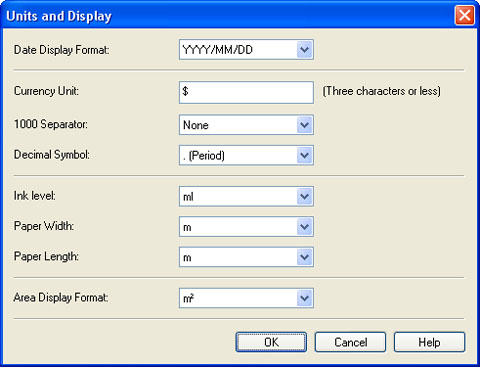 |
•Date Display Format
Use this option to select the display format for dates. "YYYY" indicates the year, "MM" the month and "DD" the day.
•Currency Unit
Enter the currency unit. Enter a text string up to 3 characters long.
•1000 Separator
Use this option to select the symbol used as a separator in numbers. The symbol is inserted every 3 digits.
•Decimal Symbol
Use this option to select the symbol used as a decimal point.
•Ink Consumed
Use this option to select the unit used for ink consumption.
•Paper Width
Use this to select the unit used for paper width.
•Paper Length
Use this to select the unit used for paper length.
•Area Display Format
Use this to select the unit used for paper area.
3. 8. 11. Windows Software > Accounting >
Automatically Acquiring Print Job Logs at Regular Intervals
Automatically Acquiring Print Job Logs at Regular Intervals
This feature collects print job logs from the printer at regular intervals and saves the logs on your computer.
- Select Regular Data Acquisition in the Settings menu.
- Select Acquire print job logs regularly.
- Click the OK button to close the dialog box.
| Important | ||
|
• Print job log collection is not performed when Set./Adj. Menu-> Printer Info-> Show Job Log of the control panel is Off. However, even if Show Job Log is set to Off, regularly acquired jobs that already have been retrieved at that time are displayed.
|
||
| Note | ||
|
• Immediately after you configure Regular Data Acquisition, no print jobs are displayed. Wait a few moments and then select Refresh in the View menu to display the print jobs.
• A maximum of 10,000 records are saved in a print job log. If this number is exceeded, jobs are deleted from the log starting from the oldest record. To save old data, it is recommended that you export the data as a CSV file.
For details of how to export print job logs as CSV files, see Exporting Print Job Data as a CSV File (3.8.14).
|
||
3. 8. 12. Windows Software > Accounting >
Canceling Regular Print Job Log Acquisition
Canceling Regular Print Job Log Acquisition
- Select Regular Data Acquisition in the Settings menu.
- Uncheck the Acquire print job logs regularly option.
- Click the OK button to close the dialog box.
3. 8. 13. Windows Software > Accounting >
Switching Between Displaying Jobs on Printer and Regularly Acquired Jobs
Switching Between Displaying Jobs on Printer and Regularly Acquired Jobs
The print job logs displayed by the Status Monitor Accounting Manager contain two types of job: Jobs on Printer and Regularly Acquired Jobs.
You can select whether to display Jobs on Printer or Regularly Acquired Jobs in the Listed Job Selection Area on the left side of the window.
•Jobs on Printer
This shows a list of the print jobs currently held on printers.
You can change the number of jobs displayed per page using the Print Jobs Shown Per Page setting in the View menu or the toolbar.
You can skip to a particular page using the Go to option in the View menu or the toolbar.
| Note | ||
|
• For printers with built-in hard disks, you can view up to 500 print jobs per printer.
• For printers without built-in hard disks, you can view up to 32 print jobs per printer. However, only 10 jobs can be displayed if the printer is switched off.
|
||
•Regularly Acquired Jobs
This shows a list of regularly acquired print jobs.
To view all the jobs in a set period, specify the period using Period and then Starting Date (or Starting Day of Week or Starting Month) in the View menu or the toolbar.
For example, to view monthly job logs starting on the 1st of each month, set Period to Monthly and set Starting Date to 1.
| Note | ||
|
• Up to 10,000 regularly acquired jobs are displayed for each printer.
|
||
3. 8. 14. Windows Software > Accounting >
Exporting Print Job Data as a CSV File
Exporting Print Job Data as a CSV File
You can export the collected print job data in the form of a CSV file by selecting Export Job Cost Data in the File menu.
| Note | ||
|
• You can also select Export Job Cost Data using the icon in the toolbar.
|
||
•Selected Jobs
Exports the data for the selected print jobs in the job list as a CSV file.
| Note | ||
|
• You can select multiple jobs by holding down the Shift key or Ctrl key as you click the job names.
|
||
•Listed Jobs
Exports the data for the print jobs currently displayed in the list as a CSV file.
3. 8. 15. Windows Software > Accounting >
Showing Job Properties
Showing Job Properties
If you select a job in the job list and then select Show Job Properties in the File menu, the Job Properties dialog box appears, allowing you to check information such as detailed cost data.
You can copy text-based information in this dialog box to the clipboard by clicking the Copy button.
| Note | ||
|
• You can also open this dialog box by right-clicking the selected job and selecting Show Job Properties. Or you can also use the toolbar icon to open the dialog box.
• If you select multiple jobs and open the Job Properties dialog box, the total costs for the selected jobs are displayed.
|
||
3. 8. 16. Windows Software > Accounting >
Showing, Saving and Loading Selected Unit Cost Data
Showing, Saving and Loading Selected Unit Cost Data
•Show Unit Cost Data
Select Show Unit Cost Data in the File menu to open the Unit Cost Data dialog box. This lists the unit costs for items such as the selected ink and paper.
You can copy text-based information in this dialog box to the clipboard by clicking the Copy button.
•Save Unit Cost Data
Select a destination folder using Save Unit Cost Data in the File menu. The unit cost data for items such as the selected ink and paper is saved as a file.
•Load Unit Cost Data
Selecting Load Unit Cost Data in the File menu loads saved unit cost data.
3. 8. 17. Windows Software > Accounting >
Showing the Total Amount of Ink and Paper Consumed
Showing the Total Amount of Ink and Paper Consumed
Select Show Ink and Paper Consumed in the File menu to open the Show Ink and Paper Consumed dialog box.
This lists the total amounts of ink and paper consumed by the printer so far.
You can copy text-based information in this dialog box to the clipboard by clicking the Copy button.
| Note | ||
|
• Up to 7 types of media are listed in order of the amount consumed. The total consumption for other media types is shown as Other.
|
||